Owner’s Guide Please read carefully prior to first use
Thank you for purchasing your Thorn bicycle. Here at Thorn Cycles we want you to be delighted with your purchase and have made every effort to try to ensure just that! This owner’s manual outlines the simple maintenance that you will need to carry out on your Thorn bicycle to allow you to gain the best and longest service from your bike. Given the appropriate care and maintenance it requires we are convinced your bicycle should last many years.
CONTENTS 4. 5. 6. 7. 8. 9. 9. 10. 10. 11. 11. 12. 12. 15. 16. 18. 19. 19. 20. 20. 20. 20. 21. 22. 23. 24. 25. 26. 28. 29. 31.
Preparing your bicycle before your first ride Although a lot of time has been spent preparing your bicycle to a very high standard, if it has been delivered in a box there are certain adjustments which will need to be carried out before it is possible to ride the bike. This section will cover these important points stage by stage. If you are unsure about any of these tasks, please do not hesitate to contact us.
3. Remove the spacers and stem from the steerer tube. 4. Refit the spacers (largest first and gradually getting smaller) and refit the stem. 5. Tighten up the top cap allen bolt until there is no play in the headset bearings. 6. Straighten the stem to be in-line with the front wheel and then tighten up the stem bolts to the correct torque setting. 7. Double check there is no play in the system and carry on with the rest of the checks as per the rest of the instructions.
Mechanical safety checks Routinely check the condition of your bike before every ride. 1. 2. 3. 4. 5. 6. 7. 8. 9. 10. 11. 12. 13. Visually inspect the bicycle to ensure no components have been damaged. Check stem & handlebar bolts are tightened securely to the appropriate torque settings. Check that the QR skewers are fitted correctly and tightly closed. In the case of rim brakes. Check that the pads are tight. When the brakes are applied, check that the pads do not touch the tyres.
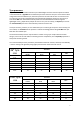
Tyre pressures Bicycles must NEVER be ridden with their tyres inflated higher than the maximum pressures stated in the tables below – regardless of the maximum pressures stated on the tyres.
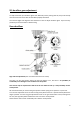
SIS derailleur gear adjustment To help ensure that your derailleur gears work efficiently and to prolong their life, they must be kept clean and free from excess dirt and should be properly lubricated. The next few pages and diagrams show the basics of how to adjust derailleur gears. If you have any problems you should contact us before riding.
Trim adjustment 1. If the chain will not move to the 2nd gear, turn the right-hand down tube cable adjusting barrel to increase the tension (counter clockwise). If the chain moves past the 2nd gear, decrease the tension (clockwise). 2. Next, with the chain on the 2nd sprocket, increase the inner cable tension while turning the chain wheel forward. Stop turning the cable adjusting barrel just before the chain makes noise against the 3rd sprocket. This completes the adjustment.
Cable tension adjustment In time if your gears do not operate smoothly, it may be that your gear cables have stretched out a bit and need adjustment. You can adjust the tension for the front and rear gear cables by using the in-line barrel adjusters situated on the gear pods (Rapid-fires) or on the down tube (road STI’s). Further detailed instructions on gear and derailleur adjustments can be found in the supplied manufacturers component instruction manuals.
STI rapidfire levers STI Rapid-fire lever uses two levers mounted conveniently under the bar and are operated by the thumb and index finger. Using the thumb lever you can shift one gear at a time, or shift through the entire cassette with a full stroke push. Using the finger lever you can shift to a lower gear one cassette sprocket at a time. You can shift the triple front chain rings with the same precise STI action, 1 or 2 chain rings at a time, using the levers on the left hand shifter pod.
Transmission chain tension on Rohloff equipped Thorn cycles There is always a “tight spot” on all chain drive systems; when setting chain tension there must always be some slack in the chain at this “tight spot”. A slack chain will do no damage whatsoever, if it is allowed to become very slack the only danger is that it may fall off.
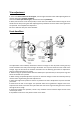
ECCENTRIC BOTTOM BRACKET SHELL HOLES FOR ECCENTRIC TOOL ECCENTRIC SCREWS Imagine your bottom bracket shell is a clock face. Your bike will arrive with the eccentric adjusted as close as possible to the 3 O’clock position whilst ensuring optimal chain tension. After riding your chain will become slack and will need to be tensioned. 1) Unscrew the eccentric screws using a 15mm spanner or large flat screwdriver. 2) 3) Insert the eccentric tool into the two holes in the eccentric.
1 ✓ ✓ 2 Pictures 1 to 4 show the range of incremental adjustments that can be made without damaging the eccentric when the eccentric screws are tightened. NB. The thin section of the eccentric is moving from the 3 O’clock position through the 12 O’clock position and ending towards the 9 O’clock position. ✓ ✓ 4 3 Picture 5 shows how the eccentric should NOT be positioned when making adjustments.
Connecting chain tension on a Rohloff equipped tandem The tension of the chain which transfers drive from the front to the rear of your tandem (connecting chain) is adjusted by way of an eccentric insert on the front bottom bracket. 1) There is always a “tight spot” on all chain drive systems; when setting chain tension there must always be some slack in the chain at this “tight spot”. A slack chain will do no damage whatsoever, if it is allowed to become very slack the only danger is that it may fall off.
Thorn lightweight mini eccentric (Mercury models only) In order to save weight, the new eccentric had to be smaller in diameter. Being smaller, means that it can adjust little more than half a link. When no more adjustment can be made with the eccentric, a new chain must be fitted. By choosing one of the ideal chain ring and sprocket combinations, the service life of the chain is maximised. A B C A has all adjustment remaining. B has half adjustment remaining. C has no adjustment remaining.
Tightening & loosening Sequence: 1, 3, 4, 2, 1, 3, 4, 2 etc. 2 3 1 4 Finger tighten each screw, and then using an 8mm spanner, tighten each screw by a sixth of a turn (60°) at a time and in the correct order until they are tight (5 Nm is more than sufficient and this removes the chance of shearing the screws). NB. This procedure only applies to the mini-eccentric and the Mercury - NOT to the eccentric we use on all of our other Rohloff specific models.
Brake type identification Cantilever brakes If your bicycle has come equipped with drop handlebars, and it is a model from our range of 26” or 700c wheeled bikes, then you may have cantilever brakes fitted. V brakes V Brakes can be on straight or drop handlebar bicycles with specific levers fitted. These are very easy to adjust with a little patience. Dual-pivot caliper brakes Some of our bikes are supplied with dual-pivot caliper brakes, these are fitted to most of the 700c wheel models.
Cable operated disc brake caliper Some of our Mercury and Club Tour bikes are supplied with disc brakes. Brake adjustment The brakes on your bicycle should have been adjusted correctly by us. However, as cables do stretch, it is important to check the adjustment of your brakes after your first ride. Please refer to the manufacturer’s manual for adjustment instructions for the specific type you have on your bike.
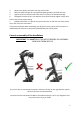
Handlebar position The position of the handlebar should be set to allow a comfortable and easy reach of gear and brake levers. When riding, your weight should be so balanced that your hands rest lightly on the handlebars. This prevents strain on wrists and forearms when pedalling. If you alter the riding position, remember to tighten all nuts and bolts securely. Be extra careful to tighten the bolts which hold the handlebars onto the stem – usually two or four hex bolts at the front of the stem.
Rear wheel removal with internal gear mech Removal of the wheel: 1. Release the V brake pipe. 2. Quick-release the two Rohloff cables by twisting them through 90 degrees (see picture below left). 3. Quick release the skewer. 4. Lift out the wheel. Replacement of the wheel: 1. Locate the chain on the sprocket. 2. Ensure that the mini anti-rotation torque arm fits into the deep slot on the LH dropout (see picture below right). 3. Tighten the quick release skewer. 4. Ensure you reinstall the V brake pipe.
Rear wheel removal with external gear mech Removal of the wheel: 1. 2. 3. 5. 6. 7. Ensure that the shifter is in gear 14. If the bike has V brakes, release the V brake pipe. Unscrew the cable box thumbscrew see picture below left). Remove the cable box. Quick release the skewer. Lift out the wheel. Replacement of the wheel: 1. Locate the chain on the sprocket. 2. Ensure that the mini anti-rotation torque arm fits into the deep slot on the LH dropout (see picture below right). 3.
Maintenance of S+S machine couplings Keep the threads clean and lubricated with Teflon bearing grease (SJS Cycles Part Number: 1796). No other lubrication is currently approved. Apply enough grease to completely coat the threads then wipe off the excess. Grit and dirt can stick to the grease on the couplings causing damage to the threads, so keep the couplings clean especially when they are open. Place S+S tool in notches and loosen coupling. Place S+S tool in notches and loosen coupling.
5. 6. 7. 8. 9. 10. Tighten the nut with the spanner wrench to at least 35 foot pounds of torque. That requires at least 70 pounds force against the end of a 6" wrench. Tighten the nut as tight as you can get it (we don't think it's possible to over tighten the nut with a 6" wrench). Remember, the 35 foot-pounds of torque is a minimum value. Be sure to apply the force at 90 degrees to the wrench. Check the tightness of the couplings daily or more often with hard use.
Thorn expedition rack If your bike is fitted with a Thorn expedition rack it will either have a rear bar or a plate mount fitted to it depending on whether you have ordered a rear light or not. Whichever one is not used will be supplied with the bike. The plate mount is pre-drilled to fit a wide selection of on the market rear lights.
Safer cycling - the basics NOTE: Like any activity, cycling involves risk of injury and damage. By choosing to ride a bicycle, you must take responsibility for that risk and so you must practise safe and responsible riding. The following are some points which, if practised, may reduce that risk. The following list is by no means exhaustive. There may be omissions and strict adherence to these points in no way guarantees survival. 1. Always carry out a mechanical safety check before you get on a bike. 2.
5. Stop at stop signs and traffic lights, slow down and look both ways at junctions. Remember that a bicycle always loses in a collision with a motor vehicle. 6. Use hand signals. Learn the local vehicle code for the correct signals. 7. Riding with headphones can be dangerous, they mask traffic sounds, distract you from what is going on around you, and wires can tangle in the bicycle causing you to lose control. 8. Never carry a passenger, unless in an approved correctly mounted child carrier or trailer. 9.
These pages are intended for you to keep records about your Thorn bicycle. To keep your bicycle in tip top condition we recommend that you have your bike regularly serviced by a qualified mechanic. You may wish to record this below. Call 01278441505 to book a service.
DATE: SERVICE: DATE: SERVICE: DATE: SERVICE: DATE: SERVICE: DATE: SERVICE: DATE: SERVICE: 29
Looking after your frame All our frames and forks have thick steel tube walls, along with stainless steel fittings and bosses. They are given extra rust protection by being internally sprayed with cavity wax. Our frames are designed to give a lifetime’s service which is why they come with a “Lifetime Guarantee” for the original purchaser (see the online Mega Brochure for more details), but, this does NOT mean that they should be neglected.
WARRANTY In offering this warranty Thorn Cycles Ltd in no way seeks to diminish your statutory rights as a consumer. Frame and forks The frame and forks have a lifetime warranty against defective manufacture and materials (except the Thorn Voyager and ME’N’U2 which carry 5 year warranties). This warranty applies to complete bike purchases and for the original purchaser only. This warranty does not cover accident, wear and tear, misuse, abuse or improper maintenance.
Thorn Cycles Ltd, 91-93 St John Street, Bridgwater, Somerset England TA6 5HX Email: sales@thorncycles.co.