
Assembly instructions

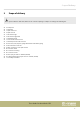
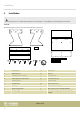
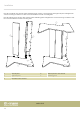
Table Of Contents

3 Installation
Place all components on a suitable mounting surface for mounting. Use a soft padding to prevent damages to the surfaces.
Overview
The following gure shows an overview of the individual components.
ö #
(
*
%
)
&
A
B C
E
F
G
'
$
D
+
,
1 Left side panel 10 Pull-out rails
2 Right side panel 11 Rack rail
3 Rear wall for cable channel A Connector bolt
4 Bottom panel for cable channel B Connector housing
5 Stabilizing panel C Wooden dowel
6 Pull-out board D Euro screw 6.3 × 16
7 Table top E Woodscrew for rack rails
8 Monitor bridge plank F Base (only for item no. 496043, 496045)
9 Monitor bridge G Cable feet-through (only for item no. 503586,
503587)
Installation
studio desk
6