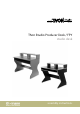
Thon Studio Producer Desk / FPY studio desk assembly instructions
Musikhaus Thomann Thomann GmbH Hans-Thomann-Straße 1 96138 Burgebrach Germany Telephone: +49 (0) 9546 9223-0 E-mail: info@thomann.de Internet: www.thomann.de 17.11.2021, ID: 503586, 503587, 496045, 496043, ...
Table of contents Table of contents 1 Safety instructions.......................................................................................................................................................................................................... 4 2 Scope of delivery.............................................................................................................................................................................................................. 5 3 Installation..
Safety instructions 1 Safety instructions DANGER! Danger for children Ensure that plastic bags, packaging, etc. are properly disposed of and are not in the reach of babies and young children. Choking hazard! Ensure that children do not detach any small parts (e.g. knobs or the like) from the product. They could swallow the pieces and choke! Never let children play unattended with the product.
Scope of delivery 2 Scope of delivery Before you assemble the studio desk, make sure the contents of package is complete according to the following list. n n n n n n n n n n n n n n n n n n 2 × side panel 1 × tabletop 1 × pull-out board 2 × pull-out rails 1 × monitor bridge 3 × monitor bridge plank 1 × stabilizing panel 1 × rear wall for cable channel 1 × bottom panel for cable channel 4 × rack rails, 3 RU, stepless, equipped with nuts and rubber piping 8 × woodscrew for rack rails 8 × Euro screw 6.
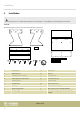
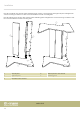
Installation 3 Installation Place all components on a suitable mounting surface for mounting. Use a soft padding to prevent damages to the surfaces. Overview The following figure shows an overview of the individual components.
Installation Preparing the components Insert the connecting bolts and connector housings into the holes provided in the side panels (6 × connecting bolt, 4 × connector housing). Position all connector housings so that the respective connecting bolts can be completely sunk into the holes and the arrow posi‐ tion of the connector housings points towards the hole. Place two feet with sleeves into each of the holes provided in the side panels (only for item no.
Installation Place the connecting bolts, the connector housings and the wooden dowels into the holes provided in the rear wall for the cable channel (4 × connecting bolts, 8 × connector housing , 8 × wooden dowel). Place the connector housings, the connecting bolts and the wooden dowels into the holes provided in the bottom panel for the cable channel (8 × connector housing, 8 × wooden dowel).
Installation Insert the twelve connecting bolts into the holes provided in the bottom side of the tabletop. ( 7 Table top A Connector bolt Assembling the components Assemble the rear wall and the bottom panel for the cable channel and tighten the connector housings clockwise to lock the connection with the inserted connecting bolts.
Installation Place the assembled cable channel and the stabilizing panel onto the connecting bolts of the right side panel and tighten the connector housings clockwise to lock the connection with the inserted connecting bolts. Place the left side panel onto the cable channel and the stabilizing panel and tighten the connector housings clockwise to lock the connection with the inserted connecting bolts.
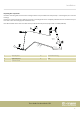
Installation Place the assembled frame horizontally onto the side panels. Screw the pull-out rails to the side panels horizontally at the required height using four Euro screws each. Insert eight wooden dowels into the holes provided in the side panels and place the table top onto the preassembled unit. Tighten the connector housings clockwise to lock the connection with the inserted connecting bolts. Insert six connecting bolts into the holes provided in the top side of the tabletop.
Installation Move the pull-out board into the pull-out rails from the front. Make sure that the stop bars of the pull-out board are attached towards the front. ' 6 Pull-out board Place the connector housings and the wooden dowels into the holes provided in the planks (each 4 × connector housing, 4 × wooden dowel) and six connecting bolts into the holes provided in the monitor bridge.
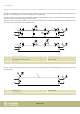
Installation Place the planks onto the connecting bolts of the tabletop. Set the monitor bridge onto the planks. Tighten the connector housings clockwise to lock the connection with the inserted connecting bolts. * ) 8 Plank 9 Monitor bridge Screw the rack rails with the woodscrews on the inside parallel to the front edge of the planks. We recommend a distance of approx. 1 cm from the front edge.
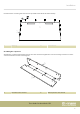
Installation Place the cable channels in the recesses in the tabletop and the monitor bridge (only with item no. 503586, 503587).
Technical specifications 4 Technical specifications Thon Studio Producer Desk FPY Thon Studio Producer Desk FPY WH, white Item number 503586 Thon Studio Producer Desk FPY BK, graphite Item number 503587 Working height tabletop 756 mm Height monitor bridge 160 mm Compartment width 19 inch Material 19 mm FPY chipboard Dimensions (W × H × D) 1060 mm × 934 mm × 660 mm Weight approx. 36.
Protecting the environment 5 Protecting the environment Disposal of the packaging material For the transport and protective packaging, environmentally friendly materials have been chosen that can be supplied to normal recycling. Ensure that plastic bags, packaging, etc. are properly disposed of. Do not just dispose of these materials with your normal household waste, but make sure that they are collected for recycling. Please follow the notes and markings on the packaging.
Notes Thon Studio Producer Desk / FPY 17
Notes studio desk 18
Musikhaus Thomann · Hans-Thomann-Straße 1 · 96138 Burgebrach · Germany · www.thomann.