
Assembly instructions
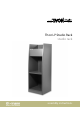


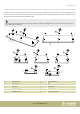
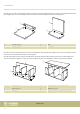
Table Of Contents

Place the base onto the connecting bolts of the lower base panel and the upper oor panel onto the connecting bolts of the front
panel. Tighten the connector housings clockwise to lock the connection with the inserted connecting bolts.
(
%
'
)
4 Lower oor panel 7 Base
6 Upper oor panel 8 Front panel
Place the rear wall and the base panels onto the connecting bolts of the left side panel. Tighten the connector housings clockwise
to lock the connection with the inserted connecting bolts.
Place the right side panel onto the pre-assembled unit consisting of the left side panel, oor panels and rear wall. Tighten the
connector housings clockwise to lock the connection with the inserted connecting bolts. Check all connections for tight t.
$
&
%
'
ö
#
1 Left side panel 4 Lower oor panel – mounted to base
2 Right side panel 5 Middle oor panel
3 Back panel 6 Upper oor panel – mounted to front panel
Installation
studio rack
8