
Assembly instructions
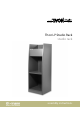

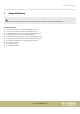

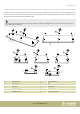
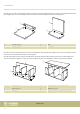
Table Of Contents

3 Installation
Place all components on a suitable mounting surface for mounting. Use a soft padding to prevent damages to the surfaces.
Overview
The following gure shows an overview of the individual components.
ö
' (
)
# $ %
&
A B
1 Left side panel 6 Upper oor panel
2 Right side panel 7 Base
3 Back panel 8 Front panel
4 Lower oor panel A Connector bolt
5 Middle oor panel B Connector housing
Installation
studio rack
6