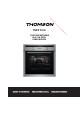
de oa nl ow D d m fro .v w w w an e FOUR ENCASTRABLE BUILT-IN OVEN INBOUWOVEN .
de oa nl ow D d m fro .v w w w Table des matières an e FR-1 .b re or nb de MISES EN GARDE............................................................................ 2 CONSIGNES DE SÉCURITÉ IMPORTANTES ....................................... 6 INSTALLATION................................................................................ 6 RACCORDEMENT ÉLECTRIQUE ........................................................ 7 DESCRIPTION DU FOUR .......................................................
oa nl ow D d de MISES EN GARDE Cet appareil est destiné à un usage domestique uniquement. Toute utilisation autre que celle prévue pour cet appareil, ou pour une autre application que celle prévue, par exemple une application commerciale, est interdite. m fro w .v w w FR-2 e Lors de son utilisation, l'appareil devient chaud. Il convient de veiller à ne pas toucher les éléments chauffants à l'intérieur du four. .
nl ow D d de oa MISE EN GARDE: Cet appareil et ses parties accessibles deviennent chauds pendant leur utilisation. Il convient de veiller à ne pas toucher les éléments chauffants. Il convient de maintenir à distance les enfants de moins de 8 ans, à moins qu'ils ne soient sous une surveillance continue. m fro w .v w w La température des surfaces accessibles peut être élevée lorsque l'appareil est en fonctionnement.
oa nl ow D d de L'appareil doit être installé en respectant les règles nationales d'installation électrique NF C 15-100. En ce qui concerne les informations détaillées sur la méthode de la fixation et les dimensions nécessaires, référez-vous dans la section « INSTALLATION ». m fro w .v w w FR-4 e Après un cycle de cuisson, le ventilateur de refroidissement continue de fonctionner pendant un certain temps, afin de garantir un refroidissement plus rapide et une meilleure fiabilité du four.
oa nl ow D d de Ne pas accrocher de linge ou de torchon à la poignée du four. m fro w w .v w Ne recouvrez pas l’intérieur du four de papier aluminium pour économiser un nettoyage : en provoquant une surchauffe, vous endommageriez l’émail qui recouvre la cavité. Nos emballages/ produits peuvent faire l'objet d'une consigne de tri, pour en savoir plus: www.quefairedemesdechets.fr FR-5 e Ces surfaces peuvent devenir chaudes. .
de oa nl ow D CONSIGNES DE SÉCURITÉ IMPORTANTES d fro m Avant d’installer et d’utiliser cet appareil, lisez toutes les instructions .v w w w an attentivement et conservez-les pour consultation ultérieure. de .b re or nb Le four doit être correctement installé et mis à la terre par un technicien qualifié. Nous ne serons pas responsables en cas de dommage pouvant être dû au non-respect des présentes instructions. Ne portez pas de vêtements amples ou tombants pendant l’utilisation du four.
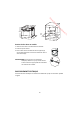
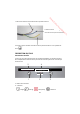
de oa nl ow D d fro m 560 .v w w w an 600 606 595 Fixation du four dans un meuble 1. Insérez le four dans le renfoncement du meuble. 2. Ouvrez la porte du four. 3. Fixez le four dans le meuble avec deux supports (A) d’une taille appropriée aux trous du châssis du four et avec deux vis (B). AVERTISSEMENT : Pour garantir une ventilation adéquate, veillez à ce qu’il y ait des entrées et des sorties d’air appropriées de ventilation de l’intérieur du meuble.
de oa nl ow D Le fil marron doit être raccordé à la borne portant la lettre L. d m fro .v w w w an nb de Le fil bleu doit être .b re or raccordé à la borne portant la lettre N. e Le fil vert et jaune doit être raccordé à la borne portant la lettre E ou le symbole de terre . DESCRIPTION DU FOUR Panneau de contrôle Le four est conçu avec deux boutons de contrôle rétractables. Ces boutons peuvent être complètement enfoncés dans le panneau de contrôle quand vous ne voulez pas utiliser le four.
nl ow D de oa 3. Bouton du thermostat 4. Écran 5. Indicateurs lumineux des fonctions d m fro w w an e FR-9 .b Éclairage du four Cette fonction permet d’allumer la lampe du four sans aucune fonction de cuisson. Décongélation Cette fonction fait circuler de l’air à la température ambiante autour des aliments. Chaleur de sole Cette fonction est idéale pour les ragoûts, les currys et toutes les cuissons lentes. La température peut être réglée entre 60 et 120 °C, la température par défaut est de 60 °C.
ow D de oa nl Gril double à air pulsé Cette fonction utilise tous les éléments supérieurs, ainsi que le ventilateur qui fait circuler la chaleur autour des aliments. Elle est idéale pour griller de grandes quantités d’aliments. La température peut être réglée entre 180 et 240 °C, la température par défaut est de 210 °C.
de oa nl ow D d Tournebroche : Embrochez de la viande sur la broche et bloquez-la avec les fourches. m fro .v w w w an UTILISATION Avant d’utiliser le four, essuyez soigneusement les parois de sa cavité interne avec un chiffon légèrement humidifié. Nettoyez la grille, la lèchefrite et la broche/fourche à l’eau chaude savonneuse avant de les utiliser. Rincez et séchez entièrement. Après avoir raccordé le four à une alimentation électrique, il bipe et son écran affiche « 0:00 ».
de oa nl ow D d Cuisson m fro .v w w w 1. Tournez le bouton de la fonction pour sélectionner la fonction désirée. L’indicateur de la fonction correspondant s’allume. an ), 2. Tournez le bouton du thermostat pour régler la température désirée. REMARQUE : Vous ne pouvez pas régler la température dans les fonctions Éclairage du four et Décongélation. 3. Appuyez sur pour démarrer la cuisson. L’écran affiche la barre d’avancement et la température sélectionnée.
de oa nl ow D d 5. Une fois la cuisson terminée, le four sonne cinq fois. m fro pour la w w . Appuyez sur w Pour interrompre la cuisson, appuyez sur .v reprendre. an . .b re or nb de Vous pouvez stopper la cuisson à tout moment en appuyant deux fois sur e Régler la fonction Rappel Cette fonction vous permet de régler un rappel sonore vous indiquant de démarrer la cuisson après un délai réglable entre 1 minute (0:01) et 9 h 59 (9:59).
. Les chiffres des heures clignotent. de oa nl ow D 1. Appuyez sur d m fro 2. Tournez le bouton du thermostat pour régler les chiffres des heures. .v an pour confirmer. Les chiffres des minutes clignotent. w w w 3. Appuyez sur .b re or nb de 4. Tournez le bouton du thermostat pour régler les chiffres des minutes. 5. Tournez le bouton de la fonction pour sélectionner la fonction désirée. e 6. Appuyez sur . 7.
de oa nl ow D d Verrou enfant m fro appuyés simultanément .v w et w Pour activer cette fonction, maintenez w an .b re or nb de jusqu’à ce que vous entendiez un bip et que le symbole Verrou s’affiche à l’écran. Tous les boutons de contrôle et toutes les touches sont verrouillés. e Pour désactiver cette fonction, maintenez et appuyés simultanément jusqu’à ce que vous entendiez un bip et que le symbole Verrou disparaisse de l’écran.
de oa nl ow D Nettoyer les accessoires amovibles d Lavez tous les accessoires amovibles à l'eau chaude savonneuse. Rincez-les et séchez-les entièrement avant de les réutiliser. m fro .v w w w an Nettoyage automatique à pyrolyse nb de .b re or ATTENTION : Avant de démarrer un cycle de pyrolyse, RETIREZ TOUS LES ACCESSOIRES DU FOUR pour éviter qu’ils ne soient endommagés. e Les éclaboussures excessives doivent être enlevées avant le nettoyage.
nl ow D de oa SPÉCIFICATIONS TECHNIQUES d m fro Cette fiche concernant le four domestique est conforme au règlement UE N° 66/2014. 5 ans après la mise en service < 96 220-240 V~ 50/60 Hz 3.2 kW 25 W 950 W 2000 W e Étape 3 .b 106 re or nb de FR-17 an 0.
de oa nl ow D d m fro .v w w w an THOMSON est une marque commerciale de Technicolor ou de ses Filiales utilisée sous licence par DARTY. MISE AU REBUT En tant que distributeur responsable, nous accordons une grande importance à la protection de l’environnement. Nous vous encourageons à respecter les procédures correctes de mise au rebut de votre appareil, des piles et des éléments d’emballage.
nl ow D de oa Pour plus de renseignements sur les procédures de mise au rebut et de recyclage, contactez les autorités de votre commune. d fro m Apportez l’appareil à point de collecte local pour qu’il soit recyclé. Certains centres acceptent les produits gratuitement. .v w w w an En raison des mises au point et améliorations constamment apportées à nos produits, de petites incohérences peuvent apparaître dans ces instructions. Veuillez nous excuser pour la gêne occasionnée.
de oa nl ow D d m fro Table of Contents .v w w w an WARNINGS .......................................................................................... 2 IMPORTANT SAFETY INSTRUCTIONS .................................................... 5 INSTALLATION...................................................................................... 5 ELECTRICAL CONNECTION .................................................................... 6 DESCRIPTION OF THE OVEN .............................................
nl ow D d de oa WARNINGS This appliance is intended for domestic household use only and should not be used for any other purpose or in any other application, such as for non-domestic use or in a commercial environment. m fro w .v w w WARNING: The appliance and its accessible parts become hot during use. Care should be taken to avoid touching heating elements. Children less than 8 years of age shall be kept away unless continuously supervised. EN-2 e During use the appliance becomes hot.
d de oa nl ow D fro m Do not use harsh abrasive cleaners or sharp metal scrapers to clean the oven door glass since they can scratch the surface which may result in shattering of the glass. w .v w w e .b re r bo en d an Place the pan and wire rack at the same level on both sides, make sure they are in a horizontal and stable position. A steam cleaner is not to be used. The temperature of accessible surfaces may be high when the appliance is operating.
oa nl ow D d de Regarding the detailed instructions for the safe use of the appliance, the precautions during user maintenance and bulb replacement, refer to the sections “Operation” and “CLEANING and Maintenance”. m fro w .v w w e EN-4 .b WARNING: Ensure that the appliance is switched off before replacing the lamp to avoid the possibility of electric shock. re The door should preferably be closed in all cooking modes. Do not hang any cloth or garment to the handle of the oven.
oa nl ow D d de WARNING: Accessible parts may become hot during use. Young children should be kept away. m fro w .v w w e .b re r bo en d an These surfaces can get hot. IMPORTANT SAFETY INSTRUCTIONS Before installing and operating this appliance, please read all instructions carefully and keep them for future reference. The oven must be properly installed and grounded by a qualified technician.
de oa nl ow D d m fro 560 .v w w w an 80 1. Fit the oven into the counter recess. 2. Open the oven door. 3. Secure the oven to the counter with two holders (A) which fit the holes in the oven frame and fit the two screws (B). WARNING: In order to ensure adequate ventilation, ensure that there are air inlets and outlets for ventilating the interior of the counter adequately. ELECTRICAL CONNECTION Electrical connections must only be performed by a qualified and authorised electrician.
de oa nl ow D The brown wire must be connected to the terminal marked L. d m fro .v w w w an .b re or nb de e The green and yellow wire must be connected to the terminal marked E or the earth symbol . DESCRIPTION OF THE OVEN Control panel The oven is designed with two push-pull control knobs. These knobs can be completely pushed inside the control panel when you do not operate the oven. 4 5 1 2 3 1. Function control knob 2. 4 Buttons: Remind Clock time 3. Thermostat control knob 4.
ow D d Description de oa nl 5. Function indicator lights Function indicator lights fro m Oven lamp This function allows the oven lamp to be on without any cooking function. Defrosting This function circulates room temperature air around the food. .v w w w .b re or nb de e EN-8 an Bottom heat This function is ideal for casseroles, curries and any slow cooking. The temperature can be set in the range of 60-120°C and the default temperature is 60°C.
ow D de oa nl Oven accessories d fro m Wire shelf: for dishes and items for roasting and grilling .v w w w an Push the wire shelf / pan between the guide bars of the shelf support rails in the oven, and push it to the end. In case the wire shelf and the pan are inserted together, lay the wire shelf over the pan. Insert the rotisserie skewer into the small opening on the right side of the oven wall cavity.
ow D de oa nl Setting the Clock d The clock is set on a 24-hour cycle. m fro .v w w w . The hour digit will flash. 1. Press 2. Turn the thermostat control knob to set the correct hour. an .b re or nb de 3. Press to confirm and then the minute digits will flash. 4. Turn the thermostat control knob to set the correct minutes. e 5. Press to confirm. “:” will flash on the display. Cooking 1. Turn the function knob to select the desired function.
ow D de oa nl 5. When the cooking is finished, the oven buzzer will sound five times. to resume. m fro . Press d To interrupt cooking, press w twice. .v w w You can stop cooking at any time by pressing an 2. Turn the thermostat knob to set the hour digit (The hour digit should be within 0-9). 3. Press to confirm. The minute digits will flash. 4. Turn the thermostat knob to set the minute digits (The minute digits should be within 0-59). to confirm. 5. Press “:” will flash.
nl ow D de oa 6. Press . 7. Turn the function and thermostat knobs to set the desired cooking time and temperature respectively. d m fro w w w to finish setting. .v 8. Press an . . After about 3 seconds, the display e 9. When the set reservation time has been reached, you will hear a beep and the oven will automatically start cooking. The reservation symbol will disappear from the display.
de oa nl ow D CLEANING AND MAINTENANCE d Switch off and disconnect the appliance from the power supply and allow it to cool completely before cleaning. m fro w an Cleaning removable accessories Wash all the removal accessories in warm soapy water. Rinse and dry them thoroughly before use. Pyrolytic self-cleaning function ATTENTION: Before starting the Pyrolytic cycle, REMOVE ALL THE ACCESSORIES FROM THE OVEN to prevent them from getting damaged.
nl ow D de oa Replacing the oven light bulb d WARNING: Ensure that the appliance is switched off before replacing the lamp to avoid the possibility of electric shock. The bulb is located inside the oven on the back wall. m fro .v w w w an 0.89 kWh/cycle 106 Ecodesign requirements according to EU regulation No.
ow D 220-240 V~ 50/60Hz 3.2 KW 25 W 950 W 2000 W 2000 W 34 W 36 W Pyrolytic 39 kg 595*575*595 mm 606*570*600 A 70L Large PRC D=less economical) de oa nl d m fro .v w w w an DISPOSAL As a responsible retailer we care about the environment. As such we urge you to follow the correct disposal procedure for the appliance and packaging materials. This will help conserve natural resources and ensure that it is recycled in a manner that protects health and the environment.
nl ow D de oa We apologise for any inconvenience caused by minor inconsistencies in these instructions, which may occur as a result of product improvement and development. d m fro w w 29 / 04 / 2016 .v w Darty Holdings SAS © 14 route d’Aulnay 93140 Bondy, France an .
de oa nl ow D d m fro .v w w w Inhoudsopgave an ELEKTRISCHE AANSLUITING................................................................................................ 7 BESCHRIJVING VAN DE OVEN .............................................................................................. 7 BEDIENING ............................................................................................................................. 10 De klok instellen ......................................................
d de oa nl ow D fro m WAARSCHUWINGEN Dit apparaat is alleen bestemd voor huishoudelijk gebruik en mag niet voor andere doeleinden of toepassingen worden gebruikt, zoals niet-huishoudelijk gebruik of in een commerciële omgeving. e .b NL-2 rre Het apparaat wordt heet tijdens de werking. Raak de verwarmingselementen in de oven niet aan. bo n de an .
d de oa nl ow D fro m WAARSCHUWING: Het apparaat en de toegankelijke delen worden heet tijdens de werking. Raak de verwarmingselementen niet aan. Houd kinderen jonger dan 8 jaar uit de buurt van het apparaat, tenzij ze continu onder toezicht staan. Tijdens de werking van het apparaat kan de temperatuur van de toegankelijke oppervlakken hoog oplopen. Installeer het apparaat niet achter een decoratieve deur om oververhitting te vermijden.
d de oa nl ow D m fro Installeer het apparaat in overeenstemming met de nationale bedradingsvoorschriften NF C 15-100. De koelventilator blijft na elke kookcyclus nog gedurende enige tijd draaien om te zorgen voor een snelle afkoeling en veilige werking van de oven. Het is aanbevolen om de deur tijdens alle kookmodi gesloten te houden. Hang geen doek of kledingstuk aan het handvat van de oven. NL-4 e .
ow D d de oa nl Bedek de ovenruimte niet met aluminiumfolie voor een eenvoudige reiniging: De oven kan oververhitten en de emaillaag van de ovenruimte kan worden beschadigd. m fro Voordat u dit apparaat installeert en gebruikt, lees de gebruiksaanwijzing grondig door en bewaar deze voor latere raadpleging. De oven moet door een vakbekwame technicus worden geïnstalleerd en geaard.
nl ow D de oa INSTALLATIE d Onderstaande figuur geeft de juiste afmetingen weer om de oven in een kast te installeren. Deze oven kan tevens onder het aanrecht worden geïnstalleerd. m fro w w .v w De wanden rond de oven moeten van warmtebestendig materiaal gemaakt zijn. Zowel het gefineerd kunststof als het kleefband moeten bestand zijn tegen temperaturen tot 120°C om het loskomen of vervorming te vermijden. an .b re or nb de e 560 80 250 100 595 570 min.
nl ow D de oa ELEKTRISCHE AANSLUITING d Elektrische aansluitingen mogen alleen door een vakbekwame en erkende elektricien uitgevoerd worden. Sluit de bruine draad aan op de aansluitklem gemarkeerd met de letter L. m fro .v w w w an aardingssymbool . BESCHRIJVING VAN DE OVEN Bedieningspaneel De oven is uitgerust met twee regelknoppen die zowel kunnen worden ingeduwd als uitgetrokken. Deze knoppen kunnen volledig in het bedieningspaneel worden geduwd wanneer de oven niet wordt gebruikt.
nl ow D de oa 3. Thermostaatregelknop 4. Display 5. Functiecontrolelampjes d m fro .v .b re or e NL-8 nb Ontdooien Deze functie laat lucht op kamertemperatuur rond de levensmiddelen circuleren. Verwarming aan de onderkant Deze functie is ideaal voor ovenschotels, kerrieschotels en slow cooking. De temperatuur kan worden ingesteld tussen 60°C en -120°C. De standaard temperatuur is 60°C. Convectie Deze functie is ideaal om op traditionele wijze te roosteren.
nl ow D de oa Convectie In deze functie wordt de ventilator automatisch ingeschakeld voor een betere luchtcirculatie en zorgt voor een gelijkmatigere warmte tijdens het bakproces. De temperatuur kan worden ingesteld tussen 50°C en 240°C. De standaard temperatuur is 180°C. Pyrolytisch Als deze functie is geselecteerd, wordt “PYA” op het display weergegeven. De standaard temperatuur is 450°C. De reinigingstijd kan op 1,5 uur of 2 uur worden ingesteld. d m fro .
de oa nl ow D d Duw het rooster / ovenplaat tussen de geleidestangen van de draagrails in de boven en duw volledig in. m fro w .v w w In geval het rooster en de ovenplaat samen worden ingebracht, installeer het rooster boven de ovenplaat. an de .b re or nb Breng het draaispit in de kleine opening aan de rechterkant van de ovenwand. e BEDIENING Voordat u de oven gebruikt, veeg de ovenwand schoon met een licht bevochtigde doek.
nl ow D de oa 2. Draai de thermostaatregelknop om de gewenste temperatuur te selecteren. OPMERKING: Het is niet mogelijk om de temperatuur in de ovenlamp- of ontdooifunctie te regelen. d m fro w w .v w 3. Druk op om het kookproces te starten. en de geselecteerde Het display geeft de voortgangsbalk temperatuur weer. De standaard kooktijd (9 uur) knippert op het display. De voortgangsbalk geeft de voortgang weer door de voorgangsblokjes in deze balk te verminderen. an om te bevestigen.
nl ow D de oa 2. Draai de thermostaatknop om de cijfers voor de uurweergave in te stellen (Het cijfer moet tussen 0 en 9 zijn). d m fro .v w w w 3. Druk op om te bevestigen. De minutenweergave knippert. 4. Draai de thermostaatknop om de cijfers voor de minutenweergave in te stellen (Het cijfer moet tussen 0 en 59 zijn). an re or nb de .b 5. Druk op om te bevestigen. “:” knippert. Het aftellen start. e 6.
de oa nl ow D d 9. Eenmaal de reserveringstijd wordt bereikt, hoort u een pieptoon en wordt het kookproces automatisch gestart. .b re or nb de om de om naar de reserveringsstatus Kinderslotfunctie Om deze functie te activeren, druk en houd en tegelijkertijd vast totdat u een pieptoon hoort en het vergrendelingssymbool verschijnt. Alle regelknoppen worden vergrendeld.
nl ow D de oa REINIGING EN ONDERHOUD d Schakel het apparaat uit, haal de stekker uit het stopcontact en laat het apparaat volledig afkoelen voordat u het reinigt. m fro w w .v w De buitenkant reinigen an .b re or nb de Maak de buitenkant van het apparaat schoon met een licht bevochtigde doek. Droog vervolgens grondig. Gebruik geen schurende of chemische schoonmaakmiddelen. e De ovenruimte reinigen (na elk gebruik) Maak de binnenkant van de oven schoon met een mild reinigingsmiddel.
ow D de oa nl De ovenlamp vervangen d WAARSCHUWING: Zorg dat het apparaat is uitgeschakeld voordat u de lamp vervangt om risico op elektrische schokken te voorkomen. De lamp bevindt zich op de achterwand van de ovenruimte. m fro .
nl ow D 220-240 V~ 50/60Hz 3.2 KW 25 W 950 W 2000 W 2000 W 34 W 36 W Pyrolytisch 39 kg 595*575*595 mm 606*570*600 A 70L Groot PRC D=minder besparend) de oa d m fro .v w w w an THOMSON is een handelsmerk van Technicolor of zijn dochterondernemingen en wordt onder licentie gebruikt door DARTY. VERWIJDERING Als verantwoordelijke handelaar dragen we zorg voor het milieu. We moedigen u aan om de juiste verwijderingsprocedure voor uw apparaat en verpakkingsmateriaal te volgen.
nl ow D de oa Lever het apparaat in bij het inzamelpunt van uw gemeente voor recycling. Bij sommige inzamelpunten kunt u het apparaat gratis inleveren. d m fro .v w w w an Darty Holdings SAS © 14 route d’Aulnay 93140 Bondy, France 29 / 04 / 2016 NL-17 e We verontschuldigen ons voor enig ongemak veroorzaakt door kleine inconsistenties in deze gebruikershandleiding, die kunnen ontstaan door productverbetering of –ontwikkeling. .