
User's Manual


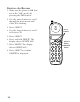


Table Of Contents
- FCC Registration Information
- Interference Information
- Hearing Aid Compatibility
- Introduction
- Before You Begin
- Parts Checklist
- Modular Jack Requirements
- Digital Security System
- Installation
- Desktop Installation
- Wall Mount Installation
- Setup
- Turning the Power ON/OFF
- Power ON
- Power OFF
- Using the Menus
- Selecting a Menu
- Selecting a Submenu
- Setting the Area Code
- Telephone Operation
- Receiving a Call
- Making a Call
- Redial
- Last Number Redial
- Review and Redial
- Menu Redial
- Flash
- Temporary Tone
- Finding the Handset
- Volume
- Mute
- Voice Messaging
- Caller ID Features
- Caller ID with Call Waiting
- Receiving and Storing Calls
- Reviewing Caller ID Records
- Deleting Caller ID Records
- Deleting a Record
- Deleting All Records
- Dialing a Caller ID Number
- Changing the Number Format
- Memory
- Storing a Name and Number in Memory
- Changing a Stored Number
- Dialing a Stored Number
- Chain Dialing from Memory
- Inserting a Pause in the Dialing Sequence
- Deleting a Stored Number
- Advanced Features
- Handset Setup
- Changing the Ring Pattern
- Changing the Ring Level
- Resetting the Handset
- Base Setup
- Tone/Pulse Dialing
- Resetting the Base
- Headset and Belt Clip Operation (optional)
- Connecting a headset to the handset
- Connecting the Belt Clip
- Changing the Battery
- Battery Safety Precautions
- Causes of Poor Reception
- Message Indicators
- Handset Sound Signals
- Troubleshooting Tips
- General Product Care
- Service
- Index
- Accessory Order Form
- Limited Warranty
- Información Del Registro a la FCC
- Información de Interferencias
- Compatibilidad con Audífonos
- Introducción
- Antes de Comenzar
- Lista de Partes
- Requisitos de conexión
- Sistema de Seguridad Digital
- Instalación
- Instalación sobre Escritorio o Superficie Plana
- Instalación sobre Pared
- Programación
- Para activar (ON) o desactivar (OFF) el aparato
- Activado (ON)
- Desactivado (OFF)
- Para Usar los Menús
- Para Seleccionar un Menú
- Para seleccionar un Submenú
- Para Programar la Clave de Area
- Operación del Teléfono
- Para Recibir una Llamada
- Para Hacer una Llamada
- Para Volver a Marcar
- Para Marcar el Último Número que fue Marcado
- Revisar y Volver a Marcar
- Menú para Volver a Marcar
- Botón de Flash
- Tono Provisional/ Temporario
- Para encontrar el Auricular
- Volumen
- Enmudecedor
- Mensaje de Voz
- Funciones del Identificador de Llamadas (Caller ID)
- Identificador de Llamadas con Llamada en Espera (Caller ID with Call Waiting)
- Para Recibir y Almacenar Llamadas
- Para Revisar Archivos del Identificador de Llamadas (Caller ID)
- Para Borrar Archivos del Identificador de Llamadas (Caller ID)
- Para Borrar un Archivo
- Para Borrar Todos los Archivos
- Para Marcar un Número del Identificador de Llamadas (Caller ID)
- Para Cambiar el Formato del Número
- Memoria
- Para Almacenar un Nombre y Número en la Memoria
- Para Cambiar un Número Almacenado
- Para Marcar un Número Almacenado
- Para Marcar en Cadena desde la Memoria
- Para Introducir una Pausa en la Secuencia de Marcado
- Para Borrar un Número Almacenado
- Funciones Avanzadas
- Programación del Auricular
- Para cambiar el Patrón de Timbrado
- Para cambiar el Nivel de Timbrado
- Para Re-Programar el Auricular
- Programación de la Base
- Marcado de Tono/ Rotatorio (Tone/Pulse)
- Para Re-Programar la Base
- Operación del Audífono y Broche del Cinturón
- Conexión del Audífono al Auricular
- Conexión del broche del cinturón
- Para Cambiar la Batería
- Precauciones de Seguridad para la Batería
- Causas de una mala recepción
- Indicadores de Mensajes
- Señales Sonoras del Auricular
- Solución de Problemas
- Cuidado General del Producto
- Cómo obtener servicios de mantenimiento
- Índice
- Formulario para hacer pedidos de accesorios
- Garantía limitada

24
DELETING ALL RECORDS
1. Make sure the phone is ON (but
not in the “talk” mode) by
pressing the PWR button.
2. Use the arrow buttons to scroll
through the main menu until
Caller ID
is flashing.
3. Press SELECT.
4. Use the arrow buttons to scroll
to
Review CID.
5. Press SELECT.
6. Press and hold DELETE. The
display shows
DELETE ALL?
7. Press DELETE. The display
shows
DELETE ALL?
8. Press SELECT to confirm.
DELETED
is displayed.
DELETE
button
MUTE
DELETE
EXIT
TALK
SELECT
WXYZ
9
TUV
8
PQRS
7
MNO
6
JKL
5
GHI
4
DEF
3
ABC
21
#
OPER
0
TONE
*
PWR
RE/PA MEMORY
FLASH
FORMAT
SELECT
button
Arrow
buttons