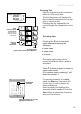
Using the Handset Becoming Familiar with Handset Operation Softkeys The Handset has two softkeys that serve multiple functions. The text shown above the softkey indicates the current function of the key. If no text is shown, then the key has no function. Press this softkey to select this action Press this softkey to select this action NavKey (Navigation Key) Use the NavKey to move around (up, down, left, right) within the menu screens and for positioning the cursor when editing text.
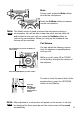
Using the Handset Sample of Text Entry: 1st press = 2nd press = 3rd press = 4th press = cycle repeats Entering Text Use the keypad to enter characters while in a text entry field. The first key press will display the first character presented on the key (refer to sample at left). Pressing the key repeatedly will cycle through the characters on the key.
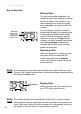
Using the Handset Day to Day Use Making Calls To make a standard telephone call, press the green key (talk key) and then dial the number. If you want to use the speakerphone, press the green key a second time and then dial the number. For pre-dialing, (preview numbers before dialing) enter the numbers first. If you make a mistake when dialing use the NavKey (navigation key) to place the cursor to the right of the number you want to delete and press the softkey remove to delete the number.
Using the Handset Mute Mute Flash During a call, press the Mute softkey to mute the microphone. Unmute Flash Press the UnMute softkey to resume normal conversation. Note: The Mute function is used to silence the microphone during a conversation. You will be able to hear the caller, but the caller will not be able to hear you until you press the UnMute softkey to resume the conversation. When you hang up the telephone, the feature will be canceled.
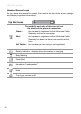
Using the Handset Handset Screen Icons As you move from screen to screen, the icons at the top of the screen change and display important information: Top Bar Icons The visibility and color of this icon tell you the status of the phone’s connection Green : the handset is registered to the Advanced Cable Gateway and has a connection Red : the handset is registered to the Advanced Cable Gateway but does not have a connection at this time Login you are using Menu Not Visible : the handset is not registered
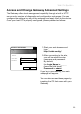
Web Configuration Access and Change Gateway Advanced Settings The Gateway offers local management capability through a built in HTTP server and a number of diagnostic and configuration web pages. You can configure the settings by way of the webpage and apply them to the device. Once your host PC is properly configured; please proceed as follows: Connect to 192.168.100.1 ? X Thomson User name: Password: Remember my password OK Cancel 1. Start your web browser and type http://cable.config/ 2.
Web Configuration Outline of Web Manager The main screen will be shown as below. Administration Gateway Status - Telephony - Router - Wireless eMTA-Settings Thomson Advanced Cable Gateway Configuration Software Welcome to Thomson Advanced Cable Gateway configuration pages. These pages provide information on your Gateway and allow you to configure its telephone and networking features.
Web Configuration Gateway – Status Web Page Group 1. Software Administration Gateway Status - Telephony - Router - Wireless eMTA-Settings Status Software : This page displays information on the current system software. Software Information Connection Standard Specification Compliant DOCSIS 2.0 Hardware Version ACG90x rev 0 Password Software Version cable ACG905 1.4.5.0 DOCSIS Software Version 2.0.0 alpha5 DECT Software Version 1252.
Web Configuration 2. Connection This page reports Current Connection Status containing startup procedures, downstream and upstream status and so on. The information can be useful to your cable company’s support technician if you’re having problems.
Web Configuration Gateway – Telephony Web Page Group 1. Base This page displays information on the DECT Handset base station Administration Gateway Status - Telephony- Router - Wireless eMTA-Settings Telephony Base : This page displays information on the DECT base system. Base Information Handsets Standard Specification Compliant PacketCable 1.0 Software Version 1249 EEPROM Revision 64 REPI 00FS400930 Password 2.
Web Configuration Gateway – Router Web Page Group 1. LAN By default the DHCP server function for the LAN is activated. LAN settings can be modified on this page. With this function activated, your cable company’s DHCP server provides one IP address for your Gateway. Your Gateway’s DHCP server provides IP addresses to your PCs within the range of addresses specified in the DHCP range start and stop address fields. A DHCP server leases an IP address with an expiration time.
Web Configuration 2. WAN This page displays information on the WAN parameters of the Gateway. Administration Gateway Status - Telephony - Router - Wireless eMTA-Settings Router WAN : This page displays information on the WAN parameters of the gateway LAN WAN WAN IP Address: 10.22.15.7 Expires in: 4d:15h:52m:2s Computer Firewall Forward DMZ 3. Computers This page displays the status of the DHCP clients (lists all computers connected to your computer) - Computer name, IP address and mac address.
Web Configuration 4. Firewall This page allows you to choose the firewall settings of the Gateway in order to protect the computers within your home network from malicious attacks from outsiders. In addition you can use this feature to restrict a computer within your home network from accessing certian Internet traffic by IP address and by logical ports.
Web Configuration Maximum Level of Security This level blocks all the incoming and outgoing traffic with the following exceptions: • Connections to the following services (servers located on the WAN) are accepted: • FTP (port 20/21) • www.(port 80) in TCP • http (port 443) in TCP • SMTP (port 25) in TCP and UDP • POP2 (port 109) in TCP and UDP • POP3 (port 110) in TCP and UDP • nntp (port 119) in TCP All the packets of an already established connection are accepted. 5.
Web Configuration This page allows you to specify up to 9 such rules. The IP address can be entered multiple times with different ports.
Web Configuration 6. DMZ Host Use this page to designate one PC on your LAN to be exposed to the Internet for use of a special-purpose service (for example - internet games or video conferences). DMZ hosting opens all ports of a PC. Administration Gateway Status - Telephony - Router - Wireless eMTA-Settings Router LAN WAN Computer DMZ Host (Exposed Host) : This page allows you to open all ports on one chosen computer.
Web Configuration Gateway – Wireless Web Page Group Important - Changes to the Wireless Web Pages should be made from a PC that is hard wired to the Gateway. The Wireless Web Pages Group enables a variety of settings that can provide secure and reliable wireless communications.
Web Configuration Security Security secures or scrambles messages traveling through the air between your wireless PCs and the gateway, so they can’t be observed by others. The following minimum security setting changes to factory defaults are recommended. • Change the default Network name of SSID • Enable mac address filtering by using the Access control list features • Choose WPA/WPA2 encryption See the 802.11b/g Security Web Page discussion below for details. 1. 802.
Web Configuration 36 Setting Description Value List or Range Default Interface Enable or disable the wireless interface. Enabled, Disabled Enabled Wireless Mac Address The Mac address of the wireless card installed is displayed THOMSONACG-XXXX as preconfigured by the factory 11 Network Name (SSID) Set the Network Name (also known as SSID) of this network.
Web Configuration 2. 802.11b/g Security This page allows you to configure the Network Authentication. This page provides several different modes of wireless security. You will have to enter proper information according to the mode you select. A network encrypted with WPA/WPA2 is more secure than a network encrypted with WEP, because WPA/WPA2 uses dynamic key encryption.
Web Configuration Other security modes available: WPA-PSK (TKIP) This is the default security mode. Temporal Key Integrity Protocol (TKIP) is used for dynamic encryption of the data. WEP-Open and WEP-Shared If one of these security modes is chosen, you have to enter a 128 bits encryption key Encryption Key 128 bits The key used for WEP is a 128 bit hexadecimal ([0-9] [A-F]) key. The key is composed of 26 hexadecimal characters.
Web Configuration 3. Access Control This page allows you to ensure security by setting an access control to the Access Point (AP). Access control is done on client’s mac addresses Administration Gateway Status - Telephony - Router - Wireless eMTA-Settings Wireless 802.11b/g Access Control : This page allows configuration of Access Control to the AP as well as status on the connected clients.
Web Configuration eMTA settings – Basic Web Page Group This group of pages gives information on the hardware and the state of your cable connection. The access to this groupof pages is protected by a static password: no username, password:Thomson 1.
Web Configuration 2. CM Hardware The CM hardware is displayed on this page. Administration Gateway Status - Telephony - Router - Wireless eMTA-Settings Basic Hardware This page displays the CM and MTa event logs. Status CM Hardware CM Hardware HW Revision: 0 Event Log Vendor: Thomson BOOT Revision: 2.1.8o SW Revision: 2.0.0alpha3 Model: ACG905 Product Type: ACG905 CM State Flash Part: Download Revision: (unknown) Software Revision: 2.0.
Appendix - Customizing Your Handset 4. CM State This page shows the current state of the cable modem. Administration Gateway Status - Telephony - Router - Wireless eMTA-Settings Basic CM State This page displays the state of the CM/MTA.
Appendix - Customizing Your Handset Additional Information Customize Your Handset Chart of the Menus While in the home screen press the menu softkey. Select the settings icon to access the settings menu of the phone. The menu structure is as follows: CONFIRM - When working in the screens on your handset, there are two ways to confirm your selections. In most screens you will use a softkey for “OK”; but, if that is not available, use the “Select” key located in the center of the navigation key.
Appendix - Customizing Your Handset 1. Ring Tone a. Selecting a Ring Tone • In the home screen, select “Menu” by pressing the softkey. • Select the settings icon and confirm. • Select “Ring Tone” and confirm. • Select “Ringtone” and confirm. • Select “External Calls” or “Internal Calls” and confirm. • Select the ringtone you want and confirm by pressing the softkey for “Use”. b. Adjusting the Ringer Volume • In the home screen, select “Menu” by pressing the softkey. • Select the settings icon and confirm.
Appendix - Customizing Your Handset Out of Range: • In the home screen, select “Menu” by pressing the softkey. • Select the settings icon and confirm. • Select “Ring Tone” and confirm. • Select “Beep Tones” and confirm. • Select “Out Of Range” and confirm. • Select “Off” or “On” and confirm. Notifications: • In the home screen, select “Menu” by pressing the softkey. • Select the settings icon and confirm. • Select “Ring Tone” and confirm. • Select “Beep Tones” and confirm. • Select “Notify” and confirm”.
Appendix - Customizing Your Handset 3. Phone Settings a. Changing the Display Contrast • In the home screen, select “Menu” by pressing the softkey. • Select the settings icon and confirm. • Select “Handset” and confirm. • Select “Contrast” and confirm. • Use the up and down keys to adjust the contrast and confirm. b.
Appendix - Customizing Your Handset 4. Call Lists a. Understanding Caller Identification Data If you subscribe to your network provider’s “Caller Identification” (caller ID) service, you can see who is calling you before you take the call. If you subscribe to the “Call Waiting” service as well, the same identification process applies to calls received when you are already on a call. The calls made and received are logged automatically, together with number, date and time.
Appendix - Customizing Your Handset 5. Using Your Phone With Multiple Handsets a. Registering/Re-Registering an Extra Handset You can have up to 5 handsets registered to your Advanced Cable Gateway system base. Refer to Thomson URL to see how addtional Handsets may be purchased. If you already have 5 handsets registered and you want to swap one of them, you must remove that handset from your list of registered phones (uninstall it) before installing the replacement handset.
Appendix - Customizing Your Handset c. Un-Registering a Handset Handsets can only be un-registered from another Handset. • Select “Menu” by pressing the softkey. • Select the settings icon and confirm. • Select “Registration” and confirm. • Select “De-Register” and confirm. • Enter the secret system PIN (0000 by default) and confirm. • Using the up and down (navigation) keys, select the Handset to be unregistered and confirm. d.
Appendix - Wiring Wiring Example Splitters - TV converter TV converter ACG Modem Cable Drop TV converter Grounding Wire New Cable Wire New 2-way splitter: One leg goes directly to the ACG (modem) One leg goes directly to the IN on the next splitter Grounding Rod For optimum performance, be sure to connect your Advanced Cable Gateway to the first point the cable enters your home. The splitter must be rated for at least 1GHz.
Appendix - FAQ Frequently Asked Questions Q. How does the Advanced Cable Gateway Work? A. The Advanced Cable Gateway provides high-speed Internet access as well as cost-effective, telephone voice and fax/modem services for residential subscribers over a CATV (cable TV) infrastructure. It can inter-operate with the PacketCable compliant head end equipment and provide IP-based voice communications. The IP traffic can transfer between the Advanced Cable Gateway and DOCSIS compliant head end equipment.
Appendix - Lights Guide Lights Guide Note - There is a simplified version of this table on page (yada yada) Legend: ON LED is on SLOW BLINK LED is blinking slowly OFF LED is off FAST BLINK LED is blinking quickly X LED can be in any state (on, off or blinking) Battery LAN Active Telephone DOCSIS Start-Up Operation Note 1 Boot Up Operation LED LABEL * Power On during 0.25s Power ( LED desc.
Appendix - Lights Guide Battery ( LED desc.
Appendix - Troubleshooting Troubleshooting You can correct most problems you have with your Gateway by consulting the troubleshooting list that follows: I can’t access the internet. Check all of the connections to your Advanced Cable Gateway. Your PC is connected to the USB port or your Ethernet card may not be working. Check if each product’s documentation for more information. The Network Properties of your operating system may not be installed correctly or the settings may be incorrect.
Appendix - Troubleshooting If you subscribe to video service over cable, the cable signal may not be reaching the modem. Confirm that good quality cable television pictures are available to the coaxial connector you are using by connecting a television to it. If your cable outlet is “dead”, call your Cable Company. Verify that the Cable Modem service is DOCSIS compliant and PacketCable compliant by calling your cable provider. I don’t hear a dial tone when I use a telephone.
Appendix - FCC Information FCC Declaration of Conformity and Industry Canada Information This device complies with Part 15 of the FCC Rules. Operation is subject to the following two conditions: (1) this device may not cause harmful interference, and (2) this device must accept any interference received, including interference that may cause undesired operation.
Appendix - Fcc Information FCC Declaration of Conformity for Handset Interference Information This device complies with Part 15 of the FCC Rules. Operation is subject to the following two conditions: (1) This device may not cause harmful interference; and (2) This device must accept any interference received, including interference that may cause undesired operation. This equipment has been tested and found to comply with the limits for a Class B digital device, pursuant to Part 15 of the FCC Rules.
Appendix - Service Service Information If you purchased or leased your Advanced Cable Gateway directly from your cable company, then warranty service may be provided through your cable provider or its authorized representative. For information on 1) Ordering Service, 2) Obtaining Customer Support, or 3) Additional Service Information, please contact your cable company. If you purchased your Advanced Cable Gateway from a retailer, see the enclosed warranty card.
Appendix - Gossary Glossary 10BaseT Unshielded, twisted pair cable with an RJ-45 connector, used with Ethernet LAN (Local Area Network). “10” indicates speed (10 Mbps), “Base” refers to baseband technology, and “T” means twisted pair cable. Authentication The process of verifying the identity of an entity on a network. DHCP - (Dynamic Host Control Protocol) A protocol which allows a server to dynamically assign IP addresses to workstations on the fly.
Appendix - Glossary The interconnection between the internal house telephone wiring and a conventional telephone service provider’s equipment. These wiring connections are normally housed in a small plastic box located on an outer wall of the house. It is the legal demarcation between the subscriber’s property and the service provider’s property.
Index E A Entering Text 19 special characters 19 Ethernet cable 14 connection 14 port locations 4 Advanced Cable Gateway battery install 9 front panel 3 introduction 1 rear panel 4 set-up activation 16 ethernet more than two computers 15 fax 15 telephone 15 Wi-Fi 8 B battery - handset charging 11, 12 rechargeable i C cable input connector location 4 call end 20 hands-free 20 make 20 receive 20 caller ID 47 call waiting 47 color ring 5 computer 1 connections hub 14, 15 more than two 15 one or two 14 port
Hands-Free 20 I text enter special characters 19 Icons Handset 22 U K UnMute 21 USB connector 4 Keypad 5, 19 L lights flashing (on ACG) 16 table for 52 loudspeaker care of 10 location 5 M Mute 21 N navigation key (Navkey) 5, 18 O OFF key 5, 18 R Red key 5, 18 S safety power source ii technical specifications i warnings ii softkey 5, 18 Speakerphone 20 T Talk Key 5 Telephone call end 20 hands-free 20 make 20 receive 20 connector location 4 telephone devices connection 15 62 V Volume earpiece 21 spe
NOTES 63
NOTES 64
NOTES 65
NOTES 66
NOTES 67
NOTES 68
NOTES 69
©Thomson Inc - Trademark(s)*Registered\-Marca(s) Registada(s)\ Photos and features subject to change without notice. Illustration of product finish may vary from actual color.