Model 28320 InfoLink Phone User’s Guide for use as a telephone and to receive information from internet
Important Instructions & Information Equipment Approval Information Your telephone equipment is approved for connection to the Public Switched Telephone Network and is in compliance with parts 15 and 68, FCC Rules and Regulations and the Technical Requirements for Telephone Terminal Equipment published by ACTA. 1 Notification to the Local Telephone Company On the bottom of this equipment is a label indicating, among other information, the US number and Ringer Equivalence Number (REN) for the equipment.
Important Instructions & Information Interference Information This device complies with Part 15 of the FCC Rules. Operation is subject to the following two conditions: (1) This device may not cause harmful interference; and (2) This device must accept any interference received, including interference that may cause undesired operation. This equipment has been tested and found to comply with the limits for a Class B digital device, pursuant to Part 15 of the FCC Rules.
Table of Contents To come after P1 approval
Table of Contents CAUTION: RISK OF ELECTRIC SHOCK DO NOT OPEN WARNING: TO PREVENT FIRE OR ELECTRICAL SHOCK HAZARD, DO NOT EXPOSE THIS PRODUCT TO RAIN OR MOISTURE. THE LIGHTNING FLASH AND ARROW HEAD WITHIN THE TRIANGLE IS A WARNING SIGN ALERTING YOU OF “DANGEROUS VOLTAGE” INSIDE THE PRODUCT. CAUTION: TO REDUCE THE RISK OF ELECTRIC SHOCK, DO NOT REMOVE COVER (OR BACK). NO USER SERVICEABLE PARTS INSIDE. REFER SERVICING TO QUALIFIED SERVICE PERSONNEL.
Introduction This User Guide provides you with all the information you need to get the most from your phone. You must first set up your phone before you can use it. This doesn’t take long and is easy to do. Just follow the simple instructions on the next few pages. Need help? If trouble is experienced with this equipment, for repair or warranty information, please contact customer service at 1-800-448-0329. Alternatively, you may find the answer in Troubleshooting Tips section at the back of this guide.
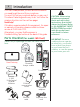
Installation INSTALLATION NOTE: This product operates at a frequency of 1.9GHz. to provide communication with minimal interference from other electronic devices. To further minimize the possibility of interference, the base of the cordless telephone should not be placed near or on top of a TV, microwave oven, or VCR. If interference continues, move the cordless telephone further away from these appliances.
Installation Your unit is provided with three power adaptors; 2 for handset charger cradles and 1 base power. The connectors are different sizes, only the larger connector/adaptor fits the base/gateway unit Installing the Handset Battery 1. Locate batteries and battery door which are packaged together inside a plastic bag and are separate from the handsets. 2. Locate the battery compartment on the back of the handsets. CAUTION: To reduce the risk of fire or personal injury, use only the Thomson Inc.
Installation Base/Gateway Set-Up CAUTION: To reduce risk of personal injury, fire, or damage use only the 5-XXXX power adaptor listed in the user’s guide. This power adaptor is intended to be correctly orientated in a vertical or floor mount position. IMPORTANT: Do not connect the telephone line until the handset is fully charged. The base must be plugged into the AC power at all times. INSTALLATION NOTE: Unit will not function if connected behind a firewall. Unit will not work with dial-up connection.
Installation Power Supply Connection 1. Connect the power adaptor provided with your unit to the base/gateway as shown below. 2. Connect the adaptor to an electrical wall outlet. 3.
Getting to Know Your Phone Base/Gateway Layout ETHERNET (indicator) DECT (blue indicator) ETHERNET Indicator (blue) When flashing; indicates ethernet activity When solid; indicates ethernet connection DECT Indicator (blue) When flashing; indicates base/gateway is paging handset. When solid; indicates an active call. POWER Indicator (green) When solid; indicates base is powered. Page button Press to locate misplaced handset(s).
Getting to Know Your Phone Handset Layout display Navigational (button) Left soft (button) Right soft (button) Alert Indicator Call/ Speakerphone (button) FLASH (button) Headset jack END (button) INT/a/A (button) VOICEMAIL (button) pause/#/lock/ conference (button) * (button) microphone
Getting to Know Your Phone 13 Left soft button Selects the current menu item or confirms a setting, depending on the current screen. Right soft button “Back” button; returns to the previous screen. Navigational/Volume button Press the outer ring to navigate up, down, left, or right while in a menu or content screen. During a call, press vol-/+ to increase or decrease the volume. Alert Indicator If flashing, indicates you have voice mail waiting or a weather or software update alert.
Getting to Know Your Phone 14 Standby Display The standby display of your phone provides various status indicators and access to the menu-based interface. The illustration below shows the screen and its elements. Alarm On indicator Current time Range indicator Battery status Handset identity Action Action Range Indicator Flashes when handset is out of range of the base/gateway. Battery Status Indicates the status of the battery. Low level. Fully charged. Partially charged. Charging.
Programming Your Phone 15 Melody Settings Set your preferences for volume, ringtones, ringer volume and keypad. Base Settings Set tone or pulse dial mode, revert to default settings, verify IP address. Time Settings Set date and time, select time format, set alarm.. Registration Register and de-register handsets to base. RSS Setting View and select channels, revert to default channels, help guide NOTE: If you cannot read the display language, go to Handset Settings/Language to change.
Programming Your Phone Menu Color From the Handset menu; 1. Use or to scroll to Menu Color. 2. Press to enter the menu. 3. Use or to scroll to the desired color. The default is Blue 4. Press to save your selection. Background Picture From the Handset menu; 1. Use or to scroll to Picture. 2. Press to enter the menu. 3. Use or to scroll through the selection, press to view. The default is Picture 4. 4. Press to save your selection. Display Contrast From the Handset menu; 1.
Programming Your Phone Area Codes Most often, Caller-ID is received with 10 digits (3-digit area code + 7-digit phone number) regardless of how many digits need to be dialed to call that number. The most prevalent dialing plans in use are 7-digit (normal 7-digit phone-number), 11-digit (1+area-code+7-digits) and 10- digits (area-code+7-digit). When dialing back from the call lists, the phone will try to figure out if 7, 10, or 11 digits should be dialed.
Programming Your Phone 18 Ringer Volume From the Melody menu; 1. Use or to scroll to Ring Volume. 2. Press to enter the menu. 3. The current setting is displayed. Use or to decrease the volume. Press The default is 6 bars. to increase to confirm. 4. Press to save your selection. Ring Volume Saved is displayed. Key Beep From the Melody menu; 1. Use or to scroll to Key Beep. 2. Press 3. Use to enter the menu. or to switch between Off and On, press to confirm. The default is On. 4.