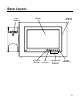
Base Layout page (button) memory card slot display menu/ok (button) exit (button) navigational 3456 (buttons) charge (indicator) 11
Installing the Phone Installing the Handset Battery NOTE: You must connect the handset battery before use. CAUTION: To reduce the risk of fire or personal injury, use only the Thomson Inc. approved Nickel-metal Hydride (Ni-MH) battery model 5-2734, that is compatible with this unit. 1. Locate the battery which is packaged inside a plastic bag and is separate from the handset. 2. Locate the battery compartment on the back of the handset. 3. Plug the battery pack cord into the jack inside the compartment.
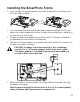
Installing the Base/Photo Frame 1. Insert the legs of the metal stand into the holes on the bottom of the base, push until they snap into place. 2. Choose an area near an electrical outlet and a telephone wall jack (RJ11C), and place your cordless telephone on a level surface, such as a desktop or tabletop, or you may mount it on the wall. 3. Connect one end of the telephone line cord into the TEL LINE jack on the back of the base and the other end into a modular jack. 4.
Changing the Photo Frame Detaching the Photo Frame; Push on the tabs gently until they pop loose. Attaching the Photo Frame; Align the frame (refer to the markings on the back of the frame for the correct placement) and gently snap onto the base. Wall Mounting NOTE: Remove the wire stand, if attached, by pressing on the tabs and sliding each leg out individually. 1. Connect the AC power adaptor into the electrical outlet and the DC connector into the jack on the back of the base. 2.
Programming the Photo Frame Specifications: The Photo Frame is compatible with SD and XD memory cards ,or Sony memory sticks (Sony MS compatible ONLY with an adaptor), JPEG Image file formats and has an Internal Memory capacity of 32MB (approx. 100 photos at maximum of 2M/photo). Frame Setup A menu structure allows access to all of the built-in features. You may program the following items in the main menu: Add Photos, Picture-Caller ID Setup, Delete Photos, Frame Preferences and Reset All Settings.
NOTE: If no memory card is detected, the screen displays No memory card is available. Check memory card installation, scroll to Retry or Cancel, and press the menu/ok button again. 5. Press the menu/ok button. You may now select an entire folder or individual photos to add to the internal memory. To select an entire folder: 1. Use the navigational buttons to position the green box around the desired folder. 2. Press the menu/ok button.
NOTE: If internal memory is full, the screen displays Internal Memory Full. File Copy Error. Press the exit button to return to main menu. You will need to delete some pictures or folders in order to load more pictures. Picture-Caller ID Setup You can set up a link so that a caller’s photo appears when you receive a call from them. The links can be edited or deleted. 1. Make sure your phone is OFF (not in talk mode). 2. Press the menu/ok button to go to the main menu. 3.
• Press the 4 button to move the flashing cursor to the right. • Press the 3 button to delete a digit. • Press the menu/ok button to save. to input Linked Photo: • Use the navigational buttons to select the desired photo or folder (selecting a folder will enable all photos in folder to cycle for the Caller ID instead of just one photo) • Press the menu/ok button to select. The screen displays Are you sure? No Yes.
Edit Existing Picture Caller ID Link (PCIDL) If you’ve already set up a PCIDL, you can edit the name, number, or photo link. From the Picture-Caller ID Setup menu: 1. Use the 5 or 6 button to scroll to Edit existing Picture-Caller ID Link. 2. Press the menu/ok button to confirm. 3. Use the 5 or 6 button to scroll to the PCIDL you wish to edit. 4. Press the menu/ok button to select. Make any edits necessary. 5. Use the navigational buttons to scroll to Save & Exit. 6.
5. Use the 5 or 6 button to select No or Yes. NOTE: When a picture or folder is deleted, it will unlink all PCIDL's associated with the photo or folder, it does NOT delete the associated name and number. After deleting a picture or folder, the picture or folder that was before the deleted photo or folder is now highlighted in the thumbnail view as a convenience so that you can continue deleting pictures or folders.
Slide Show Setup You can adjust how the photos in the slide show are presented. From the Frame Preferences menu: 1. Use the 5 or 6 button to scroll to Slide Show Setup. 2. Press the menu/ok button to confirm and select from the following settings; Source, Speed, and Shuffle. 3. Use the 5 or 6 button to scroll to desired setting. 4. Press the menu/ok button to confirm. Source - choose whether a slide show displays from internal memory, a memory card, or both.
Frame On/Off Time You can set a schedule for the frame activation. From the Frame Preferences menu: 1. Use the 5 or 6 button to scroll to Frame On/Off Time. 2. Press the menu/ok button to confirm. 3. Use the 5 or 6 button to set desired time, use the 3 or 4 button to move curser. The default setting is Turn On Frame is 5:00 AM and Turn Off Frame 11:00 PM. 4. Press the menu/ok button to save. The screen displays Saved. 5. Press the exit button repeatedly to return to the photo screen.
Reset All Settings Reset all frame preferences to factory default settings. 1. Make sure your phone is OFF (not in talk mode). 2. Press the menu/ok button to go to the main menu. 3. Use the 5 or 6 button to scroll to Reset All Settings. 4. Press the menu/ok button to enter. The screen displays Are you sure? No Yes. 5. Use the 5 or 6 button to select No or Yes. 6. Press the menu/ok button to save. The screen displays Saved. 7. Press the exit button repeatedly to return to the photo screen.
Language From the Setup HS Menu: 1. Use the cid/vol (3or4) button to scroll to the Language sub-menu. 2. Press the menu button to enter the menu. 3. Use the cid/vol (3or4) button to select English, Français or Espanol. The default setting is English. 4. Press the menu button to save your selection. Ring Volume There are 4 volume levels for your selection. They are Volume 1 to 3 and Ringer off respectively. From the Setup HS Menu: 1. Use the cid/vol (3or4) button to scroll to the Ring Volume sub-menu. 2.
NOTE: When the handset is in the idle (off) mode and is out of range from the base unit the display shows Searching. If the talk/call back button is pressed, the screen briefly displays Unavailable then returns to Searching. Key Tone - You may set the key tone to “On” or “Off” to sound a tone when you press any button. Use the cid/vol (3or4) button to scroll to On or Off, then press the menu button to save the setting. The default setting is On.