
Manual


71
ramrod, slowly push the wad or wads the remainder of the way down the bar-
rel until it contacts and bears firmly against the powder charge. Bear in mind
that air is trapped underneath the wad or wads as you load it so you must push
slowly...allowing time for this trapped air to bleed off around the wad or wads.
See photo “D”.
Use your graduated powder measure to measure your shot charge (see in-
formation contained in the loading data). Measure your shot as carefully as
you measure your powder. Pour your shot charge down the barrel and start
your Thompson/Center Natural Wad into the muzzle with your fingers. Load
this “over shot wad” with the same care you used in seating your “over powder
wad”. Allow time for trapped air to bleed off and seat the wad firmly against
the shot charge. See photo “E”.
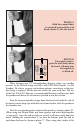
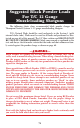
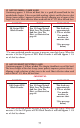
Once the shotgun is charged (wads and shot column firmly seated against
the powder charge as shown in the illustrated insert Photo “E”), it is necessary
to carefully mark your ramrod at the muzzle. A reference mark on the ramrod
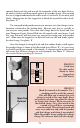
will ensure that all future charges are seated properly. See Photo “F”.
Remove
the ramrod before priming the firearm.
PHOTO E
Load over
the shot wad(s)
slowly to force
trapped air
out of the barrel.
PHOTO F
Mark the ramrod at the muzzle. Use a
marking pencil to mark the ramrod.
This will allow you to ensure that each
charge is seated to the same depth. Erase
and remark each time you adjust the charge
or change shot charges. When you arrive at
the desired charge, cut a clean notch in the
ramrod so you will have a permanent
reference mark. This reference mark will
serve as an indicator only with the powder
and shot charge used when it was marked.
When the powder char
ge and/or shot char
ge
change, the reference mark will also change.
{
{
One
Over The
Shot
Two
Over The
Powder
The entire
shot & wad
column MUST
be seated
firmly against
the powder
charge.
Breech
Cut-a-way
"Natural"
Wads
"Natural"
Wads
ShotShotShot
Powder