
Manual


32
ry remove the receiver/barrel assembly from the stock.
Step 6. After sear engagement adjustment is finalized, retighten the 1/4"
lock nut, making sure that sear engagement adjustment screw (Screw “A”)
remains in the same position.
Step 7. Reassemble the rifle.
To increase sear engagement from this minimum setting, the .050" hex
screw (Screw "A") should be turned counterclockwise further than the one
third minimum turn stated above.
Trigger adjustment for Over-travel
(Screw "B" in diagram on page 30)
TO LESSEN THE AMOUNT OF TRIGGER OVER-TRAVEL,
FOLLOW THESE INSTRUCTIONS:
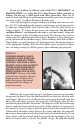
Step 1.
Ensure that the striker handle is in the "Fire" position and that there
is a nipple protector in place on the nipple.
Step 2. Loosen the 1/4" lock nut on Screw “B” (See page 30) by turning it
counterclockwise as viewed from the front of the trigger housing.
Step 3. Turn the hex Screw “B” with a .050" allen wrench clockwise until it
meets resistance (stops). Then, while holding the trigger back, turn the
screw counter clockwise until the striker falls to the "fired" position. Back
the screw up (counterclockwise) from this position one-quarter (1/4) turn.
THIS IS THE MINIMUM SETTING FOR OVER-TRAVEL. Retighten
the lock nut.
Step 4. Return the receiver/barrel assembly into the stock. Draw the strik-
er handle rearward into the “Fire” position. Shoulder the rifle and dry fire it
to check the “feel” of this adjustment. If this adjustment is satisfactory re-
move the receiver/barrel assembly from the stock.
Step 5. After the over-travel adjustment is finalized, retighten the 1/4" lock
nut, making sure that the over-travel adjustment screw (Screw “B”) remains
in the same position.
Step 6. Reassemble the rifle.
To increase trigger over-travel, the .050" hex screw (Screw “B”) should be
turned counterclockwise further than the one quarter minimum turn.