
Manual


31
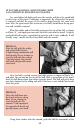
Trigger Adjustment for Sear Engagement
(Screw "A" in diagram on page 30)
Make sure that the firearm you are working with is uncharged and
unprimed prior to making any trigger adjustments. FAILURE TO
HEED THIS WARNING COULD RESULT IN ACCIDENTAL DIS-
CHARGE WHICH MAY CAUSE INJURY AND/OR DEATH TO THE
SHOOTER OR BYSTANDERS AND DAMAGE TO PROPERTY.
Adjustment of the System 1 trigger requires that the receiver/barrel be
removed from the stock. To do this, follow the takedown instructions found
in the assembly and disassembly section of this manual.
Important: The System 1 should not be dry fired without a nipple protec-
tor. To avoid damage to the nipple caused by the striker contacting it, install
a 3/8" long piece of rubber hose over the nipple.
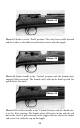
Important: Any adjustment to the sear engagement adjustment screw
(Screw “A” in the diagram on page 30) should always be made first. Only af-
ter this adjustment is made should the shooter adjust the over-travel screw
(Screw "B" in the diagram on the page 30).
TO LESSEN THE AMOUNT OF SEAR ENGAGEMENT, FOLLOW
THESE INSTRUCTIONS:
Step 1.
Ensure that the striker handle is in the “Cocked” position and that
there is a nipple protector in place on the nipple.
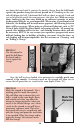
Step 2. Loosen the 1/4" lock nut on Screw “A” (See diagram on page 30)
by turning it
counter-clockwise as viewed from the rear of the trigger
housing.
Step 3. Using a .050" hex wrench, turn Screw “A” clockwise slowly until the
striker handle falls forward to the “Fired” position (keeping fingers clear of
the striker and striker handle as it falls).
Step 4. Turn the .050" hex wrench one-third (1/3) turn counterclockwise.
THIS IS THE ABSOLUTE MINIMUM SETTING FOR SEAR EN-
GAGEMENT
.
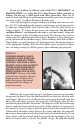
Step 5.
Return the receiver/barrel assembly into the stock. Draw the strik-
er handle rearward into the "Cocked" position. Shoulder the rifle and dry
fire it to check the "feel" of this adjustment. If this adjustment is satisfacto-