
Manual

13
... continued from page 11
This procedure will give you the nec-
essary leverage to “break” the gas
seal which was formed when the
breech plug was originally
“snugged” to the barrel during
installation. There will be initial
resistance between these parts
which must be overcome.
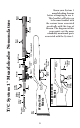
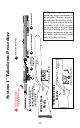
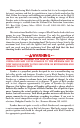
8th Step - To re-assemble, reverse the above procedure, making sure that
you
check for proper functioning of the trigger, striker and safety mechanism
prior to loading and firing. The breech plug of the System 1 should be seated
in the barrel until it is “snug”. “Snug” is defined here as being as tight as you
can turn it into the barrel by using the breech plug portion of the takedown
tool and turning it clockwise, while holding the barrel in your bare hand. Do
not use both wrenches when “snugging” the breech plug.
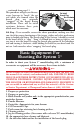
Basic Equipment For
Shooting the System 1
™
In order to shoot your System 1
™
muzzleloading rifle, a minimum of
accessories or equipment will be necessary, these items include:
Do not attempt to shoot your muzzleloading firearm until you have read
this manual in its entirety and understood it fully. FAILURE TO READ
AND FOLLOW THESE INSTRUCTIONS COULD RESULT IN AN AC-
CIDENTAL DISCHARGE, CAUSING INJURY AND/OR DEATH TO
THE SHOOTER OR BYSTANDERS AND DAMAGE TO PROPERTY. If
you are unable to understand any or all of this material, call the Custom-
er Service Department at Thompson/Center Arms at (603) 332-2333.
1. Proper eye protection
2. Proper ear protection
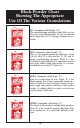
3. Black Powder or Pyrodex only
, in the appropriate granulation for your
particular firearm.
4. Powder Measure.
5. Projectiles: Appropriate for your firearm.
6. #11 Percussion Caps.
7. Patch worm for retrieving lost cleaning patches.
8. Cleaning patches
9. Jag for cleaning patches (One comes with each new T/C muzzleloader)
10. An appropriate bore cleaner and lubricant.
11. An anti-seize lubricant for the installation of the br
eech plug.
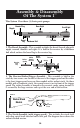
Grasp
Barrel
Re-Install
Breech Plug
Turn Clockwise
Until “Snug”
C
l
o
c
k
w
i
s
e