
Manual


46
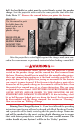
Cleaning From The Breech End
Never attempt to clean a charged or primed muzzleloading firearm. AN
ACCIDENTAL DISCHARGE CAN CAUSE INJURY AND/OR DEATH
TO THE SHOOTER OR BYSTANDERS AND DAMAGE TO PROPERTY.
When you are finished shooting for the day or for the season and plan to
store the System 1 away, it is recommended that you clean the firearm thor-
oughly. This includes removal of the breech plug and cleaning the correspond-
ing threads in the barrel. Follow these instructions for thorough cleaning.
1. Disassemble your System 1™ as detailed on pages 10 through 13 of
this manual.
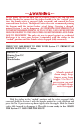
2. Next, using the System 1™ takedown tools, or two 1/2" wrenches,
remove the breech plug by turning it counter-clockwise (as viewed from the
nipple end) while turning the barrel lug in the opposite direction (clockwise).
It will be necessary to overcome the initial resistance caused by the barrel to
breech plus gas seal. The breech plug should now be scrubbed free of fouling
and later it should be lubricated with anti-seize lubricant like T/C’s Gorilla
Grease, before re-installation. The threads inside the breech end of the barrel
must also be cleaned with a stiff brush.
3. Fill a pan with very hot soapy water. Submerge the muzzle end of the
barrel in the water and push a wet patch down the barrel on the end of your
ramrod (that has a jag installed on it). A jag comes from the factory with each
new muzzleloader. Pump the rod and patch up and down in the barrel. This
will draw water into the barrel and flush out the fouling. When the barrel is
clean, wipe off the excess water and set the barrel aside to dry.
4. Remove the receiver end cap and pull the striker from the receiver.
Then thoroughly wipe all the powder residue from the striker. You may want
to submerge the striker in hot soapy water when scrubbing it. dry the parts
thoroughly before reassembly. After cleaning your System 1, it is recommend-
ed that you lightly lube the striker and trigger area. Do not use heavy grease
or oil, as during cold weather, excessive lube may congeal and slow the striker
fall (or keeping it from striking the cap on the nipple altogether) when the trig-
ger is pulled. This may cause the System 1’s striker handle to appear to be in
the “fire” position when in reality the striker has already moved forward, past
the engagement sear. If this condition occurs, the gun may go off when the
lubricant is softened by heat fr
om a vehicle or a building.