
Manual


61
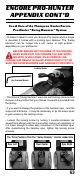
Pro-Hunter Speed Breech Cont’d
NOTE: If the breech plug is not
installed correctly, the extractor
will not engage the extractor
slot in the breech plug and the
barrel will not close on the
gun’s frame.
Again, push forward on the
sliding button on the wrench to
raise the clip out of the groove
in the breech plug - allowing
you to remove the wrench from
the breech plug (see FIG.8).
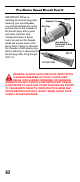
This breech plug has a
replaceable heat-resistant
O-Ring that seals the breech
area further against fouling
residue (see FIG.10).
This O-Ring can be easily
replaced if it should become
damaged. Use T/C Part
No.7531 replacement O-Rings
- available from your dealer -
or by contacting the factory.
The gas rings (shown in
FIG.10) are designed to be a
permanent assembly with the
breech plug. They should be
cleaned in place with a brush
and solvent (like T/C’s Number
13 Black Powder Solvent).
Diagram
Showing
Breech Plug
Rotated 90
0
Counter-
clockwise
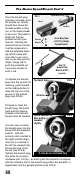
Withdraw Breech Plug
using Wrench
Extractor
Slot
To Right
Alignment
Pin To
Left
FIG.6
FIG.7
Diagram
Showing
Breech Plug
Rotated 90
0
Counter-
clockwise
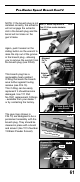
Alignment Pin Indicates
if br
eech plug
is locked
Lock
Unlock
Alignment
Pin
FIG.9
FIG.8
Sliding Retainer
Pushing Retainer For
ward Releases
Breech Plug From Wrench
Use 1/2" Breech Plug Wrench &
Turn it 1/4 turn counter-clockwise
to remove
F
IG.5