
User manual


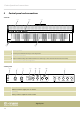
Table Of Contents
- Table of contents
- 1 General information
- 2 Safety instructions
- 3 Features
- 4 Assembly instructions
- 5 Control panel and connections
- 6 Connection options
- 7 Switching on / off and basic operation
- 7.1 Switching the digital piano on
- 7.2 Adjusting the volume
- 7.3 Setting the tone colour
- 7.4 D.A.S (Dynamic Acoustic System)
- 7.5 Touch velocity
- 7.6 Transposing
- 7.7 Tuning
- 7.8 Temperament
- 7.9 Selecting sounds
- 7.10 Layer mode and split point
- 7.11 Metronome
- 7.12 Demo pieces
- 7.13 Tempo
- 7.14 Digital effects
- 7.15 TWINOVA
- 7.16 Recording function
- 7.17 Further setting options
- 7.18 MIDI functions
- 7.19 Operating tone
- 7.20 Factory defaults
- 8 Sound list
- 9 Practise and demo pieces
- 10 Metronome rhythm list
- 11 MIDI implementation chart
- 12 Troubleshooting
- 13 Technical specifications
- 14 Plug and connection assignment
- 15 Protecting the environment

4 Assembly instructions
Unpack and check carefully there is no transportation damage before using the unit.
Keep the equipment packaging. To fully protect the product against vibration, dust
and moisture during transportation or storage use the original packaging or your
own packaging material suitable for transport or storage, respectively.
Set up the device in the desired location.
The unit is powered by the included 12 V power supply. Make sure that the device is
turned o before you connect it to the power supply or disconnect it.
Turn the volume knob counter-clockwise to minimum before connecting the digital
piano to the power supply or to other devices. This is to protect the speakers from
damage.
Connect the cable from the power supply outlet to the input socket [12V] on the rear
panel of the piano. Plug the plug of the power cord into a properly wired and
earthed mains wall outlet.
Voltage supply
Assembly instructions
DP-28 Plus, DP-28 Plus WH
9