
User manual
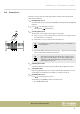


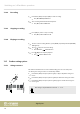


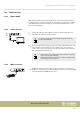


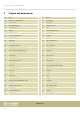
Table Of Contents
- Table of contents
- 1 General information
- 2 Safety instructions
- 3 Features
- 4 Assembly instructions
- 5 Control panel and connections
- 6 Connection options
- 7 Switching on / off and basic operation
- 7.1 Switching the digital piano on
- 7.2 Adjusting the volume
- 7.3 Setting the tone colour
- 7.4 D.A.S (Dynamic Acoustic System)
- 7.5 Touch velocity
- 7.6 Transposing
- 7.7 Tuning
- 7.8 Temperament
- 7.9 Selecting sounds
- 7.10 Layer mode and split point
- 7.11 Metronome
- 7.12 Demo pieces
- 7.13 Tempo
- 7.14 Digital effects
- 7.15 TWINOVA
- 7.16 Recording function
- 7.17 Further setting options
- 7.18 MIDI functions
- 7.19 Operating tone
- 7.20 Factory defaults
- 8 Sound list
- 9 Practise and demo pieces
- 10 Metronome rhythm list
- 11 MIDI implementation chart
- 12 Troubleshooting
- 13 Technical specifications
- 14 Plug and connection assignment
- 15 Protecting the environment

7.16.2 Recording
1. Hold down [SHIFT] and press [REC] to start recording.
ð
The [RECORDING] LED ashes.
2. The recording starts with the rst keystroke.
ð
The [REC] button LED ashes.
7.16.3 Stopping recording
Press [REC] to pause or stop recording.
ð
The [REC] button LED turns o.
7.16.4 Playing a recording
1. To turn on the recording function, press [MODE] repeatedly until the [RECORD]
LED lights up.
2.
Press to play the saved recording.
ð
The LED of the button ashes.
3.
Press again to stop the playback.
ð
The button LED turns o.
7.17 Further setting options
7.17.1 String resonance
This function simulates the resonance eects taking place in an acoustic piano.
On delivery, the string resonance is activated by default.
1. Hold down [SHIFT] and press piano key [D1] or [E1] to adjust the string reso‐
nance.
2. Hold down [SHIFT] and press piano key [D#1] to disable the string resonance.
3. Hold down [SHIFT] and press piano key [D#1] again to enable the string reso‐
nance again.
This setting is only available for sounds no. 1 … no. 4.
D1
D#1
E1
ON/OFF
Switching on / o and basic operation
digital piano
24