
User manual
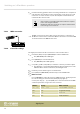
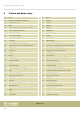
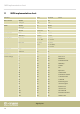
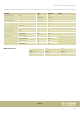
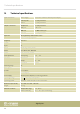
Table Of Contents
- Table of contents
- 1 General information
- 2 Safety instructions
- 3 Features
- 4 Assembly instructions
- 5 Control panel and connections
- 6 Connectivity options
- 7 Switching on / off and basic operation
- 7.1 Switching the digital piano on
- 7.2 Adjusting the volume
- 7.3 Touch sensitivity
- 7.4 Fine tuning
- 7.5 Split point setting
- 7.6 Metronome
- 7.7 Tempo
- 7.8 Transposing
- 7.9 Resonance effect
- 7.10 Digital effects
- 7.11 Selecting voices
- 7.12 Demo pieces
- 7.13 Demo mode
- 7.14 Dual mode
- 7.15 Duet mode
- 7.16 Harmony mode
- 7.17 Split mode
- 7.18 TWINOVA
- 7.19 Playing with accompaniment
- 7.20 Practising songs
- 7.21 Recording function
- 7.22 Historic tunings
- 7.23 MIDI functions
- 7.24 Factory defaults
- 8 Practise and demo songs
- 9 Styles list
- 10 Voice list
- 11 MIDI implementation chart
- 12 Technical specifications
- 13 Plug and connection assignment
- 14 Protecting the environment

2. Heed the following guidelines when connecting instruments to a computer via
USB. Otherwise, the instrument or the computer may ‘crash’, which can result
in data loss. If a ‘crash’ should occur, turn o computer and instrument and
restart both after a few seconds.
– If the computer is in standby or hibernation, wake the computer
before connecting the USB cable.
– Establish the USB connection between computer and instrument
before turning on the instrument.
7.23.3 MIDI connection
At MIDI connections, the device that controls other devices, is referred to as
the Master. A device that is controlled via MIDI is called Slave. Connect the MIDI
OUT of the master to the MIDI IN of the slave.
7.23.4 Controller settings
The digital piano has three built-in controllers to control another device.
1. Hold down [SHIFT] and press [MIDI MODE] to switch to MIDI mode.
ð
The [MIDI MODE] button LED lights.
2. Press [MIDI EDIT] to enter the Edit mode.
ð
The [MIDI EDIT] button LEDs light up.
3. Use [CTRL 1], [CTRL 2] and [CTRL 3] to enable the controller you want to adjust.
ð
The LED of the corresponding button ashes while the digital piano sends
MIDI data. When all data is transferred, the LED lights solid.
4. If desired, press the button again to resend the data.
5. Press [SHIFT] and [MIDI MODE] simultaneously to exit the MIDI mode.
6. MIDI commands
Press [COMMAND] to enable the selection of MIDI messages. The display shows
the current setting, the dot behind the [VOICE] display lights up.
Use the piano keys [0] … [9] in the [MIDI] area to enter the number of the MIDI
command you want to assign to the active controller:
Number Display MIDI command
000 … 127 ‘0.00’ … ‘1.27’ Standard MIDI command
128 ‘.Cn’ Programme change
129 ‘.dn’ Aftertouch
130 ‘.En’ Pitchbend wheel
MIDI IN MIDI OUT
Switching on / o and basic operation
digital piano
32