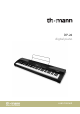
DP-26 digital piano user manual
Thomann GmbH Hans-Thomann-Straße 1 96138 Burgebrach Germany Telephone: +49 (0) 9546 9223-0 Internet: www.thomann.de 25.02.
Table of contents Table of contents 1 General information.............................................................................................................. 1.1 Further information........................................................................................................ 1.2 Notational conventions................................................................................................. 1.3 Symbols and signal words..............................................................
Table of contents 7.21 Recording function.................................................................................................... 7.21.1 Recording preparation.......................................................................................... 7.21.2 Recording................................................................................................................... 7.21.3 Stopping recording.............................................................................................
General information 1 General information This user manual contains important information on the safe operation of the device. Read and follow all safety notes and all instructions. Save this manual for future refer‐ ence. Make sure that it is available to all persons using this device. If you sell the device to another user, be sure that they also receive this manual. Our products and user manuals are subject to a process of continuous development.
General information Instructions The individual steps of an instruction are numbered consecutively. The result of a step is indented and highlighted by an arrow. Example: 1. Switch on the device. 2. Press [Auto]. ð Automatic operation is started. 3. Cross-references Switch off the device. References to other locations in this manual are identified by an arrow and the speci‐ fied page number. In the electronic version of the manual, you can click the crossreference to jump to the specified location.
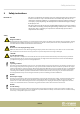
Safety instructions 2 Safety instructions Intended use This device is intended to be used for electronic sound generation using a piano key‐ board. Use the device only as described in this user manual. Any other use or use under other operating conditions is considered to be improper and may result in per‐ sonal injury or property damage. No liability will be assumed for damages resulting from improper use.
Features 3 Features The digital piano is characterized by the following features: 88 weighted keys with hammer action LED display Pitch bend wheel 128-voice polyphony 20 voices 50 styles 60 practice and accompaniment songs 2 demo songs 5 memory locations for user recordings Reverb and Chorus effects Master EQ Melody and accompaniment functions Split, duet and duo mode Metronome Transpose function Built-in speakers Connections: 2 × headphone output, MIDI out, USB-MIDI, sustain pedal, Aux IN, Aux OUT n Oper
Assembly instructions 4 Assembly instructions Unpack and check carefully there is no transportation damage before using the unit. Keep the equipment packaging. To fully protect the product against vibration, dust and moisture during transportation or storage use the original packaging or your own packaging material suitable for transport or storage, respectively. Set up the device in the desired location. Voltage supply The unit is powered by the included 12 V power supply.
Control panel and connections 5 Control panel and connections Overview ö ' # & $ ö % 1 Built-in speakers. 2 Music stand holder 3 Control panel with function keys and display. 4 Claviature with 88 keys. 5 2 × connection sockets for headphones. 6 Pitch bend wheel for changing the pitch. Operating panel ( ) * + , - .
Control panel and connections Tab. 1: Operating elements and function keys with single assignment 7 Button to turn the piano on and off. 8 [VOLUME] Rotary volume control. 17 Display. 21 [DUET] Enables / disables the duet function. 25 [SHIFT] Enables the second button function in combination with one of the buttons [18] … [20] and [22] … [24]. 26 Direct select buttons for voices. Tab. 2: Function keys with double assignment normal / MIDI operation No.
Control panel and connections No. Button Single function Function in combination with [SHIFT] 19 [STYLE] Enables / disables the style mode. Enables / disables the dual mode. Enables / disables the song mode. Enables / disables the split mode. Decreases the displayed value. Enables / disables the TWINOVA mode. Increases the displayed value. Enables / disables the selection of historic tunings. Enables / disables the transpose function. Enables / disables the harmony mode.
Control panel and connections Claviature function buttons < = BEEP PEDAL RESONANCE > TOUCH Press [SHIFT] to enable the following claviature buttons: ? A BCD TUNE OCTAVE TYPE E SCALE ROOT REVERB ON / OFF 27 [BEEP] Turns the key beep of the function keys on and off. 28 [PEDAL RESONANCE] Enables / disables the resonance function for a connected sustain pedal. 29 [TOUCH] Key to adjust the touch sensitivity. 30 [TUNE] Button for fine tuning the claviature.
Control panel and connections 36 [CHORUS] Buttons for enabling / disabling the chorus effect and to select the chorus type. 37 [EQ] Buttons for selecting a preprogrammed tone colour (EQ type). 38 [DUET] Button for selecting a preprogrammed duet accompaniment (duet type). 39 [HARMONY] Buttons for selecting a preset in harmony mode. 40 [MELODY OFF] Buttons for enabling / disabling the practice mode and to mute the right or left hand voice. 41 [METRONOME] Buttons for selecting the metronome sound.
Control panel and connections Rear panel connections Q R S T U V 47 [USB] USB interface to connect a computer. 48 [MIDI OUT] MIDI out for connecting an external MIDI device. 49 [SUSTAIN] Sustain pedal connection (1/4" phone jack). 50 [AUX IN] Input socket for connecting an external audio device (e.g. MP3 or CD player) (1/4" phone jack). 51 [AUX OUT] Output socket for connecting the digital piano to an amplifier, stereo system, mixer or recording device (1/4" phone jack).
Connectivity options 6 Connectivity options Headphones To the left beneath the keyboard you find the headphones outlets 1 and 2. Connecting headphones (not supplied) to outlet 2 mutes the speakers. Using outlet 1 maintains the sound output through the speakers. External audio devices via AUX OUT Use the [AUX OUT] socket to connect the digital piano to an amplifier, stereo device, mixing console or recording device.
Connectivity options Sustain pedal Use the connection socket [SUSTAIN] to connect a sustain pedal to the digital piano. Pedalry Use the connection socket on the bottom of the digital piano to connect the triplepedal (Sustain, Sostenuto and Soft) of the optional Thomann original stand (item no. 352262).
Switching on / off and basic operation 7 Switching on / off and basic operation 7.1 Switching the digital piano on 7.1.1 Normal switching on / off Press the power button on the left of the operating panel to turn the digital piano on or off. 7.1.2 Automatic shutoff When the digital piano is not being used for 30 minutes, it switches off automatically. To turn it on again, press the on / off switch on the left of the operating panel.
Switching on / off and basic operation Setting Meaning [2] Normal This setting corresponds to the usual touch response of a claviature. [3] Hard In this setting, the volume is lower than usual even when playing with a hard touch. Keep the [SHIFT] button pressed and press one of the piano keys in the [TOUCH] area to adjust the touch sensitivity. 7.4 Fine tuning With this function you can fine tune the entire keyboard. 1.
Switching on / off and basic operation 7.6 Metronome 1. Turning the metronome on / off Press the function button [METRONOME] to turn the Metronome on or off. When the Metronome is enabled, the LEDs of the [START/STOP] button light up. The red LED will blink with the downbeats. The green LED will blink with the upbeats. 2. Setting the tempo See Ä Chapter 7.7 ‘Tempo’ on page 20. 3.
Switching on / off and basic operation 7.8 Transposing With this function you can adjust the pitch of the claviature in semitone steps one octave up or down. 1. Press [TRANSPOSE]. ð The display shows the set value. 2. Use the buttons [NO] and [YES] to adjust the pitch in a range from ‘–05’ … ‘07’ . 3. Press [NO] and [YES] simultaneously to reset the pitch back to factory defaults. 7.9 Resonance effect This effect simulates the lifting of the damper in an analogue keyboard instrument.
Switching on / off and basic operation 7.10.2 Piano key in the [REVERB] area in the [CHORUS] area [3] Large hall Strong Chorus effect [4] Delay Flanger effect [5] Right / left delay Rotating Equalizer The digital piano offers five different EQ presets to select a specific tone colour. Keep the [SHIFT] button pressed and select the desired tone colour with the piano keys [EQ].
Switching on / off and basic operation 7.12 Demo pieces The demo songs incorporated in the digital piano show the sound and the pitch range of the instrument. 1. Press [DEMO] to start playing the demo songs in a continuous loop. ð The display shows ‘d-1’ . The [DEMO] button LED lights. 2. Use [NO] and [YES] to toggle between both demo songs. 3. Press [DEMO] again to stop playing the demo songs. ð The [DEMO] button LED goes out. 7.
Switching on / off and basic operation When the keyboard is split, the Dual mode affects only the keys to the right of the keyboard split point. 7.15 Duet mode In Duet Mode, you can play a complete melody accompaniment by the digital piano automatically by playing a chord with your left hand. 1. Enabling Duet mode Use [DUET] to change to Duet mode. ð The [DUET] button LED lights. The display shows the set Duet type for two seconds, e.g. ‘d01’ and then returns to normal. 2.
Switching on / off and basic operation 2. Preset selection Keep the [SHIFT] button pressed and select one of the three presets with the piano keys [HARMONY]. 7.17 Preset Display 1+5 ‘H-1’ Octave 1 ‘H-2’ Octave 2 ‘H-3’ Split mode With this function you can split the claviature into two areas and assign different voices. By default, the bass voice is left of the split point. 1. If desired, individually specify the split point as described at Ä Chapter 7.5 ‘Split point setting’ on page 19. 2.
Switching on / off and basic operation 4. Octave area setting Keep the [SHIFT] button pressed and specify the desired octave range with the piano keys [OCTAVE]. ð The display shows the selected range, e.g. ‘1’ . 7.19 Playing with accompaniment The digital piano features 50 styles to choose from, see Ä Chapter 9 ‘Styles list’ on page 36. 7.19.1 Style selection 1. Use [STYLE] to switch to Style selection. ð The display shows the currently selected Style ( ‘00.1’ by default).
Switching on / off and basic operation 7.19.3 Fill A/B With this function you can insert fill bars in accompaniment mode. 1. In NORMAL mode (main part A), press [FILL A/B] to insert a fill bar. The [FILL A/B] button LED is flashing. After the bar has ended, the digital piano changes to main part B. Die [FILL A/B] button LED lights. 2. In VARIATION mode (main part B), press [FILL A/B] to insert a fill bar. The [FILL A/B] button LED is flashing.
Switching on / off and basic operation 7.20.1 Playing practise songs 1. Use [SONG] to switch to the practise song playback mode. The [SONG] button LED lights. If you press the [SONG] button again all practise songs are played sequentially in a continuous loop. If you press the [START/STOP] button the currently displayed practise song will be repeated in a continuous loop. During playback, the LEDs of the [START/STOP] button are flashing. The red LED will blink with the downbeats.
Switching on / off and basic operation 2. Right hand practise Use [SONG] to switch to the practise song playback mode. The [SONG] button LED lights. Simultaneously press [SHIFT] and the piano key [R] in the [MELODY OFF] area to mute the area to the right of the split point of the claviature for practising the right hand. 3. Leaving Practise mode Press the [OFF] button in the [MELODY OFF] area to exit the Practise mode. 7.
Switching on / off and basic operation 2. Recording with accompaniment Press the [START/STOP] button in record enable mode to start recording. The chord mode (A.B.C.) is automatically enabled at the same time. The recording starts as soon as you play the first chord in the chord area to the left of the split point of the claviature ( Ä Chapter 7.5 ‘Split point setting’ on page 19). The current recording can be interrupted with [START/STOP] at any time.
Switching on / off and basic operation 7.21.6 Deleting all recordings 1. Turn off the digital piano. 2. When turning it back on again, keep the buttons [RECORD] and [PLAY/STOP] pressed. ð All user songs will be deleted without further confirmation prompt. 7.22 Historic tunings With this function, you can experiment with different historical tunings when playing certain musical genres that have not been composed based on equal temperament. 7.23 7.23.1 1.
Switching on / off and basic operation 2. Heed the following guidelines when connecting instruments to a computer via USB. Otherwise, the instrument or the computer may ‘crash’, which can result in data loss. If a ‘crash’ should occur, turn off computer and instrument and restart both after a few seconds. – – 7.23.3 MIDI connection MIDI IN 7.23.4 If the computer is in standby or hibernation, wake the computer before connecting the USB cable.
Switching on / off and basic operation 7. MIDI values Press [DATA] to enter a MIDI value. The display shows the current setting, the dot behind the [STYLE] display lights up. Use the piano keys [0] … [9] in the [MIDI] area to enter a value between 000 … 127. 8. Channel assignment Press [CHANNEL] to assign a MIDI channel. The display shows the current set‐ ting, the dot behind the [SONG] display lights up. Use the piano keys [0] … [9] in the [MIDI] area to enter a channel number between 01 … 16. 7.
Practise and demo songs 8 Practise and demo songs No. Name No. Name 001 Waltz in G-sharp Minor (Op.39 No.3) 031 Mazurka 002 The Happy Farmer 032 Minuet 1 003 Etude 033 Minuet 2 004 Dance Of The Four Swans From ‘Swan Lake’ 034 Minuet 3 005 Carmen Suite No.
Practise and demo songs Tab. 4: Demos No.
Styles list 9 Styles list No. Name No. Name No.
Voice list 10 No. Voice list Name Piano No. Name No. 008 Vibraphone Guitar 001 Grand Piano Organ 002 Grand Piano 2 009 003 Ele. Piano 004 Name 016 Acoustic Guitar (nylon) Percussive Organ 017 Electric Guitar (clean) 010 Drawbar Organ Bass Ele. Piano 2 011 Church Organ 018 005 Ele.
MIDI implementation chart 11 MIDI implementation chart Function Basic Channel Mode Note Number Velocity Note Sent Received Default 1 ALL Changed 1-16 1-16 Default No Mode 3 Messages No Mode 3 Altered *********** No Note 0 – 127 0 – 127 True voice ******** 0 – 127 Note ON Yes, 9nH, Yes, 9nH, v = 1 – 127 v = 1 – 127 No, 9nH, Yes, 9nH, v=0 v = 0 or 8nH, v = 0 – 127 Keys No No Channels No No No Yes 0 Yes Yes Bank Select 1 No Yes Modulation 5 No Yes Porta
MIDI implementation chart Function Program Change Sent Received Yes Yes *********** 0 – 127 No Yes Song Position Pointer No No Song Select No No Tune Request No No Clock Yes No Commands No *1 No *1 Local ON/OFF No No ALL Notes OFF Yes Yes Active Sensing Yes Yes System Reset No Yes True # System Exclusive System Common System Real Time Aux Messages MIDI channel modes Notes POLY MONO OMNI ON Mode 1 Mode 2 OMNI OFF Mode 3 Mode 4 DP-26 39
Technical specifications 12 Technical specifications Input connections Output connections Keyboard Power supply Connection socket for external power adapter Sustain pedal 1 × 1/4" jack socket AUX In 1 × 1/4" jack socket Headphones 2 × 1/4" jack socket MIDI port USB to host MIDI Out 1 × DIN socket, 5 pin AUX Out 1 × 1/4" jack socket 88 weighted keys with hammer action Touch sensitivity adjustable Polyphony 128-voice Sounds 20 Styles 50 Effects Master EQ, Chorus, Reverb Modes Spl
Technical specifications Further information Colour Black Surface Matt Bag Suitable bags optionally available (item no. 394939 and item no. 146377) Protective cover Suitable protective cover optionally available (item no.
Plug and connection assignment 13 Plug and connection assignment Introduction This chapter will help you select the right cables and plugs to connect your valuable equipment in such a way that a perfect sound experience is ensured.
Protecting the environment 14 Protecting the environment Disposal of the packaging material For the transport and protective packaging, environmentally friendly materials have been chosen that can be supplied to normal recycling. Ensure that plastic bags, packaging, etc. are properly disposed of. Do not just dispose of these materials with your normal household waste, but make sure that they are collected for recycling. Please follow the notes and markings on the packaging.
Notes digital piano 44
Notes DP-26 45
Notes digital piano 46
Musikhaus Thomann · Hans-Thomann-Straße 1 · 96138 Burgebrach · Germany · www.thomann.