
User Manual
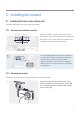
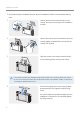
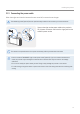

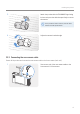
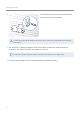

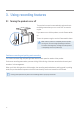

Table Of Contents
- Safety information
- 1. Product overview
- 2. Installing the product
- 3. Using recording features
- 4. Using Advanced Driver Assistance Systems (ADAS)
- 5. Settings
- 5.1 Setting the camera
- 5.2 Setting recording features
- 5.2.1 Setting the continuous impact detection sensitivity (cont. sensitivity)
- 5.2.2 Setting parking mode
- 5.2.3 Setting the Super Night Vision feature
- 5.2.4 Setting the parking impact sensitivity (parking sensitivity)
- 5.2.5 Setting the motion detection sensitivity (motion sensitivity)
- 5.2.6 Setting the record timer feature (Off Timer)
- 5.2.7 Setting the battery protection feature (battery protection)
- 5.2.8 Setting the battery cutoff voltage feature (Off voltage)
- 5.2.9 Setting the battery protection feature for wintertime (Wt Bty Protection)
- 5.3 Setting Road Safety Settings (ADAS)
- 5.3.1 Setting the safety cameras
- 5.3.2 Setting the mobile zone alert
- 5.3.3 Identifying the vehicle type
- 5.3.4 Initializing the ADAS calibration setting (ADAS Settings)
- 5.3.5 Initializing ADAS calibration
- 5.3.6 Setting the lane departure warning feature (LDWS)
- 5.3.7 Setting the lane departure detection speed (LDWS speed)
- 5.3.8 Setting the forward collision detection sensitivity (FCWS)
- 5.3.9 Setting the low speed forward collision detection sensitivity (Low Speed FCWS)
- 5.3.10 Setting front vehicle departure warning (FVDW)
- 5.3.11 Setting the ADAS Volume
- 5.4 Configuring the system settings
- 5.4.1 Setting the display language
- 5.4.2 Adjusting the system volume
- 5.4.3 Resetting the touchscreen (Calibrate Touchscreen)
- 5.4.4 Adjusting the screen brightness (LCD Brightness)
- 5.4.5 Setting the LCD Auto-Off
- 5.4.6 Setting the security LED
- 5.4.7 Setting the time zone
- 5.4.8 Setting the date (Set Date)
- 5.4.9 Setting the time (Set Time)
- 5.4.10 Setting the daylight saving time
- 5.4.11 Setting the speed unit
- 5.4.12 Setting the speed stamp
- 5.4.13 Partitioning the memory card
- 5.4.14 Formatting the memory card
- 5.4.15 Configuring the video overwriting function
- 5.4.16 Initializing the system settings (Reset Settings)
- 6. Accessing the product information
- 7. Upgrading the firmware
- 8. Using the PC viewer
- 9. Troubleshooting
- 10. Specifications

Installing the product
15
3
THINKWARE
Attach the product with the THINKWARE logo facing
indoors and press the adhesive tape firmly to secure
the camera.
If the product is fixed in reverse, the rear view
will be recorded upside down.
4
THINKWARE
Adjust the camera's vertical angle.
2.2.3 Connecting the rear camera cable
Power off the product and connect the rear camera cable to the front camera (main unit).
1
Connect one end of the rear camera cable to the
front camera’s V-IN connector.