
User Manual
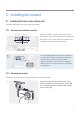
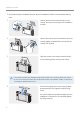
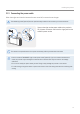

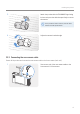
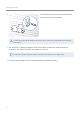

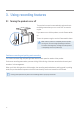

Table Of Contents
- Safety information
- 1. Product overview
- 2. Installing the product
- 3. Using recording features
- 4. Using Advanced Driver Assistance Systems (ADAS)
- 5. Settings
- 5.1 Setting the camera
- 5.2 Setting recording features
- 5.2.1 Setting the continuous impact detection sensitivity (cont. sensitivity)
- 5.2.2 Setting parking mode
- 5.2.3 Setting the Super Night Vision feature
- 5.2.4 Setting the parking impact sensitivity (parking sensitivity)
- 5.2.5 Setting the motion detection sensitivity (motion sensitivity)
- 5.2.6 Setting the record timer feature (Off Timer)
- 5.2.7 Setting the battery protection feature (battery protection)
- 5.2.8 Setting the battery cutoff voltage feature (Off voltage)
- 5.2.9 Setting the battery protection feature for wintertime (Wt Bty Protection)
- 5.3 Setting Road Safety Settings (ADAS)
- 5.3.1 Setting the safety cameras
- 5.3.2 Setting the mobile zone alert
- 5.3.3 Identifying the vehicle type
- 5.3.4 Initializing the ADAS calibration setting (ADAS Settings)
- 5.3.5 Initializing ADAS calibration
- 5.3.6 Setting the lane departure warning feature (LDWS)
- 5.3.7 Setting the lane departure detection speed (LDWS speed)
- 5.3.8 Setting the forward collision detection sensitivity (FCWS)
- 5.3.9 Setting the low speed forward collision detection sensitivity (Low Speed FCWS)
- 5.3.10 Setting front vehicle departure warning (FVDW)
- 5.3.11 Setting the ADAS Volume
- 5.4 Configuring the system settings
- 5.4.1 Setting the display language
- 5.4.2 Adjusting the system volume
- 5.4.3 Resetting the touchscreen (Calibrate Touchscreen)
- 5.4.4 Adjusting the screen brightness (LCD Brightness)
- 5.4.5 Setting the LCD Auto-Off
- 5.4.6 Setting the security LED
- 5.4.7 Setting the time zone
- 5.4.8 Setting the date (Set Date)
- 5.4.9 Setting the time (Set Time)
- 5.4.10 Setting the daylight saving time
- 5.4.11 Setting the speed unit
- 5.4.12 Setting the speed stamp
- 5.4.13 Partitioning the memory card
- 5.4.14 Formatting the memory card
- 5.4.15 Configuring the video overwriting function
- 5.4.16 Initializing the system settings (Reset Settings)
- 6. Accessing the product information
- 7. Upgrading the firmware
- 8. Using the PC viewer
- 9. Troubleshooting
- 10. Specifications

Installing the product
12
2
After determining the installation location, wipe the installation location on the windshield with dry
cloth.
3
1
2
Remove the film from the adhesive tape on the
bracket, and then press the tape to the installation
location.
4
1
2
Remove the product from the bracket and push the
bracket against the windshield to ensure that the
bracket is firmly fixed.
5
Align the product to the bracket, and then slide it
into the locking position until you hear a click.
•The product may fall and be damaged during vehicle operation if it is not firmly fixed to the bracket.
•If you need to remove the bracket from the windshield to alter the installation location, be careful not
to damage the windshield’s film coat.
6
Set the vertical angle of the camera appropriately
and temporarily fix it by lightly turning the fixing
screw.
The camera angle must be adjusted again after the
installation is complete. Do not completely tighten
the fixing screw yet.