
User's Manual


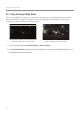
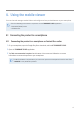


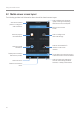
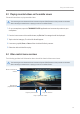

Table Of Contents
- Safety information
- 1. Product overview
- 2. Installing the product
- 3. Using recording features
- 4. Using the mobile viewer
- 4.1 Connecting the product to a smartphone
- 4.2 Mobile viewer screen layout
- 4.3 Playing recorded videos on the mobile viewer
- 4.4 Video control menu overview
- 4.5 Cloud service
- 4.5.1 Log in to the THINKWARE account
- 4.5.2 Locating the vehicle
- 4.5.3 Setting Geo-Fence
- 4.5.4 Using the strong impact notification while driving feature
- 4.5.5 Using the impact notification while parked feature
- 4.5.6 Using the strong impact notification while parked feature
- 4.5.7 Viewing impact videos on the cloud service
- 5. Using the PC viewer
- 6. Settings
- 6.1 Managing the memory card
- 6.2 Setting the camera
- 6.3 Setting recording features
- 6.3.1 Setting the continuous impact detection sensitivity
- 6.3.2 Setting the Super Night Vision feature
- 6.3.3 Setting parking mode
- 6.3.4 Setting the impact sensitivity in parking mode
- 6.3.5 Setting the motion detection sensitivity
- 6.3.6 Setting the record timer feature
- 6.3.7 Setting the battery protection feature
- 6.3.8 Setting the battery cutoff voltage feature
- 6.3.9 Setting the battery protection feature for wintertime
- 6.3.10 Setting RADAR
- 6.4 Setting road safety features
- 6.4.1 Setting the safety cameras
- 6.4.2 Setting the mobile zone alert
- 6.4.3 Identifying the vehicle type
- 6.4.4 Initializing the ADAS calibration setting
- 6.4.5 Setting the lane departure warning sensitivity
- 6.4.6 Setting the lane departure detection speed
- 6.4.7 Setting the forward collision detection sensitivity
- 6.4.8 Setting the low speed forward collision detection sensitivity
- 6.4.9 Setting front vehicle departure warning
- 6.5 Configuring the system settings
- 6.5.1 Setting the display language
- 6.5.2 Adjusting the system volume
- 6.5.3 Setting the Security LED
- 6.5.4 Setting the rear camera LED
- 6.5.5 Setting the time zone
- 6.5.6 Setting the daylight saving time
- 6.5.7 Setting the speed unit
- 6.5.8 Setting the speed stamp
- 6.5.9 Setting the Wi-Fi frequency
- 6.5.10 Setting the voice recording
- 6.6 Configuring network function settings
- 6.6.1 Setting the network function
- 6.6.2 Setting sensitivity for strong impact notification while driving
- 6.6.3 Setting driving impact video upload
- 6.6.4 Setting impact notification while parked
- 6.6.5 Setting sensitivity for strong impact notification while parked
- 6.6.6 Setting strong impact video while parked upload
- 7. Accessing the product information
- 8. Upgrading the firmware
- 10. Troubleshooting
- 11. Specifications

Using the mobile viewer
26
4.1.2 Connecting the product to a smartphone on Android 9 or later and on iOS
Before connecting the product to your smartphone,
• on an Android smartphone, open the Google Play Store, download and install THINKWARE CLOUD
application.
• on an iOS smartphone, open the Apple App Store, download and install THINKWARE CLOUD application.
Connecting via Wi-Fi
1
On your smartphone, open the THINKWARE CLOUD application.
2
At the bottom of the screen, tap Dash cam connection is required.
3
Select a dash cam model to connect to your smartphone.
4
Tap Connect in the Wi-Fi connection area at the top of the screen, and on the Wi-Fi activating screen,
tap Next.
5
Press the Wi-Fi ( ) button on the product. And then,
• on an Android smartphone, go to Connections
>
Wi-Fi.
• on an iOS smartphone, go to Settings
>
Wi-Fi.
6
From the network list, select the Wi-Fi network starting with “Thinkware” and enter “123456789” in
the password field. For security purposes, change the Wi-Fi password after connecting to the Wi-Fi
network.
7
Return to the THINKWARE CLOUD application and check Connected via Wi-Fi – dash cam model name
at the bottom of the main screen. The product is now connected to the application.