
User's Manual
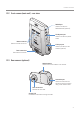
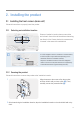


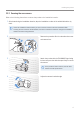
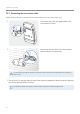


Table Of Contents
- Safety information
- 1. Product overview
- 2. Installing the product
- 3. Using recording features
- 4. Using the mobile viewer
- 4.1 Connecting the product to a smartphone
- 4.2 Mobile viewer screen layout
- 4.3 Playing recorded videos on the mobile viewer
- 4.4 Video control menu overview
- 4.5 Cloud service
- 4.5.1 Log in to the THINKWARE account
- 4.5.2 Locating the vehicle
- 4.5.3 Setting Geo-Fence
- 4.5.4 Using the strong impact notification while driving feature
- 4.5.5 Using the impact notification while parked feature
- 4.5.6 Using the strong impact notification while parked feature
- 4.5.7 Viewing impact videos on the cloud service
- 5. Using the PC viewer
- 6. Settings
- 6.1 Managing the memory card
- 6.2 Setting the camera
- 6.3 Setting recording features
- 6.3.1 Setting the continuous impact detection sensitivity
- 6.3.2 Setting the Super Night Vision feature
- 6.3.3 Setting parking mode
- 6.3.4 Setting the impact sensitivity in parking mode
- 6.3.5 Setting the motion detection sensitivity
- 6.3.6 Setting the record timer feature
- 6.3.7 Setting the battery protection feature
- 6.3.8 Setting the battery cutoff voltage feature
- 6.3.9 Setting the battery protection feature for wintertime
- 6.3.10 Setting RADAR
- 6.4 Setting road safety features
- 6.4.1 Setting the safety cameras
- 6.4.2 Setting the mobile zone alert
- 6.4.3 Identifying the vehicle type
- 6.4.4 Initializing the ADAS calibration setting
- 6.4.5 Setting the lane departure warning sensitivity
- 6.4.6 Setting the lane departure detection speed
- 6.4.7 Setting the forward collision detection sensitivity
- 6.4.8 Setting the low speed forward collision detection sensitivity
- 6.4.9 Setting front vehicle departure warning
- 6.5 Configuring the system settings
- 6.5.1 Setting the display language
- 6.5.2 Adjusting the system volume
- 6.5.3 Setting the Security LED
- 6.5.4 Setting the rear camera LED
- 6.5.5 Setting the time zone
- 6.5.6 Setting the daylight saving time
- 6.5.7 Setting the speed unit
- 6.5.8 Setting the speed stamp
- 6.5.9 Setting the Wi-Fi frequency
- 6.5.10 Setting the voice recording
- 6.6 Configuring network function settings
- 6.6.1 Setting the network function
- 6.6.2 Setting sensitivity for strong impact notification while driving
- 6.6.3 Setting driving impact video upload
- 6.6.4 Setting impact notification while parked
- 6.6.5 Setting sensitivity for strong impact notification while parked
- 6.6.6 Setting strong impact video while parked upload
- 7. Accessing the product information
- 8. Upgrading the firmware
- 10. Troubleshooting
- 11. Specifications

Installing the product
19
2.3 Installing the RADAR module (optional)
Refer to the following instructions to properly install the RADAR module. Install the RADAR module near the
product, taking the module's cable length into account.
•When the RADAR module (optional) detects an object in the radar area, Energy Saving is switched off and
the impact detection is set for 30 seconds. (If there is no impact detected, the product does not store the
recording and switches back to Energy Saving.)
•If an object and impact are detected in the radar area, a video is recorded for 20 seconds and stored in
the “parking_rec” folder. (The buzzer will sound.) When the recording ends, the product switches back to
Energy Saving.
1
Remove the film on the back of the RADAR module.
2
Attach the RADAR module’s adhesive surface to
the upper part of the front windshield and press the
adhesive part firmly to secure it.
Before installation, make sure the RADAR
module’s cable length is sufficient and check
the cable routing path.
3
Connect the RADAR module to the product’s RADAR
connector.
Check the RADAR connector location again
before connecting the module. If you connect
the THINKWARE Connected Dongle to the DC-
IN power connector, the pins inside the port
may be damaged.
4
Turn on the ACC or starts the engine to check that the product is powered on. After the product is
powered on, the recording LED(REC) and the voice guide are turned on.