
Owner's Manual
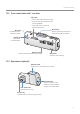
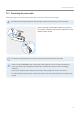

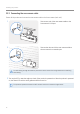
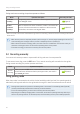
Table Of Contents
- User Guide
- Safety information
- 1. Product overview
- 2. Installing the product
- 3. Using recording features
- 4. Using the mobile viewer
- 5. Using the PC viewer
- 6. Settings
- 6.1 Managing the memory card
- 6.2 Setting the camera
- 6.3 Setting recording features
- 6.3.1 Setting the continuous impact detection sensitivity
- 6.3.2 Setting parking mode
- 6.3.3 Setting the impact sensitivity in parking mode
- 6.3.4 Setting the motion detection sensitivity
- 6.3.5 Setting the record timer feature
- 6.3.6 Setting the battery protection feature
- 6.3.7 Setting the battery cutoff voltage feature
- 6.3.8 Setting the battery protection feature for wintertime
- 6.4 Setting road safety features
- 6.5 Configuring the system settings
- 7. Accessing the product information
- 8. Upgrading the firmware
- 9. Troubleshooting
- 10. Specifications
- Quick Start Guide
- Warranty

Product overview
11
1.2.2 Front camera (main unit) - rear view
Wi-Fi button
Press to connect the product to a
smartphone via Wi-Fi network.
STATUS LED
Indicates the
recording status.
Wi-Fi LED
Indicates the Wi-Fi
connection status.
Microphone
Used for voice recording.
Memory card slot
Insert a memory card to save recordings.
REC button
• Short Press: Starts manual recording
• Press and hold for 3 seconds: Audio
recording ON/OFF
• Press and hold for 5 seconds:
Memory card format
1.2.3 Rear camera (optional)
Adhesive mount
Used to fix the rear camera in the vehicle.
Rear camera lens
Records the rear view.
Security LED
Indicates that the video is being recorded.
Connection port
Used to connect the rear
camera to the front camera
using a rear camera cable.