875-0068-07 RevA Universal Reader Assistant User Guide Version 2.6 - Supported Hardware: • • • • M6 and Astra-EX (firmware v4.19.2 and later) M6e (firmware v1.13.1 and later) Micro (firmware v1.3 and later) M5e, Compact, USB and Vega (firmware v1.7.
Government Limited Rights Notice: All documentation and manuals were developed at private expense and no part of it was developed using Government funds. The U.S. Governmentʼs rights to use, modify, reproduce, release, perform, display, or disclose the technical data contained herein are restricted by paragraph (b)(3) of the Rights in Technical Data — Noncommercial Items clause (DFARS 252.227-7013(b)(3)), as amended from time-to-time.
Contents Introduction. . . . . . . . . . . . . . . . . . . . . . . . . . . . . . . . . . . . . . . . . . . . . . . . . . . . . . .5 Usage Workflow . . . . . . . . . . . . . . . . . . . . . . . . . . . . . . . . . . . . . . . . . . . . . . . . . . .6 Installing URA . . . . . . . . . . . . . . . . . . . . . . . . . . . . . . . . . . . . . . . . . . . . . . . . . . . .7 Standalone Application . . . . . . . . . . . . . . . . . . . . . . . . . . . . . . . . . . . . . . . . . . .
Tag Operations . . . . . . . . . . . . . . . . . . . . . . . . . . . . . . . . . . . . . . . . . . . . . . . . . . .24 Workflows . . . . . . . . . . . . . . . . . . . . . . . . . . . . . . . . . . . . . . . . . . . . . . . . . . . .24 Write EPC . . . . . . . . . . . . . . . . . . . . . . . . . . . . . . . . . . . . . . . . . . . . . . . . . . . .25 Tag Inspector . . . . . . . . . . . . . . . . . . . . . . . . . . . . . . . . . . . . . . . . . . . . . . . . . .28 User Memory Editor . . . . . . . . . . . . .
Universal Reader Assistant v2.6 User Guide Introduction This document explains how to use the Universal Reader Assistant (URA) application, version 2.6 and later, for testing and performance tuning ThingMagic reader products. URA is written using the high level MercuryAPI in C# .NET. All the source code for URA is available as part of the MercuryAPI SDK. The MercuryAPI supports Java, .NET and C programming environments.
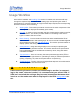
Usage Workflow Usage Workflow Once URA is installed, see Installing URA section for details, this document will step through the required steps in order to start reading tags and optimizing the readerʼs performance for a specific usecase. At a high level the steps required, and corresponding document sections, are as following: ! 1. Starting URA - This section provides an overview of the main components of the URA application displayed immediately upon startup. 2.
Installing URA Installing URA The Universal Reader Assistant application is available in two different packages: Standalone Application URA is available as a standalone application, installed using a Windows installer. Follow these steps to download and install URA: 1. Use a web browser to navigate to http://rfid.thingmagic.com/devkit 2. Find the Universal Reader Assistant link under MercuryAPI | Software and click on it. This will begin download URABonjourSetup32.
Installing URA Apple Bonjour mDNS Discovery Service URA2 uses Appleʼs Bonjour service to discover Bonjour enabled Network Readers. If you do not want Bonjour to be installed simply Cancel out of Bonjour installer once its appears during the URA install and it will not be installed. URA2 will continue to be installed even if Bonjour is cancelled. If not installed the Networked Readers list will be empty during Connect and youʼll need to manually enter the hostname or IP address.
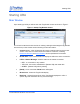
Starting URA Starting URA Main Window Upon starting up URA you will see the main Tag Results screen as shown in Figure 1. Figure 1: Startup Tag Results Screen This screen contains the basic controls for reading, viewing and handling the Tag Results. Across the top of the window are the following controls and status: Connect button - when clicked this will open the settings panel to the connect section.
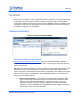
Connect Connect Once the Connect button on the Tag Results screen is clicked the connection options will be displayed. The radio button should be clicked to specify the type of reader being connected to. Please reference the specific productʼs Hardware Guide for details on how to establish a connection to each reader and how to identify the correct URI (hostname, IP Address, COM port, etc.) to identify it.
Connect Note: On some systems, especially when using the Direct to PC connection, the hostname must end in “.local” for the connection to succeed. i.e. m6-21071f.local DHCP on the LAN - the reader should be identifiable using the automatic hostname such as M6-XXXXXX (where XXXXXX is the last 6 digits of the MAC/ LAN address, seen on the barcode label) or using the ass Static IP on the LAN - the assigned IP address should be used.
Connect Serial Readers Figure 4: Connecting to a Serial Reader Finding the assigned COM port In order to connect to a serial reader (USB Reader, Vega, M5e/M6e devkits) the correct COM port must be selected from the drop down next to the Connect button. In order for the associated COM port to be displayed the reader must have been connected to the host prior to starting URA. If not, you can click Refresh to try and re-detect COM ports in use.
Connect Transport Logging For both connection types if Transport Logging is checked a logfile will be created containing all of the low level communication between URA and the reader. This can be very important to diagnosing a support problem. When gathering logs for support it is recommended the following process be followed: 1. Prior to connect, check Transport Logging. 2. Click Connect. 3. Navigate to a filesystem location to save the log file and provide a name. 4.
Connect Save Profile Once connected to a reader, with it working as desired, the full configuration of the reader, including the reader connected to, all read options, performance settings and display settings can be saved to a URAC (URA Config) file by following these simple steps: 1. Click “Save” 2. File manager pops up in URA.exe directory. The default filename field populated with [reader type]_[readername].urac. This maybe changed as desired. 3.
Basic Reading Basic Reading Once connected to a reader you can quickly start reading and obtain immediate feedback using default settings. Simply position one or more tags in front of one of the antennas connected to the reader and: 1. Click Read. This will start a continuous read on all connected antennas in the default configuration. The resulting tags will be displayed in the Tag Results Grid as shown in Figure 5. While reading is active the Status LED will be GREEN. 2.
Basic Reading Tag Results Grid As shown in Figure 5, the default displayed tag results show the following columns of data: # - The order each tag was read. EPC - The EPC ID of the tag, typically 96-bits of data shown in Hex. Timestamp - The timestamp when the tag was last seen during this query. RSSI - The receive signal strength of the tag response, in dBm. ReadCount - The number of times the tag was read on [Antenna].
Settings/Status Settings/Status Upon Connect the Settings/Status slide-out panel, as shown in Figure 6, will be displayed and opened to the Connect section. This panel contains configuration settings for the Tag Results Grid, read behavior and performance tuning, along with status information and a Firmware Upgrade utility.
Settings/Status Antennas • Antennas - The antennas supported by the connected reader will be displayed. Check those to be queried for. When Read is clicked the selected antennas will be cycled through. • Antenna Detection - Will make only antennas with a detected antenna connection available. Uncheck to make all ports available.
Settings/Status Table 2: Performance Metrics Setting Description Unique Tag Count Total number of unique tags found. Total Tag Count Total number of tags read, including re-reads of the same tag. Also displays the time during which those tags were read. ReadRate/Sec Using the Total Tag Count metric, displays the average tags per second. Performance Tuning Options This section provides a set of options, based on high-level usecase characteristics, allowing the reader performance to be optimized.
Settings/Status Tag Response Rate • Select best choice for population size - used the Tag Population size setting to determine best settings. Only recommended to be used if setting an estimated tag population size. • Customize tag response rate - adjust between: – Tags respond more often - tags will re-respond to an ongoing inventory as quickly as possible. Not recommended for large populations of tags.
Settings/Status Tag Results Column Additional Columns of tag read meta data can be selected (click check-box in drop-down menu) to be displayed: • Antenna - The antenna on with the tag was read. If the same tag is read on more than one antenna there will be a tag entry for each antenna on which the tag was read. • Protocol - The protocol of the tag. • Frequency - The frequency on which the tag was read, in kHz.
Settings/Status 3. Click Upgrade. 4. Upon completion the Status message will change to indicate it has completed. Note The latest firmware is always available on http://rfid.thingmagic.com/devkit. It requires a password which can be obtained from ThingMagic Support if you have an active support contract. Note This utility can be used to downgrade firmware also.
Settings/Status Once enabled clients can connect to the specified port. A simple test client to use is a telnet client. On Linux this can be invoked by simply entering: $ telnet [IP address of URA host] 9055 Note On Windows a telnet client applications such as putty or teraterm (both can be found by running a websearch on their name).
Tag Operations Tag Operations Universal Reader Assistant 2 currently supports the following individual Tag Operations: Write EPC Tag Inspector User Memory Editor Lock Tag All Tag Operations Tabs support two main workflows which define what tag will be operated on. Workflows 1. User Clicks on one of the tag operation tabs. This causes the following behavior: First tag to respond is selected. This means when an operation is performed it will be performed on the first tag to respond.
Tag Operations Note The best way to guarantee the select identifies a single tag is to add an Embedded ReadData on TID memoryʼs Unique Identifier portion (use length =0) to your Read operation and right-click on the resulting Data cell in the Tag Results Grid. Once in a tag operations tab most of the Settings/Status options do not apply and will be disabled. Write EPC The Write EPC tag operation tab allows the EPC of specific tags to be updated.
Tag Operations Example The following shows a typical scenario of writing a tagʼs EPC ID using Workflows 2, selecting a specific tag: 1. A Read operation was performed with an Embedded ReadData on the TID memory bank resulting in the tags as shown in Figure 10. Figure 10: Tag Results - Tag Operation Workflow 2 2. Right-click on the TID value and select WriteEPC. The tab will switch to the WriteEPC tab with the Select criteria as shown in Figure 11.
Tag Operations Figure 11: Write EPC Workflow 2 4. Once a New EPC is entered and Write clicked, if successful, a follow-up Read should show the newly written EPC, as shown in Figure 12. Figure 12: WriteEPC Successful Write and Read Note If the EPC ID is used for Select (right-click on the EPC cell) the Read operation will not work following a successful write. In general, using the current EPC ID as a Universal Reader Assistant v2.
Tag Operations select criteria for a write EPC is a bad idea since the operation cannot be easily retried in the event of a partial write. Tag Inspector The Tag Inpector tab allows the full contents of a tagʼs memory banks to be displayed in context. Once the tag to operate on has been set the Tag Inspector will read the full contens of all the memory banks of the tag, as long as they exist and are not read-locked and display them as shown in Figure 13.
Tag Operations Figure 13: Tag Inspector User Memory Editor The User Memory Editor tag operation tab allows the contents of User Memory of specific tags to be viewed and updated. The tag the operation will be applied to follows the rules defined in the two Tag Operations Workflows. Once the tag to operate on has been set the User Memory Editor tab supports the following workflow: 1.
Tag Operations Figure 14: Addressible Hex Editor ASCII Notepad - interprets the data on the tag as ASCII characters. In this mode the data can be displayed and edited as if it were a text file in a text editor. Modified, but not yet written, data will be shown in red. Figure 15: ASCII Notepad Editor Universal Reader Assistant v2.
Tag Operations Note: While typing in ASCII Notepad Editor the total space and remaining space available will be shown in red. 2. Once confident the desired data is setup to be written to, clicking the Write to Tag button will cause the data to be written to the tagʼs User Memory Bank. W A R N I N G ! In URA v2.3 when a Write to Tag is clicked, whether in the ASCII Editor or Hex Editor the entire contents of the User Memory will be written as shown in the editor. It WILL NOT only write modified data.
Tag Operations Figure 16: Lock Tag Operation Note It is not possible to request the current lock status from a Gen2 tag. For this reason the Lock Tag tab cannot show the current lock state. It can only be used to request new locking states be applied. Universal Reader Assistant v2.
Troubleshooting Troubleshooting Troubleshooting Table Problem Table 5: Common Problems and Solutions Path to Solution Cannot connect to reader • Verify the hostname, IP address or COM port is correct. See the hardware specific guide for more details on setting up a connection. • For the M6 and Astra-EX the reader control communicate uses the LLRP interface which uses network port 5084. Verify 5084 is not being blocked by the network firewall.
Troubleshooting 1. Transport Logging: Follow the steps to collect transport logs. 2. Collect the Error Log saved in [Windows Start menu] | Documents | URA | tmrlog_[timestamp].txt 3. Reader Serial Number: See the 2d barcode label. 4. Reader Diagnostics 5. Boot Logs (if using a networked reader): Follow the process for collecting boot logs described in the hardware user guide, reboot the reader and save the full output from the console. 6.