BUILD IN APPLIANCES FOR USE WITH UNIVERSAL LPG ONLY CAUTION – ALL OUTER SURFACES WILL GET HOT WHEN IN USE Models S~OG72000Z SD Duplex Oven&Grill S~OV72000Z SD Oven Only USER AND INSTALLATION INSTRUCTIONS PLEASE READ THOROUGHLY AND KEEP FOR FUTURE REFERENCE INS 1002Z– Issue 3 FOR USE IN AUSTRALIA THETFORD AUSTRALIA PTY LTD 41 LARA WAY CAMPBELLFIELD VIC TEL: 03 9358 0700 FAX: 03 9357 7060
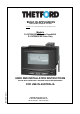
Gas - Universal LPG Only 2.75 Kpa This appliance is designed for use with Universal LPG and should not be converted for use with any other gas Use only the Gas Pressures specified This appliance MUST be earthed All cooking appliances become hot during use. It is important the installer verifies the furniture construction material and that it is suitable for the application - i.e.
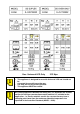
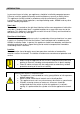
Fig. 1 Control Positions for Grill Operation OFF Fig.
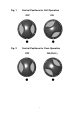
Fig.
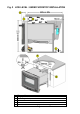
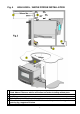
Fig. 4 HIGH LEVEL / ABOVE FRIDGE INSTALLATION A Dimensions between 110mm (Min) & 170mm a protective heat shield MUST be fitted. Above 170mm we advise verification test before installing without plate B Air gaps must be maintained C Gas escape hole, baffled - Caravan side.
INTRODUCTION In your own interest of safety, gas appliances should be installed by competent persons. Failure to install the appliance correctly could invalidate any warranty or liability claims. This appliance shall be installed in accordance with the manufacturer’s installation instructions, local gas fitting regulations, municipal building codes, AG5601 and any other relevant statutory regulations.
OPERATION Operation of the Door This appliance is fitted with our unique slide under door. As you open the door fully, it slides neatly under the oven. This feature maximises the space in the kitchen area by reducing the protruding door, giving easy access to the inside of the oven. To open the door:1. Pull the handle forward and down, as with any other drop down door 2. When in fully open position push the door horizontally to slide the door in. 3.
OPERATION Using the Grill - cont. On first use of the grill, it should be heated for about 20 minutes to eliminate any residual factory lubricants that might impart unpleasant smells to the food being cooked. A nontoxic smoke may occur when using for the first time so open any windows and turn on mechanical ventilators to help remove the smoke. Although the grill does heat up quickly, it is recommended that a few minutes preheat be allowed.
OPERATION 7. To turn off: turn the control knob clockwise until the circle on the control knob is aligned with the dot on the control panel. 8. To remove a shelf, pull forward until it stops, raise at front and remove. On first use of the oven, it should be heated for about 30 minutes at gas mark 5 to eliminate any residual factory lubricants that might impart unpleasant smells to the meals being cooked.
OPERATION Do's and Don'ts DO DO DO DO DO DO DO NOT DO NOT DO NOT DO NOT DO NOT DO NOT DO NOT read the user instructions carefully before using appliance for the first time. allow the oven to heat before using for the first time, in order to expel any smells before the introduction of food. clean the appliance regularly. remove spills as soon as they occur. always use oven gloves when removing food shelves and trays from the appliance. check that controls are in the off position when finished.
INSTALLATION Regulations and Standards In your own interest of safety, gas appliances should be installed by competent persons. Failure to install the appliance correctly could invalidate any warranty or liability claims. This appliance shall be installed in accordance with the manufacturer’s installation instructions, local gas fitting regulations, municipal building codes, AG5601 and any other relevant statutory regulations. Data label.
INSTALLATION Fixing Fixing screw positions are located on each side of oven opening and are accessed by opening the door. Screw into place using a flange head No 6 woodscrew WARNING When installing DO NOT lift appliance using the door handles. Connection A ¼ BSP female connection is provided for gas inlet, on the rear of the appliance. It is recommended that the appliance be connected by copper tubing, a rubber or hose connection must not be used. After connection the appliance must be tested for soundness.
MAINTENANCE & SERVICING IMPORTANT Shut off gas supply at isolating valve, switch off electric supply and ensure all parts are cool before cleaning or servicing All servicing must be carried out by an approved competent person. After each service the appliance must be checked for gas soundness This appliance must not be modified or adjusted unless authorized and carried out by the manufacturer or his representative.
MAINTENANCE & SERVICING 6. Grill burner injector (No62) Disconnect from gas supply (1). Remove appliance from housing (2). Release injector holder from bracket, disengage the grill pipe from the control and remove the injector. 7. Oven burner injector (No62) Open the oven door and unscrew the burner retaining screw, slide the burner to the left and lift out. The injector is exposed to the right hand side of the cut out. Unscrew the injector. 8. Thermocouple replacement Disconnect from gas supply (1).