
User Manual


6 7
EN
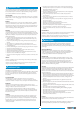
Place template B on the sawn-out panel. NOTE: Make sure
that the decorative stripes on the panel are in line with those on the
vehicle!
FR
Placez le gabarit B sur le panneau que vous avez découpé.
REMARQUE : Assurez-vous que les bandes décoratives situées
sur le panneau s'alignent avec celles se trouvant sur le véhicule !
DE
Legen Sie Schablone B auf das ausgesägte Teil der Wand.
HINWEIS : Achten Sie darauf, dass die Dekorationsstreifen auf
der Klappe mit denen am Fahrzeug übereinstimmen!
NL
Plaats sjabloon B op het uitgezaagde paneel. OPMERKING:
Zorg ervoor dat de decoratiestrepen overeenkomen met die op de
caravan!
IT
Collocare la mascherina B sul pannello ritagliato. Assicurarsi
che le strisce decorative sul pannello siano in linea con quelle sul
veicolo!
SE
Placera mall B på den utskurna panelen. NOTERA: Se till att
ränderna på panelen är i linje med de på fordonet!
EN
Draw an outline on the sawn-out panel. Place protective tape around
the outline both inside and outside the line.
FR
Tracez le contour du gabarit sur le panneau découpé. Placez un ruban
de protection de part et d'autre du contour tracé.
DE
Zeichnen Sie den Umriss auf das ausgesägte Teil. Kleben Sie den
Umriss sowohl innen wie außen mit Klebeband ab.
NL
Teken de omtrek na op het uitgezaagde paneel. Breng aan weerszij-
den van de getekende lijn plakband aan als bescherming.
IT
Disegnare la sagoma sul pannello ritagliato. Collocare del nastro di
protezione intorno alla sagoma all’esterno e all’interno della linea.
SE
Rita konturen på den utskurna panelen. Placera skyddstejp runt
konturen både innanför och utanför linjen.
EN
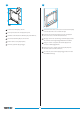
Saw the door panel. Remove the protective tape.
FR
Sciez le panneau de porte. Retirez le ruban de protection.
DE
Sägen Sie die Klappe zurecht. Entfernen Sie das Klebeband.
NL
Zaag het paneel op maat. Verwijder het afplakband dat u als bescher-
ming heeft geplakt.
IT
Tagliare con la sega il pannello porta. Rimuovere il nastro di protezio-
ne.
SE
Såga luckpanelen. Ta bort skyddstejpen.
EN
Place the brackets (#6) on the inner side of the door (#2).
FR
Placez les clips (#6) sur la partie interne du portillon (#2).
DE
Setzen Sie die Klammern (#6) auf die Innenseite der Klappe (#2).
NL
Breng de clips (#6) aan op de binnenkant van de deur (#2).
IT
Collocare le staffe (#6) sul telaio interno della porta (#2).
SE
Placera klammer (#6) på luckans inre del (#2).
EN
Apply sealant in the groove of the outer side of the door (#1).
FR
Appliquez du mastic dans la rainure de la partie externe du portillon
(#1).
DE
Spritzen Sie Dichtmasse in die Fuge an der Außenseite (#1).
NL
Vul de groef van de buitenkant van de deur (#1) met kit.
IT
Utilizzare del sigillante nella scanalatura del telaio esterno della porta
(#1).
SE
Placera tätningsmaterial i spåret på luckans yttre del (#1).
EN
Tap the inner side of the door (#2) into the outer side of the door
(#1).
FR
Tapez sur la partie interne (#2) du portillon pour l'insérer dans la
partie externe (#1).
DE
Befestigen Sie das Innenteil (#2) mit leichten Hammerschlägen im
Außenteil (#1).
NL
Sla de binnenkant van de deur (#2) in de buitenkant van de deur
(#1).
IT
Battere per far entrare il telaio interno (#2) della porta nel telaio
esterno (#1).
SE
Knacka försiktigt in luckans inre del (#2) i luckans yttre del (#1).
EN
Fit the door panel in the outer side of the door (#1).
FR
Placez le panneau de porte dans la partie externe du portillon (#1).
DE
Setzen Sie die Klappenfüllung in den Rahmen (#1).
NL
Plaats het uitgezaagde paneel in de buitenkant van de deur (#1).
IT
Collocare il pannello dello sportello nel telaio esterno della porta
(#1).
SE
Placera panelen i luckans yttre del (#1).
EN
Fill the groove of the outer frame (#3) with sealant.
FR
Remplissez de mastic la rainure de la partie externe du cadre (#3).
DE
Füllen Sie die Fuge an der Außenseite (#3) mit Dichtmasse.
NL
Vul de groef van het buitenframe (#3) met kit.
IT
Riempire la scanalatura del telaio esterno (#3) con del sigillante.
SE
Fyll spåret på ytterramen (#3) med tätningsmaterial .
10
12
11
13
14
16
15
17