
Configuration Guide User Manual
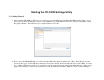


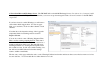

8. Clock Settings
There’s not a lot to say about this screen that isn’t already
self-evident, with the possible exception of a comment
about the necessity for an SNTP server connection. In
addition to correcting any errors to the TR-700NW/AW’s
internal time keeping, a connection to an SNTP server also
allows for automatic clock setting after a power failure or
surge. While the logger readings would be unaffected,
without this all 700W originated messages for warnings
and the like will show erroneous times until the unit is
manually reset by the user. Again, be sure that any
firewalls in your network allow connection to the time
server.
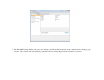
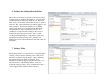
9. Recording Settings
It is in this window that you set the basic logging
parameters for the device. Mostly this is all self-
explanatory.
One important point is that it is in this window where you
can enter any Adjustment Settings. This allows you to
enter any reading errors that are noted during a calibration
process. Once this is done the data that is displayed and
recorded by the unit is “post correction”, and further
adjustment after downloading becomes unnecessary.
Note that adjustments are linear and can be either “1 Point”
(offset) or “2 Point” (mX + b). The TR-700W cannot
accept quadratic corrections (aX
2
+bX+c).