User Manual
CONTENTS Introduction 4 DTR overview 4 probes 5 functions 5 display 5 DTR operation 6 switching the DTR on or off 6 changing label 6 displaying limits 6 feeding paper 6 printing a ticket 6 remote button operation 6 batteries 7 recharging the DTR 7 connecting devise to PC 7 reset 7 cleaning 7 paper loading procedure 8-9 specification 10 3
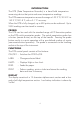
INTRODUCTION The DTR (Data Temperature Recorder) is a hand held temperature measuring device that prints and saves temperature readings. The DTR measures temperature across the range of -39.9 °C/-39.8 °F to 149.9 °C/301.8 °F, with a 0.1 °C accuracy. When the DTR is fully charged, up to 500 prints can be achieved. Up to 2500 readings can be stored in memory. PROBES The DTR can be used with the standard range of ETI thermistor probes or the DTR switch penetration probe.
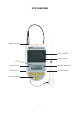
DTR OVERVIEW probe socket cover handle printer cover LCD 'reset' button charge indicator power socket USB socket control panel 5
DTR OPERATION SWITCHING THE DTR ON OR OFF The 'On/Off' button switches the DTR on or off. 'Switch off' will be displayed for two seconds before shut down is complete. CHANGING LABEL To scroll through the stored labels, press the 'Label' button. The selected label will be displayed on the screen. Labels change in a continuous loop. Up to four labels can be stored using the PC software. DISPLAYING LIMITS To display the high or low limit for the selected label, press the 'Limits' button.
BATTERIES The DTR is fitted with a 3 cell rechargeable 3.6V NiMh battery pack. It is NOT user replaceable. Please return to the ETI Service Department for battery replacement. When the DTR power is low, the 'Lo Bat' segment of the LCD is lit. Print and feed operations are inhibited when 'Lo Bat' is indicated. Pressing the 'Print' or 'Feed' buttons will result in 'Recharge' being displayed for a short time in the display.
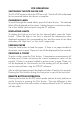
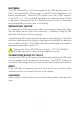
PAPER LOADING PROCEDURE To reload the printer with a new paper roll, follow the steps below: 1. Un-clip the printer cover handle (fig 1). 2. Pull the printer cover handle until the cover un-clips. To avoid damage to the handle do not use excessive force (Fig 2). 3. Lift the lid until completely open (fig 3). 4. Remove any existing paper or the plastic tube from the previous roll. The easiest way to do that is to turn the DTR upside down, so the printer contents fall out (fig 4). 5.
fig 1 fig 2 fig 3 fig 4 fig 5 fig 6 fig 7 fig 8 9
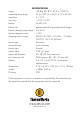
SPECIFICATION range operating temp range resolution accuracy battery battery life battery charging temp range battery charging cycles charging power supply sensor type connector type printer type paper width paper roll diameter print lines per roll display dimensions weight IP rating -39.8 to 301.8°F (-39.9 to 149.9°C) 41 to 122°F (5 to 50°C) & 10 to 80 %rh 0.1 °C/°F +0.9°F ±0.5°C Ni-MH 3.6V approximately 500 prints from a full charge 5 to 40°C >500 INPUT 100-240V - 47-63Hz 1-1AMax OUTPUT 12V, 3.