
Installation Guide


THERMOFILM® – The complete underfloor heating solution for all wood & laminate floors.
Thermosoft International Corporation Installation Manual: ThermoFilm®
Page 11
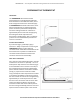
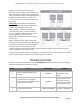
Laying THERMOFILM™ heating elements
Before commencing the installation of THERMOFILM,
check the labels on each THERMOFILM to ensure they are
the correct sizes and power ratings.
Following the plan prepared at the ordering stage and
working from one side, roll out the first element copper
buss side down with the connection leads closest to the
thermostat wall and leaving a minimum 2” gap from all
walls. Apply light finger pressure on the cable connection
covers to leave an imprint on the insulation, move the
element to avoid damage and using a sharp knife remove
the insulation to allow the cable connection over to sit
flush with the insulation surface (fig.4).
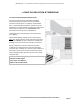
Adjusting THERMOFILM length
THERMOFILM is available in standard or custom
lengths up to 60 ft long. Should THERMOFILM
require to be shortened this can be easily done
by cutting along the cutting line using a sharp
knife and straight edge or scissors and insulating
the ends of the copper strips using the insulating
green polyester tape discs as shown in the
diagram (fig.5) or 0.75”-1.0” wide electrical
tape. Care should be taken not to cut
close to the edge of the black
heated area. Repeat the
procedure for the
remaining elements,
butting adjacent
elements
edge to
edge.
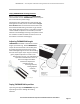
Taping THERMOFILM in position
Tape along the edges of THERMOFILM using duct
tape taking care not to damage the heating
elements.