
Installation Guide


Rev.1.12.09.10 8
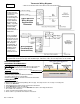
Installation Methods:
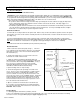
Ceramic & Porcelain Tile Method #3-1: Ceramic floor tile (8” or larger) on concrete sub-floor
Setting Materials:
• Use Latex Portland cement mortar that conforms to test
requirements found in ANSI A118.4.
• Hydrate (mix with water) according to the bag recommendations.
• Use a slow mixer (300 rpm or less) or mix by hand.
• Allow mixture to sit undisturbed for 15 minutes, then lightly remix.
Trowel Size:
• WarmFlex to sub-floor: 1/4”x1/4”x1/4” Square or “U” notch.
• Tile to WarmFlex: Use a square or “U” notch trowel with notch size
appropriate for the size and type of tile installed. Minimum 1/4”x3/8”x1/4”.
Concrete Requirements:
• Maximum variation of 1/4” in 10’-0”. Deflection is not to exceed 1/360 of span.
• All cracks in excess of 1/16” must be filled as per ANSI specifications.
• Surface must be clean, dry and free of contaminants and sealers.
• Lightweight concrete surfaces must comply with manufacturer’s specifications for tile installations.
Installing WarmFlex™
1. Lay out the WarmFlex™ .
2. Leave approximately 3” of space between the walls and WarmFlex™ to run lead wires.
3. Pull back the WarmFlex.
4. Dampen, but do not saturate, the concrete floor with a sponge or a mist sprayer.
5. Key the thin-set mortar into the sub-floor with the flat side of a 1/4”x1/4” square or “U” notch trowel and then comb it
with the notched side using a left to right motion.
6. Apply the thin-set mortar only as far ahead as will allow installation of the WarmFlex
®
prior to the mortar beginning to
set or “skin over”.
7. Lay the WarmFlex™ and lead wires back into the thin-set.
8. Immediately (within 10 minutes) roll the WarmFlex™ with a 75lb roller in diagonal directions.
9. Do not walk on the rolled areas. Allowing traffic on the installed WarmFlex™ prior to full set may cause indentations
resulting in weak areas and hollow spots.
10. Make sure no trowel notch ridges remain under the WarmFlex™.
11. Seams should be butted together, leaving no gaps or overlaps.
12. Allow the WarmFlex™ to set for at least 16 hrs.
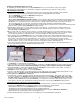
Ceramic and Porcelain Tile Method #3-2: Tile on Plywood Sub-floor
Setting Materials:
• For WarmFlex to sub-floor: use EGP (Exterior Glue Plywood)
Latex Portland Cement Mortar that conforms to ANSI A118.11.
• For Tile to WarmFlex: use Latex Portland Cement Mortar that
conforms to ANSI A118.4.
Trowel Size:
• WarmFlex mat to sub-floor: 1/4” x 1/4” x 1/4” Square or “U” notch.
• Tile to WarmFlex: Use a square or “U” notch trowel with notch size
appropriate for the size and type of tile installed. Minimum 1/4”x3/8”x1/4”.
Sub-Floor Requirements:
• Sub-floor assembly must comply with ANSI A108.12.
• 16”oc, 2”x10” minimum joist: total sub-floor thickness -1 1/8” with clean structurally sound exterior plywood as
the top surface.
• 24”oc truss or I-joist: total sub-floor thickness - 1 1/2” with clean structurally sound exterior plywood as the
top surface.
• Must be free of all sealers and contaminants.
• Maximum variation of 1/8” in 10’-0”.
• Deflection is not to exceed 1/360 of span when measured under 300lb concentrated load (see ASTM C627).
Installing WarmFlex™
(Same as Installation Method #3-1)
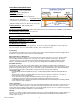
3-2
WarmFlex™
3-1
WarmFlex™
Concrete Slab Subfloor
Plywood Subfloor