
Installation Guide


Rev.1.12.09.10 12
TROUBLE-SHOOTING
Steps for the electrician to trouble-shoot the radiant floor heating mats and programmable thermostat:
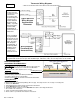
1. Turn power off at the main breaker. Check that the electrical connections are proper: 120V
Power Lines connected to the 2 terminals marked LINE; heating mats connected to the 2 terminals
marked LOAD (multiple mats connected in parallel: black-to-black and white-to-white); floor sensor
connected to the 2 terminals marked Sensor.
2. Check to be sure all electrical connections are tight. An E2 error showing on the thermostat display
screen indicates a loose sensor wire or a faulty sensor. Loose connections may also trip the GFCI.
3. Turn power on, use a Voltmeter to check the Line side of the thermostat to verify that the thermostat is
receiving 120V power. If yes, proceed to Step 4. If not, trouble-shoot the power source.
4. Turn up the thermostat so that the thermostat calls for heat and the heat waves display on the
thermostat display screen. If the waves appear, proceed to Step 5. If the waves do not appear, there
may be a problem with the floor sensor. Check to make sure there is only one floor sensor connected to
the thermostat. Connecting two sensors will prevent the thermostat from calling for heat. If two floor
sensors were connected, turn off the power and disconnect one floor sensor. If only one sensor is
connected, turn off the power, disconnect the sensor and measure the resistance of the floor sensor
using an Ohmmeter. The resistance should be between 12 and 15 kOhms (12,000-15,000 Ohms) at
77°F to 68°F respectively. If not, call customer technical support.
5. With power on, use a voltmeter to determine if the load side of the thermostat registers 120V when the
thermostat is calling for heat. If not, the thermostat may be faulty (it is not passing voltage to the mats). If
the thermostat registers 120V on the load side, the thermostat is good. Proceed to Step 6 to check the
heating mats.
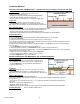
6. Turn off power at the main breaker. Disconnect all wires and remove the thermostat. Check the
resistance between each heating mat’s white and black wires using an Ohmmeter. The resistance for
each mat should be within 15% of the factory resistance recorded on the label R=N or as follows:
120V Mat
Dimensions
120V Mat
Resistance
Ohms
240V Mat
Dimensions
240V Mat
Resistance
Ohms
1.5’ x 5’
286±15%
1.5’ x 10’
556±15%
1.5 x10
139±15%
1.5 x 20
274±15%
3' x 5'
129±15%
3' x 5'
519±15%
3' x 10'
64±15%
3' x 10'
253±15%
na
na
3’ x 20’
125±15%
If the mat resistance is not correct, call customer technical support. The mat heating wires may be
damaged and may need to be repaired or the mat replaced.
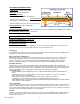
7. To verify mats are working, with power off, connect the floor mats directly to power: 120V black-to-
black (line); white-to-white (neutral); 240V black-to-black (line); red-to-red (line).
8. Turn on power to determine if the mats heat up. It may take 45 minutes or longer to feel the warm
floor. Compare the warm floor to areas of the floor that are unheated to feel the difference.
9. If the mats heat up, turn off the power and replace the thermostat. If it is within the warranty period,
return the thermostat for replacement.
10. If you do not determine the problem after performing the above steps, call customer technical support.
Thermosoft International Corporation
701 Corporate Woods Parkway • Vernon Hills, IL 60061
Telephone 847-279-3800 • Facsimile 847-279-8845