
Operating Manual


Chapter 4 Set up Additional Measurements Accu-Wave
4-10 TN Technologies
Set up Alarm Menu
Note: If relays are installed, the default indicator for alarm N is “controlling relay
N,” even if N exceeds the number of relays. Press →→ to change the alarm
indicator, and the “controlling relay #” options will then correctly reflect
the number of installed relays.
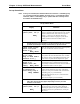
“Set up Alarm” Menu
Display Comments
Set up alarm 3
(Alarm point, etc.)→→
NEXT↓↓
This item only shows up if an alarm (e.g., alarm 3)
has been assigned to the measurement in the “Assign
alarms to measurement” item of the “Set up fault
alarms…” menu (see “Set Up Fault Alarms or
Change Process Alarm” on page 6-3). The alarm
number and the measurement number can be
different.
Note: The appearance of the following menu items depends on the selected
measurement type. You must enter a set point to activate the rest of the Set
up Alarm menu. Example displays show volume (cu ft) measurement.
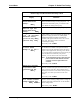
←←Exit alarm 3 setup
Alarm 3 set point
40.00 cu ft
NEXT↓↓ HELP→→
Enter the measurement value for the alarm set point;
the value at which the alarm is activated.
Alarm 3 clear based
on clr point
Chng to “dead band”→→
Continue as is.↓↓
Select a clear point or dead band configuration. A
clear point is the exact measurement value at which
the alarm is cleared. A dead band specifies the span
between the set point and the implicit clear point.
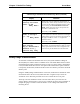
Alarm 3 clear point
30.00 cu ft
{Makes alarm “Hi”
limit} NEXT↓↓ HELP→→
Enter desired clear point (or dead band) value, the
measurement value at which the alarm is cleared
(turned off). If dead band selected, enter the width of
the dead band relative to the set point.
Alm 3: cu ft
is indicated by
controlling relay 2
NEXT↓↓ CHANGE→→
Select action used to indicate that alarm 3 has been
triggered. The default for alarm N is “controlling
relay N,” if relays are installed. Other selections are:
controlling relay 2 ( 3, 4 if installed)
Meas #1 dispy flash (#2, #3, etc., if measurements
have been setup)
Zero current output 1 (or 2 if installed)
Note: Additional menu items related to controlling relays are shown in the next
table. Other menu items may appear depending on entries you made
elsewhere in the menus.
Set up alarm 4
(Alarm point, etc.)→→
NEXT↓↓
If you assigned more than one alarm (e.g., alarm 4) to
the measurement, menu items will be displayed
allowing the option to set up these other alarms. If
you don’t want to set up another alarm, scroll past
this screen.