
Installation Guide


Doc. No: 81128 Page 5 of 16 Rev G 1/17 JWJ
STEAM HEAD INSTALLATION
Parts Enclosed
Deluxe steam head
Escutcheon
Tools Needed
Pipe wrench
1.5” cutting tool
Silicone gun
Other tools as required
IMPORTANT NOTE!
LOCATE THE STEAM HEAD 6” INCHES FROM CORNER AND 12 INCHES FROM FLOOR.
STEAM HEAD IS TO BE MOUNTED AS FAR AS POSSIBLE FROM TYPICAL BATHING
POSITION (SEATED OR STANDING) AND AS FAR FROM CONTROL AS POSSIBLE
WHILE MAINTAINING APPROXIMATELY A – 60” CONTROL HEIGHT.
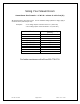
1. Drill a 1 1/2” diameter hole in the shower wall or wall above the bathtub for the steam outlet line.
2. Connect 1” copper pipe or copper tubing onto the steam outlet with a 1” union. Run a 1” copper
pipe from the union to the 1 1/2” hole in wall.
3. Attach the steam head and escutcheon to the copper pipe. CAUTION: Do not obstruct the
steam line with any shut-off valves, plugs or caps. All Steam Suite generators are designed
to build NO PRESSURE. NOTE: Make sure the steam head ARROW is pointing UP as shown in
the detail below. Then press chrome cover over the steam head with the lettering HOT upright and
readable.
4. The steam line can run up, down, or horizontal; but cannot run down and then up. If it does, a
steam trap will be produced at the low point blocking the flow of steam. Insulate the steam outlet
piping if the piping run exceeds 10 feet or is exposed to cold areas. NOTE: Use steam rated
insulation (225 °F minimum).
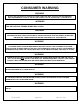
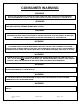
WARNING: Avoid contact with steam head! It will burn you. Avoid direct contact with the
steam coming out of the steam head! It is extremely hot! It will burn you!
NOTE: DO NOT mount sensor near steamhead!
1” COPPER PIPE