
Installation Guide


Page. 14
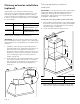
Hanging the chimney wall
hood
Hanging the chimney wall hood
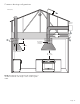
1. The transition supplied with the hood connects to
standard 10-inch round duct. Ensure the transition is
attached and the screws do not hinder damper
operation. (See “Attaching the hood transition” on
page 11.)
2. Installations require a cutout in the ceiling to
accommodate 10" (254 mm) duct. (See “Ceiling
cutout” on page 12.)
3. Installations require a cutout for the 1/2'' (13 mm)
conduit carrying power to the unit. (See “Ceiling
cutout” on page 12.)
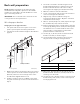
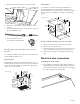
4. Use a T-20 torx head screwdriver to remove the screw
securing the junction box channel covering the wires.
5. Remove one circular knockout behind junction box
channel. Secure a 1'' (25.4 mm) strain relief (not
included).
6. Using two people to lift, rest the hood on the wood
bracket. Make sure the wood bracket fits into the
recess on the back of the hood.
7. From inside the hood, pre-drill the holes labeled “J”
in hood into the wood bracket with a 5/8'' (16 mm)
drill bit. Secure the hood to the wood bracket with
five (5) 1½'' (38 mm) screws.
8. Connect additional ducting.
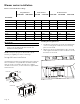
*Follow cooking appliance manufacturer’s recommendations.
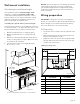
OptionOptionOption
16"
(406)
18"
(457)
* 30" (762) –
40" (1,016)
* 30" (762) –
40" (1,016)
* 30" (762) –
40" (1,016)
6½"
(165)
6½"
(165)
6½"
(165)
7¾"
(197)
24"
(610)
C
L
C
L
C
L
inches (mm
J