
Installation guide

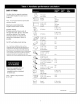

TABLE
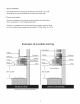
2.
DUCTWORK
INSTALLATION
GUIDELINES
garage
or
into
any
enclosed
space).
Keep
duct
runs
as
short
and
straight
as
possible.
In
order
opreference,
use:
Ist.
10”
round
duct
2nd.
8round
duct
3rd.
3-1/4”
x
14”
duct
Ath.
7”
round
duct
5th.
3-1/4”
x
lo”
duct
6th.
6”
round
duct
lengths
and
do
not
crush
when
making
corners.
For
safety
reasons,
ducting
should
vent
directly
outdoors
(not
into
an
attic,
underneath
the
house,
into
the
Duct
fittings
(elbows
and
transitions)
reduce
air
flow
efficiency.
Back
to
back
elbows
and
“S”
turns
give
very
poor
delivery
and
are
not
recommended.
Ashort
straight
length
of
duct
at
the
inlet
of
the
remote
blower
gives
the
best
delivery.
Transition
to
duct
from
the
integral
blower
to
remote
duct
transition
as
close
as
possible.
The
use
of
flexible
metal
round
duct
should
only
be
used
when
no
other
duct
fitting
exists.
Limit
use
to
short
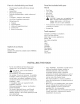
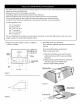
1.
Prepare
duct
and
conduit
cut
outs,
see
figures
1
and
2
as
needed.
|
Model
|
30”
|
36”
Cabinet
Front
X
|
esa
|
eort6"
Bottom
of
Cabinet
or
Soffit
Vertical
\e
eS
9
/
Discharge
1
1-1/2"
Dia.
Holes
Vertical
conduit
option
Rear
Wall
Hood
Width
Figure
1
«—1
a
3-9/16"
|
23-1/8"
$$$
eo
Figure
2
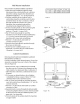
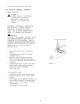
2.
Assembly
of
the
10”
transition:
The
transition
supplied
with
the
hood
mounts
to
the
top.
Do
not
install
transition
until
hood
is
fixed
on
cabinet
or
wall.
a.
Place
the
transition
piece
over
the
hood
outlet
and
secure
with
4
screws
provided.
(Figure3)
b.
Wrap
all
joints
(metal
transition
and
hood)
with
duct tape
for
an
airtight
seal.
c.
Remove
tape
holding
damper.
Hood
outlet
Figure
3
Transition
Screws
(4