Owner’s Manual and Assembly for Model TSP3737 0
●●● Dear Customer, Congratulations on your purchase of the TheraSauna Persona, the new generation of Health Sauna. We are confident that you will enjoy many benefits of using your TheraSauna Persona for many years to come. Carefully and thoroughly read this manual in its entirety before using your TheraSauna Persona for the first time. We recommend keeping this manual for regular review and future reference.
●●●Table of Contents CONDITIONS OF USE…………………………………………………………………………..3 GENERAL TECHNICAL CHARACTERISTICS……………………………………………….3 PACKAGING AND INDIVIDUAL PANEL INFORMATION…………………………………...3 PARTS LIST……………………………………………………………………………………….4 INSTALLATION INFORMATION AND ASSEMBLY……………………………………….5-11 DIGITAL CONTROL OPERATION INSTRUCTIONS………………………………………..12 ENJOYING YOUR SAUNA………………………………………………………………....13-14 MAINTENANCE………………………………………………………………………………….14 WARNINGS…………………………………………………………………………………...
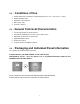
●●● Conditions of Use 1. Outside Ambient Air Conditions for Optimal Operation from +5℃ ~+ 40℃ (+41℉ ~+104℉) 2. Relative humidity ≤ 85% 3. Depression: 700~1060 hpa 4. Main supply: 120V 5. Frequency: 60Hz±1 ●●● General Technical Characteristics 1. Functions processed by microprocessors 2. Temperature adjustable from 37.78℃ to 60℃ (100℉-140℉) 3. Adjustable use time from 0 to 60 minutes 4. Digital temperature sensor 5. SoftTouch™ Control 6.
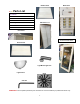
Bottom Panel ●●● Parts Back Panel List Front Panel Bottom Panel Roof Panel Back Panel Interior Light Side Panels x 2 Side Panels x 2 Bench Panel Roof Panel Front Panel with Glass Bench Panel Light Mounting Screw Light Fixture Bolts 5/16 Hex WARNING!!! The receptacle provided by the manufacturer must be installed by a qualified electrician only.
●●● Installation Information & Assembly A. Do not plug any other appliances into the outlet with your sauna. B. The sauna should always be placed on a fairly leveled surface. C. The sauna must be placed indoors and in a dry area. D. Do not spray the exterior with water. If your floor is damp, install a floor separator to keep the sauna high & dry. E. Do not store flammable objects or chemical substances near the sauna. Assembly Instructions Assembly of the sauna requires at least 2 adults to complete.
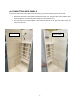
(4) CONNECTING SIDE PANELS Connect the Side Panels to the Bottom Panels by lining up holes and fastening them with screws. 1. Each Side Panel has a white label to identify which side it is. The panel with "LEFT PANEL" label should be placed on the left side when facing the sauna from the front. 2. And, the panel with “RIGHT PANEL" label should be placed on the right side when facing the sauna from the front.
(5) INSTALLING BENCH PANEL Install the Bench Panel by sliding it over the Horizontal Guides on each Side Panel. Be careful not to scratch the Side Panels when doing so. Make sure to position the Bench so that the "BACK" sticker is facing back, the smooth and finished sides of the Bench are facing up and forward.
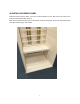
(6) CONNECTING FRONT PANEL WITH GLASS DOOR Place the Front Panel onto the recessed area where the "FRONT" sticker is. Align with both Side Panels and secure in place by fastening with screws.
(7) PLACING TOP PANEL (ROOF) IN PLACE 1. Put the Top Panel on the assembled panels. 2. Gently place the Top Panel onto the rest of the assembled panels. When all four corners are in place, gently push down the Top Panel until it is snuggly fit over the rest of the panels. 3. Make sure that the cables around the corners do not get pinched between the panels.
(8) LIGHT INSTALLATION 1. Connect the power cables and feed into hole supplied. 2. Use screw to secure. 3. Place bulb in light and slip in light cover.
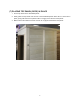
HERE IS THE FINISHED PRODUCT! ENJOY YOUR NEW SAUNA! 11
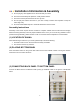
●●● Digital Control Operating Instructions Digital Keypad Start Up & Adjustments Note: If you experience power failure, sauna will return to factory default settings, which are 135℉ and 60 minutes, you will have to reset your settings. On powering up the sauna, the panel will display sauna internal temperature. Once the TheraSauna® Classic reaches the set temperature, the heat indicator light will turn off to let you know the sauna has reached your desired temperature.
●●● Enjoying your Sauna INSTRUCTIONS FOR USE Review all health and safety instructions. If in doubt as to the advisability of using your infrared sauna, consult with your physician. If you feel light -headed or heat-exhausted during a session, exit the sauna immediately. 1. Set the temperature to a comfortable level, normally, 37.8-60℃ (100℉-140℉). 2. Allow approximately 15-20 minutes for the sauna to warm up before beginning a session. 3.
another towel on the floor to absorb extra sweat. A third towel draped over the knees may aid you in comfort and is useful to towel off sweat. 7. Be sure to towel off excess sweat during your session to help the body to perspire more freely. 8. To help relieve sore and tense muscles, massage the affected areas while in sauna to help heal faster. 9. Shaving your face or legs with a razor while profusely sweating in a sauna yields an incredibly smooth result without the use of gels or foams. 10.
●●● Warnings This appliance is not intended for use by persons (including children) with reduced physical, sensory or mental capabilities, or lack of experience and knowledge, unless they have been given supervision or instruction concerning use of the appliance by a person responsible for their safety. Children should be supervised to ensure that they do not play with the appliance! Safety Instructions • Read and follow all instructions carefully.
16
17 THERASAUNA PERSONA MANUAL 1.16.