
User`s manual


17
LAN Current LAN IP setting.
Link Aggregation Current Link Aggregation status
Disk Info Current status of disk slot has been installed
RAID Current RAID status.
System Fan Current system fan status.
2006/06/16 12:00 Current system time.
The N4100PRO will rotate these messages every one-two seconds on the LCD
display.
USB Copy
The USB Copy function enables you to copy files stored on USB devices such as
USB disks and digital cameras to the N4100PRO with a press of a button. To use
USB copy, follow the steps below:
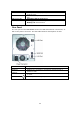
1. Plug your USB device into an available USB port on the Front Panel.
2. In Display Mode, press the Enter (
↵).
3. The LCD will display “USB Copy?”
4. Press Enter (
↵) and the N4100PRO will start copying USB disks connected
to the front USB port.
5. All of data will be copied into system folder named “USBcopy”.
Typical Setup Procedure
From the Web Administration Interface, you can begin to setup your N4100PRO
for use on your network. Setting up the N4100PRO typically follows the five steps
outlined below.
For more on how to use the Web Administration Interface, see Chapter 4:
System Management > Web Administration Interface.
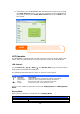
Step 1: Network Setup
From the Web Administration Interface, you can configure the network settings of
the N4100PRO for your network. You can access the Network menu from the
menu bar.
For details on how to configure your network settings, refer to Chapter 4:
System Management > Network Management.
Step 2: RAID Creation
Next, administrators can configure their preferred RAID setting and build their
RAID volume. You can access RAID settings from the menu bar of the Web
Administration Interface by navigating to Storage > RAID.
For more information on configuring RAID, see Chapter 4: System
Management > RAID Configuration.
Don’t know which RAID level to use? Find out more about the different RAID
levels from Appendix C: RAID Basics.