Thecus N299 User’s Manual
Copyright and Trademark Notice Thecus and other names of Thecus products are registered trademarks of Thecus Technology Corp. Microsoft, Windows, and the Windows logo are registered trademarks of Microsoft Corporation. Apple, iTunes and Apple OS X are registered trademarks of Apple Computers, Inc. All other trademarks and brand names are the property of their respective owners. Specifications are subject to change without notice. Copyright © 2007 Thecus Technology Corporation. All rights reserved.
Safety Warnings For your safety, please read and follow the following safety warnings: Read this manual thoroughly before attempting to set up your N299. Your N299 is a complicated electronic device. DO NOT attempt to repair it under any circumstances. In the case of malfunction, turn off the power immediately and have it repaired at a qualified service center. Contact your vendor for details.
Table of Contents Copyright and Trademark Notice ................................................... 2 About This Manual ......................................................................... 2 Limited Warranty........................................................................... 2 Safety Warnings ............................................................................ 3 Table of Contents .......................................................................... 4 Chapter 1: Introduction .......
Folder Management ............................................................................ 26 Adding Folders .......................................................................................... 27 Editing Folders .......................................................................................... 27 Deleting Folders ........................................................................................ 27 Folder Access Control List (ACL) .....................................................
Using WebDisk .................................................................................... 61 Using iTunes® Server .......................................................................... 62 Adding Music Files .............................................................................. 62 Playing Music Files .............................................................................. 62 Using Photo Gallery .............................................................................
Data Security..................................................................................... 87 RAID Levels......................................................................................... 87 RAID 0.............................................................................................. 87 RAID 1.............................................................................................. 88 JBOD .............................................................................................
Chapter 1: Introduction Overview Thank you for choosing the Thecus N299 IP Storage Server. The Thecus N299 is an easy-to-use storage server that allows a dedicated approach to storing and distributing data on a network. Data reliability is ensured with RAID features that provide data security and recovery. Two Gigabit Ethernet ports enhance network efficiency, allowing the N299 to take over file management functions.
Backup Server Don’t leave precious data to chance. With advanced backup capabilities, you can easily upload mission critical files to the N299, and even automate your backup tasks for true peace-of-mind. To find out how to backup your files with the N299, refer to Chapter 5: Using the N299 > File Backup. Download Manager Tired having downloads take up all of your bandwidth when you need it most? With the N299’s Download Manager, you can let the N299 complete your BT, HTTP, and FTP during off-peak hours.
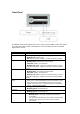
Front Panel The N299’s front panel displays the unit’s array of status LEDs, and is also where you’ll find the power button and USB port.
o Blinking red (5 seconds): USB device connection failure • Data Transfer USB Port Power Button o Blinking blue: Active data transfer o Blinking red: USB device read/write error • USB 2.0 port for USB storage expansion. • Power on/off N299 Rear Panel The rear panel of the N299 houses the USB and Ethernet connections, as well as the power connector.
Chapter 2: Getting Started Overview Your N299 is designed for complete ease-of-use. To help you get started, the following chapter will help you get your N299 up and running in no time. Please read it carefully to prevent damaging your unit during installation. Before You Begin Before you begin, be sure to take the following precautions: 1. Read and understand the Safety Warnings outlined in the beginning of the manual. 2.
Cable Connections Make the following connections on the Thecus N299 and then power up the unit: 1. Connect an Ethernet cable from your network to the WAN port on the back panel of the N299. 2. Connect the provided power cord into the universal power socket on the back panel. Plug the other end of the cord into a surge protected socket. 3. Press the power button on the front panel to power on the N299. 4. Make sure system is running properly by checking all front panel LEDs for any error indications.
b. Login Login into N299 with administrator’s account and password. c. Network Setting Name your N299 system and configure the network IP address. You can choose either fixed IP or DHCP.
d. Change Admin Password e. Start Browser Access the current N299 administrator Web User Interface pressing the “Start Browser” button.
f. RAID and FW installation Please config the RAID first then carry on with FW installation to complete setup procedure. NOTE The Thecus Setup Wizard is designed for installation on systems running Windows XP/2000 or Mac OSX or later. Users with other operating systems will need to install the Thecus Setup Wizard on a host machine with one of these operating systems before using the unit.
First Time Setup Once the hardware is installed, physically connected to your network, and powered on, you can now configure the Thecus N299 so that it is accessible to your network users. Follow the steps below for initial software setup. Step 1: Initial Login Make sure your network is connected to the Internet and access the N299 Login webpage: 1. Type in the default IP address http://192.168.1.100 in your browser’s address line. If you have changed the N299’s IP address, type this in instead.
2. Set host name and specify the domain name. 3. Enable DHCP for setting the IP automatically or Disable DHCP to enter your own IP settings. 4. Repeat steps 2 and 3 for the LAN item under the Network menu to configure the LAN port. 5. In the Network menu, choose the Service item and the Service Support screen appears. 6. Enable or Disable each protocol according to your requirements. Press Apply to confirm the setting. NOTE • For normal usage, enabling all protocols is recommended.
3. Press the Apply button for each user and they will be added to the user list. 4. From the Accounts menu, choose Groups item and the Local Group Configuration screen appears. Click Add to add a new group. 5. Enter a group name in the Group Name box and click Apply to add the group to the group list. For more on managing users, go to Chapter 3: System Management > User and Group Management.
Chapter 3: System Configuration Overview The N299 provides an easily accessible web management interface. With it, you can configure and monitor the N299 anywhere on the network. Web Administration Interface Make sure your network is connected to the Internet. To access the N299 Login Page: 1. Type the N299’s IP address into your browser. (Default IP address is http://192.168.1.100) Your computer’s network IP address must be on the same subnet as the N299. If the N299 has default IP address of 192.168.1.
Clicking on any of these items will display the dropdown menu selections for each group. In the following sections, you will find detailed explanations of each function, and how to configure your N299. Language Selection The N299 supports multiple languages. On the menu bar, click Language and the Change Language screen appears. This screen allows you to select preferred language for the N299.
Status Menu The Status Menu on the menu bar allows you to see various aspects of the N299. From here, you can discover the status of the N299, and even find out other details like firmware version and up time. Product Information Once you login, you will first see the basic Product Information screen providing Manufacturer, Product No., Firmware Version, and Up Time information. To access this screen again, navigate to Status > About.
System Information From Status menu, choose the Info item, and the System Information screen appears. You can change the system information that appears on uPnP devices screens (i.e. Network Neighborhood) on Windows-based systems by entering the new information here and pressing Apply to confirm. System Information Item System Description Description Shows the system description that would also appear on the Login page.
Storage Management The Storage Menu displays the status of storage devices installed or connected to the N299, including disk and RAID information. Disk Information From the Storage menu, choose the Disks item and the Disk Information screen appears. From here, you can see various items about installed SATA hard disks. Blank lines indicate that a SATA hard disk is not currently installed in that particular disk slot.
RAID Configuration On the RAID Information screen, press the Config button to go to the RAID Configuration screen. In addition to RAID disk information and status, this screen lets you make RAID configuration settings. For more information on RAID, see Appendix C: RAID Basics. RAID Level You can set the storage volume as either None, JBOD, RAID 0, or RAID 1. RAID configuration is usually required only when you first set up the device.
Creating a RAID To create a RAID volume, follow the steps below: 1. On the RAID Configuration screen, set the RAID storage space as JBOD, RAID 0, or RAID 1 — see Appendix C: RAID Basics for a detailed description of each. 2. Tick the checkboxes of the hard disks you wish to use to create a RAID. 3. Specify a stripe size — 64K is the default setting. 4. Press Create to build the RAID storage volume.
Adding Folders On the Folder screen, press the Add button and the Add Folder screen appears. This screen allows you to add a folder. After entering the information, press Apply to create new folder. Press Back to return to the Folder screen. Add Folder Item Folder Name Description Browseable Public Web Access Apply Reset NOTE Description Enter the name of the folder. Provide a description the folder. Enable users to browse the folder content. Admit or deny public access to this folder.
Folder Access Control List (ACL) On the Folder screen, press the ACL button, and the Folder Access Control List (Folder ACL) screen appears. This screen allows you to configure access to the specific folder for users and groups. Use the Read only, Writable, Deny access, or Unset radio buttons to configure access levels for listed users and groups. Press the Apply button to confirm your settings.
Network Management Use the Network menu to make network configuration settings as well as service support settings. WAN Configuration From the Network menu, choose WAN, and the WAN Configuration screen appears. This screen displays the network parameters of the WAN connection. You may change any of these items and press Apply to confirm your settings.
LAN Configuration The N299 supports a second Ethernet port for higher service availability. To configure these ports, choose LAN from the Network menu, and the LAN Configuration screen appears. Press Apply to save your changes. LAN Configuration Item Description MAC Address Displays the MAC address of the LAN interface. Jumbo Frame Support Enable or disable Jumbo Frame Support on the LAN interface. IP Specifies the IP address of the LAN interface. Netmask Specifies the Network Mask of the LAN interface.
WLAN Configuration When a compatible wireless USB dongle is installed on the N299, the N299 will become an access point, and the Network dropdown menu will contain a WLAN menu item. From the Network menu, choose WLAN, and the WLAN Configuration screen appears. This screen displays the wireless network parameters of the system. You can to change any of these items and press Apply to confirm your settings. • Currently supported USB wireless dongles are: 3Com 3CRUSB10075, Zyxel G220USB, PCI GW-US54mini.
NOTE Users should obey the international RF regulatory rules as they set up the wireless RF channel on the N299. The RF operating channels for different regions have been specified as following. Thecus has no responsibility for users attempting to violate the international RF regulation. 11 14 13 2 4 N. America Japan Europe (ETSI) Spain France Web Services Configuration From the Network menu, choose the Services item, and the Web Service screen appears.
Apple Network Setup From the Network menu, choose the Apple Network item, and the Apple Network Configuration screen appears. This screen displays the configuration items for the Apple Filing Protocol. You can change any of these items and press Apply to confirm your settings. A description of each item follows: Apple Network Configuration Item Description Apple File Service Enable Apple File Service to use the N299 on MAC OS-based system. MAC CHARSET If your operating system does not support Unicode (e.g.
User and Group Management The N299 has built-in user database that allows administrators to manage user access using different group policies. From the Accounts menu, you can create, modify, and delete users, and assign them to groups that you designate. Local User Configuration From the Accounts menu, choose the Users item, and the Local User Configuration screen appears. This screen allows you to Add, Modify, and Delete local users.
Modifying Users 1. Select an existing user from the Local User Configuration screen. 2. Click on the Modify button, and Local User Setting screen appears. 3. From here, you can enter a new password and re-enter to confirm, or use the << or >> buttons to have this user join or leave a group. Click the Apply button to save your changes. Deleting Users 1. Select an existing user from the Local User Configuration screen. 2. Click on Delete button and the user is deleted from the system.
Adding Groups 1. On the Local Group Configuration screen, click on the Add button. 2. The Add NEW Local Group screen appears. 3. Enter a Group Name, and select users to be in this group from the Users List by adding them to the Members List using the << button. 4. Click the Apply button to save your changes. Modifying Groups 1. On the Local Group Configuration screen, select a group name from the list. 2. Press the Modify button and the Local Group Setting screen appears. 3.
System Management The System menu gives you a wealth of settings that you can use to configure your N299’s system administration functions. You can set up system notifications, view system logs, and even upgrade firmware from this menu. System Notifications From the System menu, choose the Notification item, and the Notification Configuration screen appears. This screen lets you have the N299 notify you in case of any system malfunction. Press Apply to confirm all settings.
System Logs Item Truncate All Log File |<< < > >>| INFO WARN ERROR GO Ascending Descending Download All Log File Description Clear all log files. Use the forward ( > >>| ) and backward ( |<< < ) buttons to browse the log pages. Provides all log information including warning messages and error messages. Shows all warning messages and error messages. Shows only error messages. Specify the number of lines per page and press Go. Shows logs by date in ascending order. Shows logs by date in descending order.
System Configuration Item Download Browse Upload NOTE Download/Upload Description Save and export the current system configuration. Click to browse the folder of your PC to locate the configuration files. Import a saved configuration file to overwrite current system configuration. Backing up your system configuration is a great way to ensure that you can revert to a working configuration when you are experimenting with new system settings.
Change Administrator Password From the System menu, choose the Administrator Password item and the Change Administrator Password screen appears. Enter a new password in the New Password box and confirm your new password in the Confirm Password box. Press Apply to confirm password changes. See the following table for a detailed description of each item. Change Administrator Item Old Password New Password Confirm Password Apply Password Description Type in the current administrator password.
Chapter 4: Additional Feature Setup Overview With a bevy of additional features and services, the N299 is so much more than a mere external hard disk. The sections below show you how you can utilize your N299 to serve files, music, movies, pictures, and more. FTP Server N299 can act as a FTP server, enabling users to download and upload files with their favorite FTP programs. From the Network menu, choose the FTP item, and the FTP screen appears.
iTunes® Server With the built-in iTunes server capability, the N299 enables digital music to be shared and played anywhere on the network! From the Network menu, choose the iTunes item, and the iTunes Configuration screen appears. You may enable or disable the iTunes Service from here. Once enabled, enter correct information for each field and press Apply to save your changes.
Media Manager Settings Item Description Media Server Enable or disable the Media Server service. Click Shared Media Folders Select the folder(s) that contains media files to be shared. By default, these include: • Photos • Video • Music • USBCopy • USBHDD • USDCam Enabled on With this setting, you can choose if the shared media folders are available via WAN, LAN, or WAN. Check the appropriate boxes to access your shared media folders through selected connections.
Download Manager With the built-in Download Manager, you can have the N299 download HTTP, FTP, and BT files without having full PC powered on. What’s more, you can even schedule your downloads for off-peak hours, ensuring efficient use of bandwidth. Download Tasks Item Description Click to start the specified task. Click to pause the specified task. Click to delete the specified task. A prompt will appear asking you if you would like to delete the task itself, or the task and all related downloaded files.
3. Next, select the destination folder from the Destination Folder dropdown. This is where the download will reside. 4. Select the maximum download bandwidth from the Max. Download Bandwidth dropdown. 5. Press Apply to add the task.
6. Once added, your download will appear in the list of download tasks. To start the download, simply click the Start icon ( ) and the download will begin. 7. The following prompt will be shown when the download begins: 8. The download status will continually update in the Download Tasks window. To pause the download, click the Pause icon ( ). Adding an FTP Task To add a new FTP task to the Download Manager, follow these steps: 1. Using the Task Type dropdown, select FTP and click Add.
2. In the FTP Task window, start by inputting the target URL in the FTP File box. This is the link to the download you want to queue. 3. Next, select the destination folder from the Destination Folder dropdown. This is where the download will reside. 4. The next step depends if you are using an anonymous login for your FTP download. If you are logging in anonymously, select Enable and move on to step 5.
If you are required to login with a user name and password, set Anonymous FTP to Disable and input your user name and password into the appropriate fields. 5. Select the maximum download bandwidth from the Max. Download Bandwidth dropdown. 6. Press Apply to add the task. 7. Once added, your download will appear in the list of download tasks. To start the download, simply click the Start icon ( ) and the download will begin.
8. The following prompt will be shown when the download begins: 9. The download status will continually update in the Download Tasks window. To pause the download, click the Pause icon ( ). Adding a BT Task To add a new BT task to the Download Manager, follow these steps: 1. Using the Task Type dropdown, select BT and click Add. 2. In the BT Task window, start by clicking Browse… and selecting the torrent file you wish to start.
3. Next, select the destination folder from the Destination Folder dropdown. This is where the download will reside. 4. Next, you can designate the Sharing time after completion by selecting the number of hours from the dropdown. 5. Next, you can select the maximum and minimum number of peers from selecting the counts from the appropriate dropdowns. 6. Next, you can set the maximum download and upload bandwidths from the dropdowns below.
7. Press Apply to add the task. 8. Once added, your download will appear in the list of download tasks. To start the download, simply click the Start icon ( ) and the download will begin. 9. The following prompt will be shown when the download begins: 10. The download status will continually update in the Download Tasks window. To pause the download, click the Pause icon ( ).
Deleting Tasks To delete a task, simply follow the steps below: 1. Click the delete icon ( ) beside the task that you wish to delete. The Delete Task dialogue box will appear. 2. Select Delete Task only if you wish to remove only the torrent file and all transient files, leaving the unfinished download files intact. 3. Select Delete Task and Files if you wish to remove the torrent file and all transient files, and the unfinished download files. 4. Click OK to delete the task.
2. To schedule a daily download period, select Daily and select a start time and end time. To schedule a weekly download period, select Weekly and select a start day/time and end time/day. 3. Click Apply to save your changes. NOTE If the Download Scheduler is enabled, ALL download tasks will adhere to the designated schedule. Printer Server You can configure the N299 to act as a printer server. That way, all PCs connected to the network can utilize the same printer.
6. Select “Connect to a printer on the Internet or on a home or office network”, and enter “http://N299_IP_ADDRESS:631/printers/usbprinter” into the URL field. 7. Your Windows system will ask you to install drivers for your printer. Select correct driver for your printer. 8. Your Windows system will ask you if you want to set this printer as “Default Printer”. Select Yes and all your print jobs will be submitted to this printer by default. Click Next. 9. Click Finish.
4. Select The printer that I want isn’t listed. You can press The printer that I want isn’t listed to go into next page without waiting for Searching for available printers to finish. 5. Click Select a shared printer by name. Type http://:631/printers/usb-printer in the box, where is the IP address of the N299. Click Next. 6. Select or install a printer and then press OK.
If your printer model is not listed, please contact your printer manufacturer for help. 7. Windows will attempt to connect to the printer. 8. You can choose to set this printer as the default printer by checking the Set as the default printer box. Click Next to continue. 9. Done! Click Finish. IP Cam Surveillance With the Simple Surveillance Server, you can connect an IP cam to the N299 to capture images.
IP Cam Surveillance Information screen appears. The IP Cam screen provides information and allows you to configure the Simple Surveillance Server. IP Camera Item Location URL Interval Folder Action Apply Cancel Description Specify the location where the IP Cam located. Input the URL address to capture the image. Designates the interval for each captured frame. Input where the images will reside. Click ADD to add the task, Delete to remove task. Click Apply to save changes. Click Cancel to abandon changes.
URL: This is where the URL for your IP cam is entered. Every IP cam has a URL that is provided which links to a landing page for all captured images. In this example, the Vivotek PT7237 uses the following URL: http://172.16.66.95/cgi-bin/video.jpg Please refer to your IP cam manual for the appropriate URL to enter into this field. Interval: Here, you can designate the time between each captured image. Select the desired interval from the dropdown menu.
Frequency: Here, you can set the frequence of the schedule to either Daily or Weekly. When set to Daily, images will be captured every day at the designated time. When set to Weekly, you can have the IP camera capture images at certain days of the week (i.e Monday to Friday). Start Time: Choose the start day and time for image capture. If you’ve selected a Daily frequency, you will be unable to select the start day as the IP camera will be set to capture images every day.
Step 3: Browse Captured Images Once the capture schedule has been set, you can browse the captured images on the N299. The easiest way to do this is to simply open the folder you previously designated as the capture directory and view your captured pictures using your favorite photo viewing software. In the example above, all captured images will appear in the IPCam folder. Alternatively, you may also use the built-in web-based Photo Gallery to view your pictures.
Chapter 5: Using the N299 Overview Once the N299 is setup and operating, users on the network may manage all varieties of digital music, photos, or files by simply using their web browsers. To manage your personal files or access public files on the N299, just enter its IP address into your browser, and you will be taken to the N299 Login page. Login Page On the login page, simply enter your User ID and Password and click Login to log into the system.
Modified Date Change Password Logout Up New Folder New File (upload) Delete Selected Items Date Click Click Click Click Click Click file was last modified to change your password to logout of WebDisk to go up one directory level to create a new folder to upload a new file to this folder to delete all checked items 3. When user clicks on a file name, the file will be downloaded.
Using Photo Gallery Using the Photo Gallery, users can view and share photos, and even create their own albums right on the N299. To manage your photo gallery or see other photo albums, click on the Photos icon from the left panel. You will see your own Photo Gallery and all public Photo Albums on the network. To manage any picture files, you must first select the item by clicking its check box.
2. The owner of the album can enter an album password to protect the album, so that only people with the correct password can view the album. Uploading Pictures to Albums Uploading pictures to albums using the Web User Interface is easy: 1. When the album is created, click the album icon to enter the album. Initially the album is empty. 2. Click the Add button to upload pictures into the album. The Upload Photos screen will appear. Users can select and upload up to 8 pictures at a time. 3.
3. Windows XP will ask whether you want to run or save this file. Click Run. 4. Once the Wizard is installed, use the Windows file manager to browse the folder that contains the picture you want to publish. On the left pane, there will be an icon labeled “Publish this folder to the Web”. 5. Click on this icon and Web Publishing Wizard will start.
6. Select the pictures you want to publish to the Photo Web Server by placing a check mark on the top left hand corner of the picture. Click Next. 7. Your PC will start to connect to the Photo Web Server. 8. Select N299 Photo Gallery Wizard to publish your pictures to the N299. 9. Login into the N299 with your local user name and password. 10. Create your album by entering an album name and clicking on the Create Album button.
11. Select the album you want to upload your pictures to. 12. Confirm the target album. 13. Windows will show you that the picture upload is in progress. 14. When the upload is finished, the Wizard will ask you whether if you want to go to the website. Click Finish to go to your Photo Web Server.
15. Click on the user’s icon to go to that user’s album. 16. You will see the user’s album list. Click on MyAlbum. 17. Finished! You will see the pictures just selected in the album.
EXIF Information While viewing pictures, you can also have the N299 display the EXIF information for each photo. Slide Shows Slide shows are a great way to enjoy pictures stored on your N299. You can click on the Start Slide Show icon on the top right hand corner to start the slide show. To stop the slide show, click on the Stop Slide Show icon on the top right hand corner.
File Backup There are a number of ways to back up your data to your N299. Nsync You can backup a share folder to another N299 (Nsync Target) or any FTP server for safe keeping as long as you have appropriate access right on that target. When using Nsync between two N299s, you have the option to transmit files securely between two N299s. If the files on your N299 are lost for any reason, you can restore those files from the target N299.
Adding an Nsync Task From the Nsync Information screen, click Add to display the Add Nsync Task screen. Add Nsync Task Item Task Name Manufacturer Target Server IP Address Source Folder Nsync Task Name Authorized Username on Target Server Password on Target Server Test Connection Schedule Time Type Apply NOTE Description The name of your Nsync task. Select whether the target is a Thecus Product (e.g. N299) or FTP server. The IP address of your target server. The share folder you want to backup.
1. On the Nsync window, select the Nsync task you would like to delete by checking its checkbox. 2. Click Delete to remove the selected Nsync task. Setting Up an Nsync Target on an Nsync Device On the Nsync target server, the administrator of that server has to set up a user account with a folder named “nsync” and grant write access. 1. On the Nsync server, add a user for Nsync source (ex. nsyncsource1).
Thecus Backup Utility The Thecus Backup Utility is on your Installation CD. When you click on the CD, the Backup Utility will be installed under Program Groups > Thecus > Thecus Backup Utility. If it is not installed, you can copy the file (Thecus Backup Utility.exe) to a convenient location on your hard disk and double click to execute it. NOTE If you can not find Thecus Backup Utility on your CD, please download it from the Thecus website (http://www.thecus.com).
3. To check the log for that task, click on the Log icon for that task. NOTE Thecus Backup Utility also supports MAC OS X. Just copy the Thecus Backup Utility.dmg to your MAC OS X machine and double click to execute it. Windows XP Data Backup If you use Windows XP Professional, you can also use the Windows Backup Utility (Ntbackup.exe) to backup your files. If you use Windows XP Home Edition, follow these steps to install the utility: 1.
3. Select which option you Want to back up. 4. Click Next and in the Backup Type, Destination, and Name page, specify a back up location using the Browse button. 5. Find and select the drive that specifies your N299 as your backup destination and click Next. 6. Click Next to display the wizard’s final page and click Finish to start backing up. Apple OS X Backup Utilities Mac OS X does not include any backup software.
Chapter 6: Tips and Tricks Mapping a Client PC to the N299 You can map share folders on the N299 so that you can access them as if they were drives on your computer. You can connect to the shared network folders on the N299 as follows: Windows 1. Go to the My Computer folder in Windows. 2. In the menu bar, select Tools and then Map Network Drive… 3. The Map Network Drive window appears. 4. Assign a drive letter for the share folder. 5. Click the Browse button to find the folder over your network.
7. Click OK. The share folder appears as the drive you assigned. You can now access this folder as though it were a drive on your computer. Apple OS X On an Apple computer, you can connect to shared computers and servers using a network address. 1. Choose Go > Connect to Server… 2. Enter the network address for the server in the Server Address text box. When connecting using SMB/CIFS protocol, type: smb://192.168.1.100/Folder1 When connecting using AFP protocol, type: afp://192.168.1.
3. When MAC OS X is trying to connect N299, it will ask for a User Name and Password which has access to the folder. 4. When MAC OS X has connected to the N299 successfully, an icon representing the folder will appear on the MAC OS X desktop. You can access the folder by double clicking on the icon. USB Storage Expansion The N299 supports external USB hard disks through its two USB ports.
Replacing a Hard Drive To replace a hard disk drive in the N299: 1. Remove two screws located on the back of the unit using a Philips screwdriver. 2. Unscrew four mounting screws. 3. Lift up the hard disk tray by pulling up the top panel of the N299. 4. Remove the damaged hard drive. 5. Carefully insert a standard 3.5” SATA hard disk into the tray, and secure the hard disk with screws from the included accessory pack. 6. Carefully lower the hard disk tray back into the N299. 7.
2. Click on the Sign Up Now link. 3. Check the Check boxes, select a user name (i.e.: N299), enter your email address (i.e.: xxx@example.com), check Enable Wildcard, and create a password (i.e.: xxxx). 4. Wait for an email from www.dyndns.org. 5. Open the email and click on the link to activate your account Part II - Enable DDNS on the Router 1. Go to the router setup screen and select IP Config > Miscellaneous DDNS Setting from your Home PC. 2. Click on Yes for Enable the DDNS Client? 3. Select www.
Chapter 7: Troubleshooting Guide N299 Won't Turn On In the event that the N299 won’t turn on, check to see that the power cable is correctly plugged in to the N299. Also check to see if the electrical outlet is functioning. Resetting NAS IP Address and Admin Password If you’ve forgotten the admin password, or if you need to reset the unit’s IP address, first make sure that the unit is powered off. press the reset button and the power button at the same time.
2. The mapped network drive could not be created because the following error has occurred: Multiple connections to a server or shared resource by the same user, using more than one user name, are not allowed. Disconnect all previous connections to the server or shared resource and try again. To check out existing network connections, type net use under the DOS prompt. N299 Chassis Feels Hot The N299 uses its chassis to dissipate heat, and feeling warm to the touch is completely normal.
Simple Problem Diagnosis Procedure This procedure is meant to provide a simple and quick way to identify which part of the N299 has failed. 1. Don’t insert a hard disk into the N299. Attach the power cord and then reset the IP address and admin password to the default settings by doing the following: a) Power on the N299 and immediately press the Reset button for 10 seconds. (The Reset button is near the LAN connector) b) This resets the N299 to its default IP address and password settings.
Appendix A: Product Specifications Hardware Specifications Core Processors / Memory Processor SATA Controller NOR Flash Memory Network Interfaces WAN LAN Wireless (optional) Storage HDD Bays HDD Capacity USB 2.
Fan Multimedia Support Media Server iTunes Server Photo Web Server Simple Surveillance Server Share Management User Authentication Folder Management Permission Management File System File System Type Language Support System Management Web-based Administration Setup Wizard Email Notification Backup Thecus Backup Program Thermally-controlled system fan Supports uPnP AV streaming protocol Supported File Types: AAC, MP3, WAV Supported File Types: GIF, JPG (JPEG), BMP, PNG Supports EXIF display Supports slide
Appendix B: Customer Support If your N299 is not working properly, we encourage you to check out Chapter 7: Troubleshooting Guide, located in this manual. You can also try to ensure that you are using the latest firmware version for your N299. Thecus is committed to providing free firmware upgrades to our customers. Our newest firmware is available on our Download Center: http://www.thecus.com/download.
Appendix C: RAID Basics Overview A Redundant Array of Independent Disks (RAID) is an array of several hard disks that provide data security and high performance. A RAID system accesses several hard disks simultaneously, which improves I/O performance over a single hard disk. Data security is enhanced by a RAID, since data loss due to a hard disk failure is minimized by regenerating redundant data from the other RAID hard disks.
RAID 1 RAID 1 mirrors all data from one hard disk drive to a second one hard disk drive, thus providing complete data redundancy. However, the cost of data storage capacity is doubled. This is excellent for complete data security. JBOD Although a concatenation of disks (also called JBOD, or "Just a Bunch of Disks") is not one of the numbered RAID levels, it is a popular method for combining multiple physical disk drives into a single virtual one.
Appendix D: Licensing Information Overview This product included copyrighted third-party software licensed under the terms of GNU General Public License. Please see THE GNU General Public License for extra terms and conditions of this license. Source Code Availability Thecus Technology Corp. has exposed the full source code of the GPL licensed software. For more information on how you can obtain our source code, please visit our web site, http://www.thecus.com.
CGIC License Terms Basic License CGIC, copyright 1996, 1997, 1998, 1999, 2000, 2001, 2002, 2003, 2004 by Thomas Boutell and Boutell.Com, Inc. Permission is granted to use CGIC in any application, commercial or noncommercial, at no cost. HOWEVER, this copyright paragraph must appear on a "credits" page accessible in the public online and offline documentation of the program.
Also, for each author's protection and ours, we Want to make certain that everyone understands that there is no warranty for this free software. If the software is modified by someone else and passed on, we Want its recipients to know that what they have is not the original, so that any problems introduced by others will not reflect on the original authors' reputations. Finally, any free program is threatened constantly by software patents.
c) If the modified program normally reads commands interactively when run, you must cause it, when started running for such interactive use in the most ordinary way, to print or display an announcement including an appropriate copyright notice and a notice that there is no warranty (or else, saying that you provide a warranty) and that users may redistribute the program under these conditions, and telling the user how to view a copy of this License.
operating system on which the executable runs, unless that component itself accompanies the executable. If distribution of executable or object code is made by offering access to copy from a designated place, then offering equivalent access to copy the source code from the same place counts as distribution of the source code, even though third parties are not compelled to copy the source along with the object code. 4.
This section is intended to make thoroughly clear what is believed to be a consequence of the rest of this License. 8. If the distribution and/or use of the Program is restricted in certain countries either by patents or by copyrighted interfaces, the original copyright holder who places the Program under this License may add an explicit geographical distribution limitation excluding those countries, so that distribution is permitted only in or among countries not thus excluded.