
Network Device User's Manual
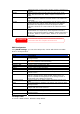

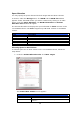


1. On the RAID Information screen, click New.
2. On the RAID Configuration screen, set the RAID storage space as JBOD,
RAID 0, RAID 1, RAID 5, RAID 6, or RAID 10 — see Appendix C:
RAID Basics for a detailed description of each.
3. Specify a RAID ID.
4. If this RAID volume is meant to be the Master RAID volume, tick the
Master RAID checkbox.
NOTE
In a multiple RAID configuration, one RAID volume must be
designated as the Master RAID volume. The Master RAID volume will
store all installed modules. If the Master RAID is changed to another
location (i.e. assigning HDD 2 to be the Master RAID volume after
HDD 1 had been previously assigned), then all modules must be
reinstalled. In addition, all system folders that were contained on the
Master RAID volume will be invisible. Reassigning this volume to be
the Master RAID will make these folders visible again.
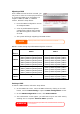
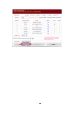
5. Tick the checkboxes under the “member” heading of the hard disks you
wish to use to create a RAID.
6. Specify a stripe size — 64K is the default setting.
7. Specify the percentage allocated for user data. The remaining space will
be made available for target USB, iSCSI target.
8. Selected the file system you like to have for this RAID volume.
33
9. Press Apply to build the RAID storage volume.
NOTE
Select ZFS file system while snapshot is needed.
It is only one ZFS file
system allowed to be created per system.
ZFS file system is only accessible by CIFS/SMB, not for AFP and NFS
users.
NOTE
Building a RAID storage space may take time, dep
hard drives and RAID mode.
ending on the size of
WARNING
Creating RAID destroys all data in the current RAID
volume. The data is
unrecoverable.
With a RAID 1, RAID 5, RAID 6, or RAID 10 volume, you can also add a spare
disk after the RAID is created. See Chapter 7: Tips and Tricks > Adding a
Spare Disk for details.
Expanding a RAID
To expand a RAID 1, RAID 5, RAID 6, or RAID 10 volume, follow the steps below:
1. Replace one of the hard drives in the RAID volume and allow it to
automatically rebuild.
2. Once rebuilt, you can continue to replace any remaining disks in the RAID
array.