
Instructions / Assembly


3
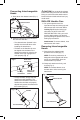
Wall Mount Assembly
1. Remove the wall mounts and screw
pack from the packaging and locate
stud on the wall.
2. Position wall mounts on stud as
shown. Drill screws into stud. Be
sure to allow enough space between
the mounts to insure that the head
attachments will not interfere with
each other (Fig. 5).
3. Insert attachments into mounts
(Fig. 5).
mWARNING! Some dust and debris
created by the use of the tool could
contain chemicals known to the State
of California to cause cancer and birth
defects or other reproductive harm. Some
examples of these chemicals are:
• chemicals in fertilizers
• compoundsininsecticides,herbicides,
and pesticides
• arsenic and chromium from chemically
treated lumber
Your risk from exposure to these
chemicalsvaries,anddependsonhow
often you do this type of work. To reduce
yourexposure,workinawell-ventilated
areaandwithapprovedsafetyequipment,
such as dust masks that are specially
designedtolteroutmicroscopic
particles.
NOTE:Ifyouhaveanyquestions,please
call the Snow Joe
®
+ Sun Joe
®
customer
service department at 1-866-766-9563 for
assistance.
Service + Support
If your SUN JOE
®
SJ-HS101 HANDLER
MULTI-TOOL SYSTEM: Garden Starter Set
requiresserviceormaintenance,please
call the Snow Joe
®
+ Sun Joe
®
customer
service center at 1-866-SNOWJOE
(1-866-766-9563).
Model + Serial Numbers
Whencontactingthecompany,reordering
parts,orarrangingservicefroman
authorizeddealer,youwillneedtoprovide
themodelandserialnumbers,whichcan
be found on the decal located on the
handle of the unit. Copy these numbers
into the space provided below.
Wall mount
Screw
Tool
attachment
Wall stud
Fig. 5
Record the following numbers from the housing
or handle of your new product:
Model #:
Serial #:
S J - H S 1 0 1