
Instructions / Assembly


2
Connecting Interchangeable
Heads
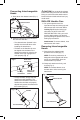
1. Press down the release button (Fig. 1).
2. Install tool attachment (tool head) on
the SUN JOE Handler.
• The release button (located in the
handle) must be held down while
installing the attachment.
• TheatsontheHandlertipmust
bealignedwiththeatsonthe
attachment socket in order for the
Handler to be fully engaged and
work properly (Fig. 2).
• Toaligntheats,simplytwistthe
attachment while installing. The
attachment will bottom out on the
handlewhentheatsareproperly
aligned and prevent the attachment
from rotating (Fig. 3).
mCAUTION! Do not push the release
button while using the SUN JOE Handler.
Doing so could cause the attachment to
become disconnected and serious injury
could result.
SUN JOE Handler Care
1. For optimal performance it is
important to keep the locking tip and
attachments free of dirt and debris.
Locking Tip: Rinse the locking tip
with water. DO NOT PUSH THE
RELEASE BUTTON. Doing so could
result in debris getting into the ball
joints impeding the performance of the
locking tip mechanism.
Attachments: Toremovedebris,rinse
attachments with water.
Removing Interchangeable
Heads
1. Press down the release button
(located in the handle) (Fig. 4).
NOTE: The locking mechanism is
designed to be engaged at all times
and is only deactivated when the
release button is pressed.
2.Grasptoolattachmentrmly,and
remove (Fig. 4).
NOTE: The release button must
be held down while removing the
attachment.
Release button
Handler
Fig. 1
Fig. 2
Flats on the
Handler tip
Flats on the
attachment
socket
Locking
mechanism
Handler
Tool attachment
Fig. 3
Release button
Handler
Fig. 4
Locking
mechanism
Tool attachment