
Installation Manual


14.
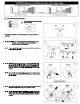
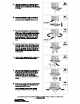
Match the correct screw holes in the CAN
CONVERTER mounting plate with the holes
in the new fixture's canopy. Screw the fixture's
long screws into the holes in the mounting plate.
Note: The screw heads will be on the inside
of the can.
PENDANT
14.
If you are installing a flush mounted fixture,
match the long screws to the correct holes
in the mounting plate. The long screws will
screw in from the bottom up through the
canopy.
Brass Nut
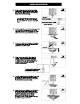
13.
Remove the medallion. Screw the brass nut
onto the threaded pipe all the way up to the
mounting bracket and tighten the brass nut.
PENDANT
13.
12.
Place your medallion at the can light opening
against the threaded pipe. Screw the pipe
upward so that it extends beyond the medallion
by 1/4 inch.
1/4 INCH
PENDANT
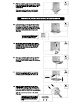
12.
Run the wires from the power-outlet-adapter
and ground wire down through the hole in the
mounting bracket. Run the wires through the
threaded pipe then screw the pipe into the
mounting bracket.
11.
PENDANT
11.
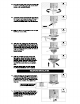
10.
Loosen the wing nuts on the flat head screws.
Place the medallion you will be using against
the ceiling and adjust the length of the screws
so that the heads rest about 1/16th inch inside
the back of the medallion. Then tighten the
wing nuts.
PENDANT
10.
If you are using the flat medallion, adjust
the screws so that the heads are inside
the can. Then tighten the wing nuts.
PENDANT / FLUSH MOUNT / TRACK LIGHT INSTALLATION
(Turn your power back on at the breaker
box.
Your installation is now complete)
CHANDELIER
16.
Slide the medallion, light canopy and the light
hook nut up to the ceiling. Secure the assembly
in place by tightening the light hook nut onto
the light hook.
16.