
Installation Manual


15.
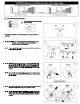
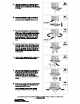
Using wire nuts, pair together the fixture's hot
wire to the power-outlet-adapter's hot wire,
the fixture's neutral wire to the power-outlet-
adapter's neutral wire and the fixture's
ground wire to the ground wire on the
mounting bracket. Tuck the wiring neatly into
the light canopy and medallion
CHANDELIER
15.
14.
Feed the wiring from the chandelier all the way
up through the light hook and the threaded
pipe and let the wires fall down the outside of
the can. Cut off the excess wiring.
CHANDELIER
14.
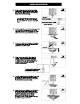
Bring your pre-assembled chandelier into
position. Thread the chandelier wiring up
through the links in the chain, then slide
the chandelier nut, the light canopy and the
medallion down the chain. Attach the
chain to the light hook.
13.
You may want to place your chandelier
on a box on top of your ladder so that
the chain will reach the light hook.
CHANDELIER
13.
12.
Remove the light hook, canopy and medallion.
Use a brass nut to secure the threaded pipe
against the mounting bracket.
Brass Nut
CHANDELIER
12.
11.
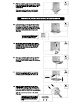
Place the medallion you will be using along with
the chandelier's canopy against the ceiling.
Adjust the threaded pipe so that the top of the
light hook threads are just inside the canopy.
CHANDELIER
11.
10.
Screw the threaded pipe into the mounting
bracket until it extends below the level of the
can. Screw the light hook that came with the
fixture onto the threaded pipe.
Light Hook
10.
CHANDELIER
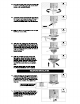
Fixture's Light Hook
Can Converter Reducer Bushing
* If the fixture's light hook does not fit the
threaded pipe, use the reducer bushing
to accommodate the diameter of the light
hook.
CHANDELIER INSTALLATION