TRH MODELS TRH30P | TRH36P | TRH48P COOK LIKE A GOD
USE AND CARE MANUAL PROFESSIONAL RANGE HOOD TRHP MODELS TRH30P | TRH36P | TRH48P
TABLE OF CONTENTS IMPORTANT SAFETY INSTRUCTIONS ............................................................................. 2 ATTENTION ...................................................................................................................... 2 WARNING .................................................................................................................... 2 - 5 GROUNDING INSTRUCTIONS .....................................................................................
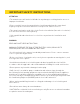
IMPORTANT SAFETY INSTRUCTIONS ATTENTION *The manufacturer will not be held liable for any damages resulting from incorrect or improper installation. *Please read this instruction manual before installing and using this range hood. Properly keep this instruction manual in a safe place for future reference. *This range hood can be used either in the Ductless installation (internal recirculation ) or in the Charcoal Filter sold separately.
IMPORTANT SAFETY INSTRUCTIONS *CAUTION:To reduce risk of fire and to properly exhaust air, be sure to duct air outside-do not vent exhaust air into space within walls or ceilings,attics or into crawl spaces,or garages. WARNING - TO REDUCE THE RISK OF FIRE, USE ONLY METAL DUCTWORK. WARNING- TO REDUCE THE RISK OF A RANGE TOP GREASE FIRE: a) Never leave surface units unattended at high settings. Boil overs cause smoking and greasy spillovers that may ignite.Heat oils slowly on low or medium settings.
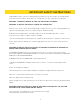
IMPORTANT SAFETY INSTRUCTIONS *Check that the domestic power supply guarantees adequate grounding. *Do not connect the hood to exhaust ducts carrying combustion fumes(boilers,fireplaces,etc.) *If the hood is used in conjunction with non-electrical appliances(e.g.gas burning appliances),a sufficient degree of aeration must be guaranteed in the room in order to prevent the backflow of exhaust gas.The kitchen must have an opening directly with the open air in order to guarantee the entry of clean air.
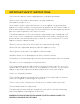
IMPORTANT SAFETY INSTRUCTIONS GROUNDING INSTRUCTIONS This appliance must be grounded.In the event of an electrical short circuit,grounding reduces the risk of electric shock by providing an escape wire for the electric current. This appliance is equipped with a cord having a grounding wire with a grounding plug.The plug must be plugged into an outlet that is properly installed and grounded.
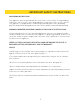
DIMENSIONS PRODUCT DIMENSION *All measurements in parenthesis are in millimeter. *All inch measurements are converted form millimeters,thus inch measurements are estimated.
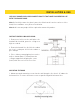
INSTALLATION & USE USE ONLY RANGE HOOD CORD CONNECTION KITS THAT HAVE PROVIDED FOR USE WITH THIS RANGE HOOD. Note 1: Carefully remove the plastic protective film from all exterior surfaces of the hood, filters and duct cover prior to installation. Note 2: At least two people will be required to mount this product. INSTALLTION DRILLING AND LINING 1. Draw a vertical line on the wall where the hood will be installed, up to the ceiling or as high as needed. 2.
INSTALLATION & USE 2. Align mounting holes on the back of range hood with mounting screws on the wall. Place range hood on the screws and fasten the screws. 3. Use the auxiliary screws provided to secure the range hood. FIX THE AIR OUTLET 1.Use the sealing strip provided in the accessories bag and place it around the air outlet joint cover by one circle and make sure there is no air leakage. 2.Using 4 screws provided to install the joint cover onto the range hood.
INSTALLATION & USE CONNECTIONS Ducted mode air exhaust system Caution:To reduce the risk of fire,use metal ductwork only.(Metal duct should be sourced by locally.) 1.Decide where the ductwork will run between the hood and the outside. 2. A straight, short duct run will allow the hood to perform most efficiently. 3.Long duct runs,elbows,and transitions will reduce the performance of the hood. Use as few of them as possible. Larger ducting may be required for best performance with longer duct runs. 4.
INSTALLATION & USE Electrical connection *Electrical wiring must be done by a qualified person(s) in accordance with all applicable codes and standards. Turn off electrical power at service entrance before wiring. *If the supply cord is damaged,it must be replaced by the manufacturer,its service agent or similarly qualified persons in order to avoid a hazard. *Do not use the plug and an extension cord other than the ones initially supplied with the hood. *This appliance must be grounded.
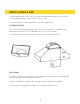
MAINTENANCE Proper maintenance of the Range Hood will assure proper performance of the unit. Disconnect the hood from the main supply before carrying out any maintenance work. GREASE FILTER * The grease filters should be cleaned frequently, Use a warm detergent solution.(every two months of operation,or more frequently for heavy use. ) * Grease filters are washable. * You can purchase the filter at www.thorkitchen.com 1.Remove the grease filter one by one by pushing down each latch.
MAINTENANCE CHARCOAL FILTER FOR DUCTLESS INSTALLATION (NOT INCLUDED) This filter not washable,can not be regenerated,and should be replaced approximately every 3 months of operation,or more frequently in the case of heavy usage. 1. To install the charcoal filter(not included),and lock it until the stop click is heard. 2.Instal l grease filter afte r charcoal filte r(no t included)is installed LED BULBS This range hood may require two DC12V 2.0W LED.
CAUTION 1. THE SURFACE OF THE HALOGEN BULBS MAY BE HOT, TAKE CARE WHEN TAKING THE REPLACEMENT. HOOD CLEANING Stainless steel is one of the easiest materials to keep clean. Occasional care will help preserve its fine appearance. Cleaning tips: * Warm water with soap or detergent is all that is usually needed. * Follow all cleaning by rinsing with clear water. Wipe dry with a clean,soft cloth to avoid water marks.
WARRANTY Warranty & Service This product has been manufactured by Thor Group, 4651 EAirport Drive, California 91761 For Customer Service, please call (877) 288 - 8099 For the most up to date warranty and service policy, please refer to our website WWW.THORKITCHEN.COM/WARRANTY-REGISTRATION For in-warranty service requests, please visit our website at WWW.THORKITCHEN.COM/SERVICE Please Note: You must provide proof of purchase or installation date for any in-warranty service requests.
WELCOME TO THE CLUB You chose THOR Kitchen to enhance your culinary journey and we’re stoked to have you in the club. Think of it as a secret society of really savvy people, such as yourself, choosing professional power and performance at an affordable price. Register your product by following the steps below. WARRANTY REGISTRATION Scan theQR code or visit thorkitchen.com/warranty WARRANTY Input your product info and select register You’re done. Let’s get cookin’.