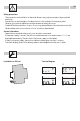
20 Safety precautions · The connection and installation of electrical devices may only be carried out by a qualified electrician. · Interventions in and changes to the device result in the voiding of the warranty claim. · Observe your national regulations and the respective safety provisions. · Fixed and flexible conductors of up to 10 mm2 may be attached to the external terminal clips. · Flexible cables with a cross-section ≤ 1 mm2 should not be attached.
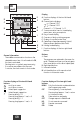
OK 21 reset 1 6 12 18 24 D C E F C1 15:26:38 G B H MENU A 1 Res. I J K L M Display A Function displays of the two left-hand buttons B Channel status displays = Channel 1 ON = Channel 1 OFF Channel 1 = C1, Channel 2 = C2 C 3 communication lines for time display, menu items, entry prompts etc.
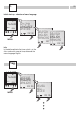
1. 22 Initial start-up - selection of menu language 1 6 12 18 24 C1 15:26:38 MENU 1 Res. 12H 24H LANGUAGE ESC DATETIME ESC OK MENU DEUTSCH ENGLISH DEUTSCH OK FRANCAIS ENGLISH OK OK FRANCAIS ESC ESC OK Info In the delivered state the time switch is in the Auto mode with a preset time, date and the menu language English. Prog. 1 6 12 18 24 C1 15:26:38 MENU 1 Res.
Prog. 23 Weekly program REVIEW NEW OK DELETE ESC OK HOLIDAY WEEKLY OK ESC OK CYCLE ON/OFF OK PULSE B A C ESC OK Info The time switch has 50 memory spaces. A date-related program can be produced under the HOLIDAY menu item.
Prog. A 24 ON/OFF programming CYCLE ON/OFF OK PULSE only with 2-channel version ESC OK FREE 50 SELECT OK CHANNELSELECT OK I CHANNEL OK I ESC ESC OK SELECT DAY OK CHL ON ESC OK HOURS 00 CHL ON ESC OK MINUTES 15:00 CHL ON ESC OK HOURS 00 OK CHL OFF ESC OK MINUTES 18:00 CHL OFF ESC OK SAVED P01 P02 Example ON command for channel 1 at 3 pm. OFF command at 6 pm. · Select NEW program and confirm with OK. · The free memory spaces are briefly displayed. · Select channel and confirm with OK.
Prog. B 25 Cycle programming Period Start time Length Pause 9.00 h 17.00 h Cycle length Channel ON A cycle switching command consists of: Channel OFF · Start time · Length = ON switching period · Period = ON switching period + pause) · Cycle length = Length of time between channel ON and channel OFF Info The time period between the start and end times must not be less than the period length. An interlacing of cycle programs is not permitted.
Prog. B 26 Cycle programming PULSE CYCLE OK ON/OFF only with 2-channel version ESC OK FREE 50 SLECT CHANNELSELECT OK I CHANNEL OK I ESC OK ESC OK SELECT DAY OK CHL ON ESC OK HOURS 00 CHL ON ESC OK MINUTES 04:00 CHL ON ESC OK PERIOD 0 OK DAY ON ESC OK PERIOD 2 DAY ON ESC OK PERIOD 2:00 HOURS ESC OK Example Garden watering: Water for two hours every 2nd day. ON command for channel 1 at 4.00 am. OFF command at 6.00 am. · Select CYCLE and confirm with OK.
Prog. 27 PERIOD 02:00 MINUTES ESC OK DURATION 0 DAY ESC OK DURATION 2:00 HOURS ESC OK DURATION 02:00 MINUTES ESC OK HOURS 00 CHL OFF ESC OK MINUTES 06:00 CHL OFF ESC OK SAVED P04 GB · Period of ON command: Enter days, hours, minutes or seconds and confirm with OK. · Select day block or individual day (block formation as desired) and confirm with OK. · Enter hour for OFF command (+/-) and confirm with OK. · Enter minute for OFF command (+/-) and confirm with OK. · Program is saved.
Prog. C 28 Pulse programming Start time Length 9.00 h A pulse switching command consists of: · Start time · Length Example Start time ON switching period ON/OFF PULSE OK CYCLE = ON switching period Shortest ON switching period = 2 sec Monday to Friday 9.00 am 10 sec. only with 2-channel version ESC OK FREE 50 SELECT OK CHANNELSELECT OK I CHANNEL OK I ESC ESC OK SELECT Example Monday to Friday daily ON command for channel 1 at 3.00 pm. ON switching period 1 hour.
Prog. 29 ESC OK SELECT DAY OK CHL ON ESC OK HOURS 00 CHL ON ESC OK MINUTES 15:00 CHL ON ESC OK DURATION 01:00 HOURS ESC OK DURATION 01:00 MINUTES ESC OK SAVED P05 GB · Period of ON command: Enter days, hours, minutes or seconds and confirm with OK. · Program is saved. · Program jumps to selection REVIEW, NEW, DELETE. Now additional programs can be created. DURATION 0 OK DAY ESC OK · Select day block or individual day (block formation as desired) and confirm with OK.
Prog. 30 Holidays program Info Only a date range can be entered. If several programs are entered, the last date or range of dates entered applies for all switching commands in the holidays program.
Prog. 31 View, edit program DELETE REVIEW OK NEW ESC OK ON OK P01 15:00 HH:MM OFF EDT OK OK P02 18:00 HH:MM Info · The program steps can be scrolled through with ▼ ▲. · The respective program can be edited by pressing EDT. The procedure is the same as when creating a new program. EDT OK Delete all programs Info · It is possible to delete all programs with YES · By pressing NO, individual programs can be deleted.
32 Set date and time Info The date and time are preset at the factory.
33 Switchover for summer/winter time Info The following settings are possible: PROGRAM DAYLIGHT OK 12H 24H ESC OK AUTO Factory presetting of the legal specification. This is automatically recalculated for each year.
RND 34 Random switching program Info A random switching program is started by selecting RND. The programmed activation command is delayed in such instances by a variable (random) period of time of 0-30 minutes. CONFIG RANDOM OK 12H 24H ESC OK RANDOM ESC OK ON RANDOM 7:00 OK 7:30 RANDOM OK MENU DATETIME PROGRAM DAYLIGHT ESC OK CONFIG RANDOM OK 12H 24H ESC OK RANDOM ESC OK 20:00 ON MENU 20:30 Ending the random switching program: · RND appears on the display. · Press MENU.
35 config Configuration DAYLIGHT CONFIG RANDOM ESC OK EXT I/P TAXIMODE OK ESC OK Taxi mode TAXIMODE OK Info Programs can be replaced via the IR interface using a taxxi module. For this purpose, the device must be in TAXIMODE and must be energised. TAXIMODE can be ended via ESC. ESC taxxi module prog = program selection in = import program out = export program out prog · Use prog to select a program number. · Press in or out depending on whether a program is to be imported or exported.
36 External input – manual switch Info An appropriate channel is assigned to an external button by selecting EXT O/R. TAXIMODE EXT I/P OK ESC OK COUNT EXT O/R OK ESC OK SELECT CHANNEL OK I ESC OK When the button is pressed, a switching command is issued and remains in effect until the button is next pressed or the next automatic switching command is issued. Example: Press external button. Light ON until the next programmed OFF command or an OFF command issued by again pressing the manual switch.
37 Operating mode Info Left-hand button = Channel 1 Right-hand button = Channel 2 (only with 2-channel version) 1 6 12 18 24 C1 15:26:38 MENU 1 Res. Pressing 1 x = FIX ON = continuous ON Pressing 2 x = FIX OFF = continuous OFF Pressing 3 x = return to Auto mode FIX ON: FIX FIX OFF: FIX AUTO: (keine Anzeige) programmierte Schaltzeiten (no display) programmed switching times Technical Data Dimensions H x W x D Weight g (approx.