
Daim Ntawv Qhia Tus Neeg Siv

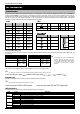
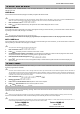
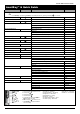
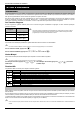
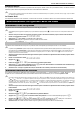
Table Of Contents
- EN. Overview
- Operating the Alarm System
- To FULL Arm the System
- To PART Arm the System
- To ARM Individual Areas
- To DISARM the System
- To DISARM the System When Not in Entry
- To CANCEL the Exit Mode
- To CLEAR an Arm Fail
- To SILENCE an Alarm
- To DISPLAY the cause(s) of System Alerts (Alarms)
- To RESET After an Alarm
- To OMIT Zones
- The Turn CHIME On and Off
- To CHANGE Your User Code
- Using a Proximity Tag
- SmartKey™ & Quick Guide
- FR Vue d’ensemble
- Fonctionnement du système avec un code
- Armement TOTAL du système
- Armement PARTIEL du système
- Armement individuel de Partions
- Désarmer le système
- Désarmer le système hors temps d’entrée
- Annuler le mode de sortie
- Effacer une faute d’armement
- Rendre une alarme silencieuse
- Afficher la/les cause(s) des alertes système
- Remise en marche après une alarme
- Éjection de Zones
- Activer/Désactiver le Carillon
- Changer votre code Utilisateur
- Utiliser un TAG de proximité
- Guide de référence Rapide
- NL Overzicht
- Bediening van het alarmsysteem met een code
- VOLLEDIG aanzetten van het systeem
- Voor het GEDEELTELIJK aanzetten van het systeem
- AANZETTEN van afzonderlijke partities
- UITZETTEN van het systeem
- Systeem uitzetten anders dan bij binnenkomst
- ANNULEREN van de uitloopmodus
- Mislukt aanzetten WISSEN (resetten)
- Sirenes stoppen na alarm
- Oorzaken van systeemwaarschuwingen (alarmen) WEERGEVEN
- RESETTEN na een alarm
- Zones OVERBRUGGEN
- DEURBEL AAN en UIT zetten
- Gebruikerscode VERANDEREN
- Gebruik van een badge of tag
- Snelgids
- DE Übersicht
- Alarmsystem mithilfe von Codes bedienen
- System KOMPLETT scharfschalten
- System TEILWEISE scharfschalten
- Individuelle Bereiche SCHARFSCHALTEN
- System UNSCHARFSCHALTEN
- System UNSCHARFSCHALTEN, wenn Sie sich nicht am Eingang befinden
- Ausgangsmodus ABBRECHEN
- Scharfschaltungsfehler LÖSCHEN
- Alarm STUMMSCHALTEN
- Ursachen von Systemwarnungen (Alarmen) ANZEIGEN
- System nach einem Alarm ZURÜCKSETZEN
- Zonen AUSBLENDEN
- SIGNALTON (GONG) ein-/ausschalten
- Benutzercode ÄNDERN
- Proximity-Leser verwenden
- Kurzanleitung

Premier Elite Series User Guide
2 INS555-3
EN. Overview
Introduction
Users of the alarm system will be assigned a unique 4, 5 or 6 digit User code, and may be assigned a Proximity Tag or a SmartKey™.
Codes, Tags & SmartKey™ are used to arm and disarm the system. Some User codes can also access additional options such as,
system tests and omitting zones. Keypads will be installed throughout the premises, usually one at each entry/exit door. The keypads
are used to perform all of the system operations i.e. Arming, Disarming etc. Most User codes can be used at any keypad on the system.
However, Local Users will only be able to use certain keypads on the system.
Keys
LED
ICONS
UK English
English
=
Power
=
Ready
=
=
=
Armed/Info
OK
=
Ready
=
=
=
Omit
=
Service
=
=
=
=
SmartKey™
=
=
Buttons
Function
LED's
=
=
=
Power
Status
=
=
=
Arm
Disarm
=
=
=
Part Arm
Part Arm
=
=
=
Disarm
Arm
The Keypad Emergency Keys
In case of emergency, the alarm system can provide three immediate emergency alarms by pressing and holding two specific keys for
two seconds.
UK Only
Non UK
The emergency keys can be enabled/disabled
for each keypad on the system. The Panic
alarm can be programmed for either audible
or silent operation. The Panic alarm can be
programmed for either instant or delayed
operation
Emergency Alarm
Press Keys
Emergency Alarm
Press Keys
Panic Alarm (PA)
&
Fire
&
Fire
&
Panic Alarm (PA)
&
Medical
&
Medical
&
The Keypad Quick Arm Keys
The ‘Quick Arm’ keys allow the system to be armed without having to enter a User code first.
The ‘Quick Arm’ keys will only work if the keypad has been programmed to allow arming in this way.
To FULL arm the system, press
.To PART arm the system, press
,
or
followed by
.
Keypad Lock
The keys on the keypad can be locked to prevent unwanted access to the system.
The Emergency keys will NOT operate with the keys locked.
To Lock the keys press
and
together.
To Unlock the keys, press
and
together again.
LED Indicators
Five LED indicators have been provided to indicate the status of the system.
LED
Status
Meaning
Power
On
AC mains is present on the control panel
Flashing
AC Mains is not present, the control panel is running on the standby battery
Service
On
The system requires attention, contact your installer
Off
The system does NOT require attention
Ready
On
All zones are secure and the system is ready to be armed
Off
One or more zones are active
Flashing
The system has zones (with the ‘Force Omit’ attribute) that are active
Info.
On
The system is armed (can also be programmed for other indications)
Off
The system is unarmed (can also be programmed for other indications)
Omit
On
One or more zones are omitted
Off
No zones are omitted