
- Texas AIP Consumer Audio User's Guide

www.ti.com
3.1 Basic Operating Set-Up
3.2 Software Control and Operation
3.2.1 User Interface Panel
Basic Operating Set-Up
Follow these steps to set up the DEM-DAI3793A/3794A EVM for operation.
Step 1. When using the kit for the first time, install the TUSB3410 VCP (Virtual COM Port) driver to
the host PC. To install the driver, refer to the Virtual COM Port Driver Installation
Instructions.pdf located in the DEM-DAI3793 folder of the software CD or available through
the TI web site .
Step 2. Connect the audio signal sources and/or receiver, using one of these connections:
• S/PDIF cable (optical or coaxial)
• Analog input/output (RCA)
Step 3. Connect microphone, speakers, headphone, an audio amplifier, or measurement equipment,
if necessary.
Step 4. Confirm that jumpers CN103–CN107 are shorted.
Step 5. Connect the USB cable between the host PC and the motherboard (CN201).
Step 6. Apply +6V to +10V to the motherboard (CN101, CN102 for power supply).
Step 7. Execute EVM3793A.exe.
When the installation is complete, the EVM software is ready to use.
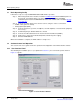
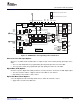
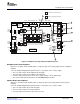
This section of the user's guide reviews the operation and configuration of the EVM controller software.
After finishing the installation process (as explained in Section 3.1 ), the user interface panel shown in
Figure 3-1 appears.
Figure 3-1. User Interface Window
22 Set-Up Guide SBAU127 – July 2007
Submit Documentation Feedback