
User manual


Quick Start Guide
www.ti.com
9 Quick Start Guide
NOTE: For all the measurements shown in the following, ProSim Fluke SPOT Light SpO2
Functional tester was used.
• Install the AFE44x0SPO2EVM GUI PC Software (Check the TI website at www.ti.com for the latest
software) by running the setup file and following the instructions on the screen
• Connect the USB cable to the computer and plug in the mini USB interface cable to the J4 mini USB
connector on the EVM
• Connect the DB9 connector of the finger sensor pulse oximeter cable to the J2 connector of the EVM.
• Turn on the Fluke simulator by pressing the ON switch for at least 3 seconds, and then connect the
Fluke simulator to the finger sensor. Leave the default setting of 97% for SpO2, 80 bpm for HR, and
2% for PA. Figure 35 shows the Fluke SPOT Light Pulse SpO2 Functional Tester setup with the finger
sensor pulse oximeter cable.
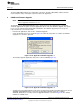
• Open the AFE44x0SPO2EVM GUI software by clicking on Start→All Programs→Texas
Instruments→AFE44x0SPO2EVM GUI.
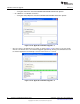
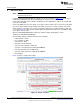
• Click the ADC Capture & Analysis tab and set the following:
– Capture Mode to Finite
– No. of Samples to 2048
– Volts/Codes to Volts
– Plot Mode to Four Plot Mode
– Select the first waveform to LED1 (IR)
– Select the second waveform to LED1 (IR) AMBIENT
– Select the third waveform to LED2 (Red)
– Select the fourth waveform to LED2 (Red) AMBIENT
– Click Capture
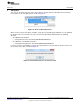
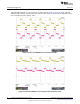
• Figure 44 shows a sample data capture
Figure 44. Sample Test Data
36
AFE4400 and AFE4490 Development Guide SLAU480C–January 2013–Revised May 2014
Submit Documentation Feedback
Copyright © 2013–2014, Texas Instruments Incorporated